We attempted to salvage a framed drawing that hung on the back wall of our fire testing room.
Upon getting the art piece back to the lab, our first task was to reduce the risk of injury to ourselves. We realized that we could be injured by the broken glass or splinters from the frame.

We examined the piece to determine if the artwork was attached to the board behind it. We placed packing tape over the pieces of broken glass to keep them from shattering, being sure to contacting any part of the artwork with tape.


We carefully flipped the piece over using a piece of stiff board for support and to contain any glass particles that were not captured by the tape.

We cut the hanging wire and removed it from the frame.


Then we removed the tape that was around the edge backing board. We went much more slowly than seemed necessary to avoid any tearing to the artwork. We peeled the tape away at nearly a 180 degree angle as depicted in the following photo. This method prevents ripping as much as possible and reduces the pressure on the object from which we were peeling away. Peeling away at a 90 degree angle is one of the least effective ways of tape removal because it can cause delamination of the fibers in the substrate. Keep a close eye as you work.

We dusted away particles of soot and drywall dust from the artwork before proceeding with the removal of the art piece to keep our work as clean as possible.

Carefully, we removed the metal diamonds that held the backing board in place by slipping a micro spatula beneath the tab and gently lifting away from the artwork. Be careful not to damage the artwork by gouging it with your spatula. Match your tool to the strength of the task. Lift the tab just enough to grab it with a needle-nose pliers using controlled strength. Pull the tabs straight out without bending them. Just as with tape removal, 180 degree removal is best.


Generally when unframing the glass is not broken and it is usually best to flip the artwork back over and lift the glass from the object so you can see what is happening as you lift the glass. In our case, the glass was broken, so we lifted the artwork carefully from the frame. We examined the artwork with raking light, light aimed at an oblique angle or nearly parallel to the surface of the object.

While wearing UV goggles, we examined both the front and back of the piece under UV light to look for damage. We noticed yellowish spots, which are most likely from rubber-based adhesives. Whitish spots suggest acrylic-based adhesive. These are not conclusive findings but are indicative of those substances.

Before beginning the actual process of dry-cleaning, we made a paper tray to hold the artwork and to contain any messes.

To keep the artwork from moving, we placed glass paperweights with blotter paper underneath and lead weights above the glass. We placed the weights on the margins of the print, not over the ink.

We used a piece of chromatography paper (un-sized paper) to test the friability of the ink. First we touched the chromatography paper gently to the surface of the print; next we brushed the chromatography paper gently across the surface of the ink. There was no off-set in either case.

We gently brushed soot off of the piece without touching the ink using a slightly stiff brush. Then we brushed over the media with a very soft brush.


For the main phase of the dry-cleaning, we used soot sponges, which are made of vulcanized rubber. You can also use vinyl erasers, which are designed to remove graphite, either as whole erasers or grated into crumbs.


The paper will be brittle in charred areas, so use care to not damage the piece further. Moving your sponge in small arcs, not back and forth, will leave a less obtrusive lines. Take care to keep your workspace clean; avoid getting eraser crumbs on the floor because they can get slippery.
 Some tape can be removed with a micro spatula, working gently from the inside of the piece to the outside edge.


A crepe eraser may remove residual adhesive.

Once your cleaning is complete, lift the weights off of the artwork.
There is not much you can do to repair charred areas. A conservator may be able to reduce the dis-figuration, or it may be more desirable to retain the damaged parts as provenance.

During the cleanup stage, we used packing tape to tape the back side of the glass.

We wrapped the frame and broken glass in Kraft paper before discarding to prevent anyone getting injured.

 |
| The drawing, in wonderful condition, before the fire. |
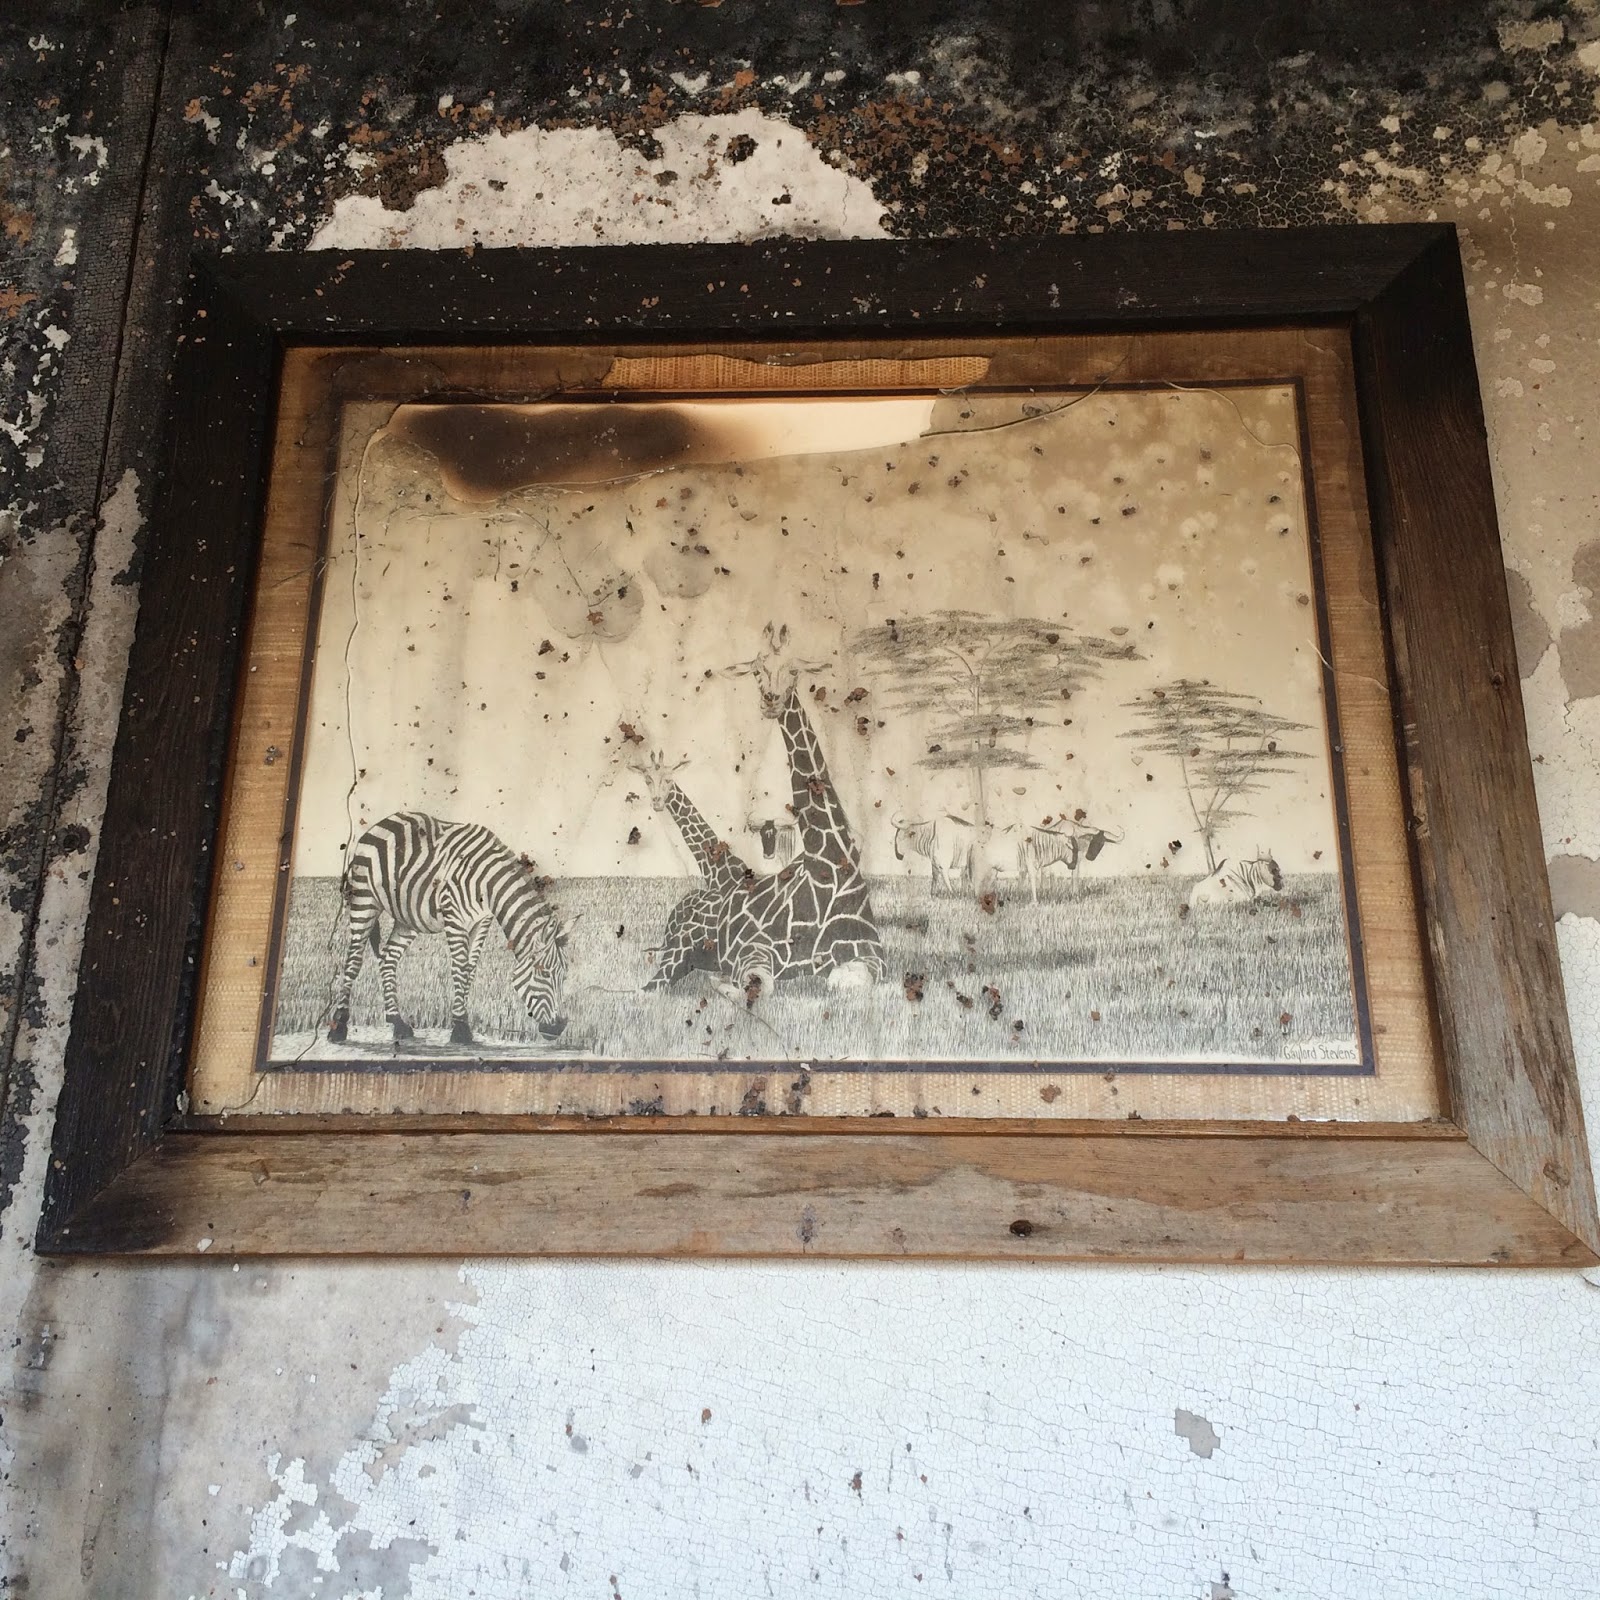 |
| A little worse for the wear after the fire was put out. |
We examined the piece to determine if the artwork was attached to the board behind it. We placed packing tape over the pieces of broken glass to keep them from shattering, being sure to contacting any part of the artwork with tape.
We carefully flipped the piece over using a piece of stiff board for support and to contain any glass particles that were not captured by the tape.
We cut the hanging wire and removed it from the frame.
Then we removed the tape that was around the edge backing board. We went much more slowly than seemed necessary to avoid any tearing to the artwork. We peeled the tape away at nearly a 180 degree angle as depicted in the following photo. This method prevents ripping as much as possible and reduces the pressure on the object from which we were peeling away. Peeling away at a 90 degree angle is one of the least effective ways of tape removal because it can cause delamination of the fibers in the substrate. Keep a close eye as you work.
We dusted away particles of soot and drywall dust from the artwork before proceeding with the removal of the art piece to keep our work as clean as possible.
Carefully, we removed the metal diamonds that held the backing board in place by slipping a micro spatula beneath the tab and gently lifting away from the artwork. Be careful not to damage the artwork by gouging it with your spatula. Match your tool to the strength of the task. Lift the tab just enough to grab it with a needle-nose pliers using controlled strength. Pull the tabs straight out without bending them. Just as with tape removal, 180 degree removal is best.
While wearing UV goggles, we examined both the front and back of the piece under UV light to look for damage. We noticed yellowish spots, which are most likely from rubber-based adhesives. Whitish spots suggest acrylic-based adhesive. These are not conclusive findings but are indicative of those substances.
Before beginning the actual process of dry-cleaning, we made a paper tray to hold the artwork and to contain any messes.
We used a piece of chromatography paper (un-sized paper) to test the friability of the ink. First we touched the chromatography paper gently to the surface of the print; next we brushed the chromatography paper gently across the surface of the ink. There was no off-set in either case.
 i
iWe gently brushed soot off of the piece without touching the ink using a slightly stiff brush. Then we brushed over the media with a very soft brush.
For the main phase of the dry-cleaning, we used soot sponges, which are made of vulcanized rubber. You can also use vinyl erasers, which are designed to remove graphite, either as whole erasers or grated into crumbs.
The paper will be brittle in charred areas, so use care to not damage the piece further. Moving your sponge in small arcs, not back and forth, will leave a less obtrusive lines. Take care to keep your workspace clean; avoid getting eraser crumbs on the floor because they can get slippery.
When the artwork is as clean as possible on the front, flip it over to clean the back. When lifting the piece, support it with a board or turn gently.
A crepe eraser may remove residual adhesive.
Once your cleaning is complete, lift the weights off of the artwork.
There is not much you can do to repair charred areas. A conservator may be able to reduce the dis-figuration, or it may be more desirable to retain the damaged parts as provenance.
During the cleanup stage, we used packing tape to tape the back side of the glass.
We wrapped the frame and broken glass in Kraft paper before discarding to prevent anyone getting injured.
No comments:
Post a Comment