Friday, December 12, 2014

Finishing Up! Our Tabletop Exercise

For our second-to-last class (can't believe we are already at this point!), our instructor decided to give us an opportunity to do a "tabletop exercise", as well as demonstrate mold removal again. 

So, a tabletop exercise is like acting in a play about disaster, except that you play out your own job title/position to help your agency or institution practice their response to a disaster and figure out what was good and what was lacking. In this case, none of us are actually staff members in the mock institution we were given so we were actually “actors” in this play. I don’t think many of us had heard of tabletop exercises, much less participated in one, so this experience was pretty fascinating stuff for the class.

Here was our background story, so to speak, for the scenario:

The scenario in the exercise was set in the fictional small town of Landerville, Ohio, which sits near a dam that is considered “High Risk”. We chose, as our institution, to have a 4-level library, including a basement. The basement housed much of the digital technology as well as the map collections. First floor included much of the textile artifacts (AKA period clothing), while the reference items, children’s area, and reading areas were on the second and third floors. There were 10 roles/positions to be played, including a lowly mail clerk, a conservator, reference librarian(s), two assistant directors, and the senior director of the hypothetical library, all with different ages, socioeconomic backgrounds, and personality quirks.  

The entire class was given FEMA’s Incident Command System Organization chart for disaster planning before the tabletop exercise was to begin. I, acting in the role of Senior Director, was given an additional insert with so-called “privileged information” for when the scenario was posed; it was basically background information on the city dam that listed some of the issues currently occurring and some of the possible consequences of a structural failure, things like the time it would take for the water to reach the city, how high the water would ride and when it would hit that peak, and how long it would take for those waters to recede. That last bit of info turned out to the only bit that the rest of the “staff” did not have.

Over the course of the exercise, the team was given information about the scenario while the facilitator gave us questions to think about in our planning and every so often, she threw in an inject (usually in the form of an emergency bulletin) that gave us new information, the dam actually failing or the water finally reaching town. It sort of threw us in high gear each time it happened and showed us how truly short on time you are in a disaster situation.
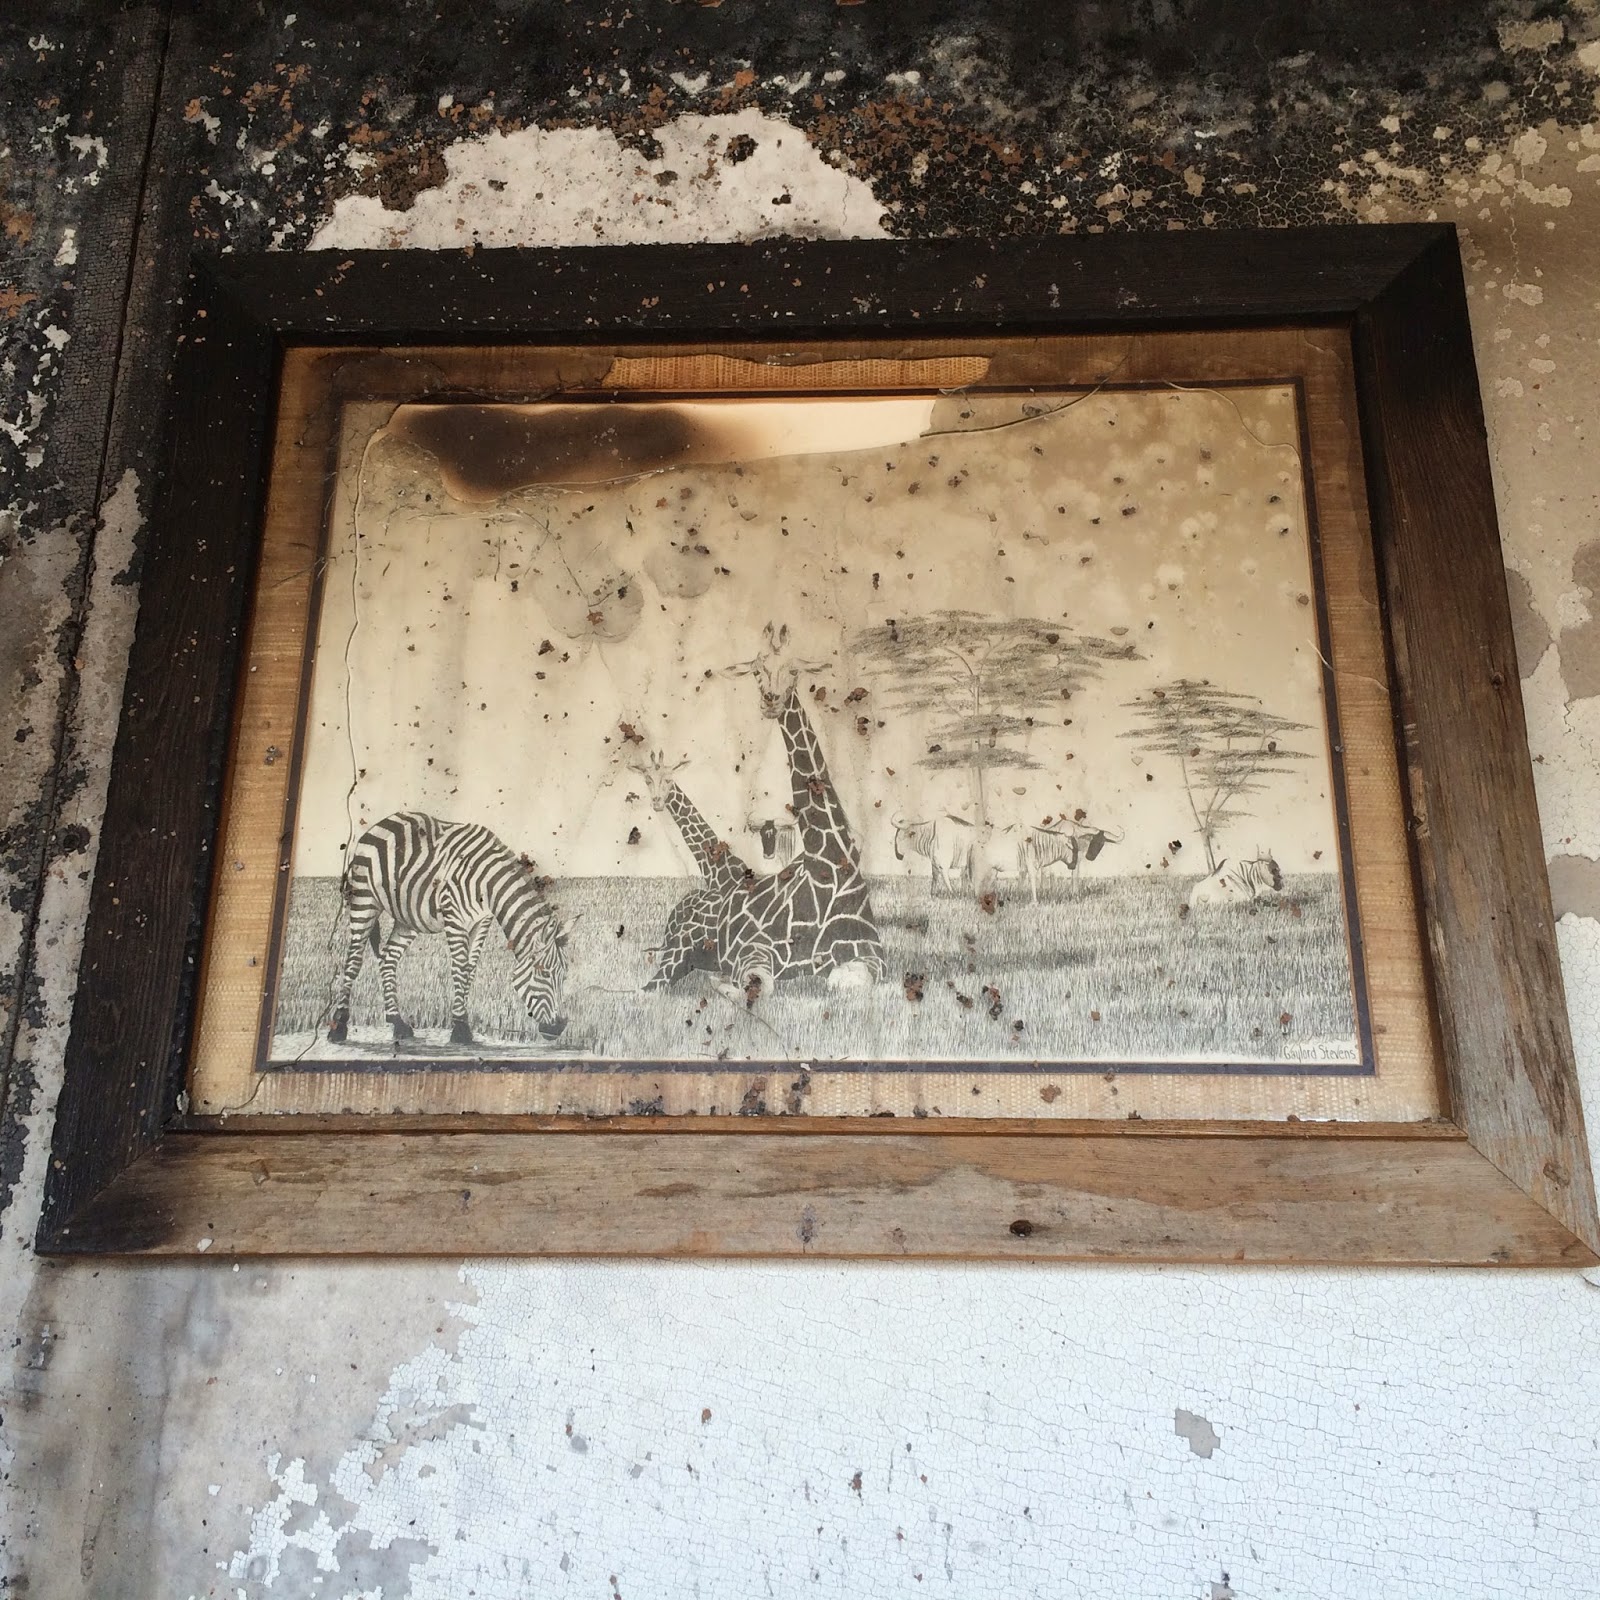
Throughout the exercise, we had to deal with staff members who didn’t show up or left early, mandatory evacuation orders, possible thieves or vandals after the floodwaters receded, and possible mold infestation because of 12 feet of water flooding the institution. As I said earlier, it really made it clear that when a sudden emergency strikes, there’s not much time to make decisions and get things done. We had to try to determine on the fly what was a priority item or collection that should be moved. Even at full capacity, it would be difficult to get done because how time-consuming it is to carefully pack and move delicate items.

We learned two major lessons from the exercise:

1. How important it is to have a disaster plan ahead of time
2. How important it is to organize your institution/collection responsibly
3. Know what your highest-priority items are, all the way down to the least priority


That brings the fascinating and intense experience that was our class to end this semester. The class truly provided insight into a part of library sciences that is not often thought of: disasters & risk planning. I think I speak for the entire class when I say that we thoroughly enjoyed Cultural Heritage Disasters; the burning, the flooding, and even the mold!

Wednesday, December 3, 2014

Humidifying Documents

So you have discovered that even after rescuing your documents from the blows of misfortune, or maybe just the lazy sideswipe of ill-luck, that several important documents have been crumpled by rough floodwater, or perhaps curled by the desiccating heat of a fire. Fortunately, it is very possible to flatten the documents using a humidity chamber. By using moist air to rehydrate the paper fibers, it is possible to make the documents pliable enough to once more lie flat and smooth. The procedure, as outlined below, is simple and does not require any special materials.

Humidification Procedure:
  1. Line the bottom of a large tray with a wet towel or wet blotter paper.
  2. Place a rack on top of the wet material which will keep the documents from making direct content with it while simultaneously allowing the damp air to circulate. A diffuser, commonly used for fluorescent ceiling lights, works well for this purpose.
  3. Cover the top of the rack with cheesecloth or other loose weave cotton material. This will support the paper while it gains moisture and prevent impressions from the rack. Cheesecloth will also continue to allow the humid air to permeate the paper.
  4. Seal the top of the tray with a heavy lid, or plastic wrap in order to keep the humidity levels within the container up.
  5. The length of time to leave the documents in the container will depend on several factors including type of paper and severity of damage. Check the flexibility of the papers frequently at first, then every 2-3 hours. It is not recommended to leave them in the humidifying chamber for longer than 24 hours.
  6. Once humidification is complete, the papers can be pressed to flatten them. To do this, place them between two sheets of blotter paper, and then two boards or heavy books topped with weights.  Whatever is used for press boards must be flat and larger than the paper being flattened.

Keep the following in mind when humidifying documents:
  • Any non-permeable container large enough to hold the necessary materials can be used for humidification.
  • Water can poured into the bottom of the container for humidification rather than using a towel or blotters, but there is a greater risk of the documents becoming wet. Remember, it is the HUMID AIR doing the work, not the water directly, as that will further damage the documents, so always keep the documents being humidified away from the wet materials or water.

Record sleeves being humidified

Tuesday, December 2, 2014

Salvaging Manuscripts & Architectural Plans

In the flood salvage, we handled a lot of delicate materials as we tried to save them. Most paper is surprisingly resilient, as we found out while treating architectural plans and manuscript papers. Salvaging water damaged papers can be a daunting task. To avoid further damage, we were especially careful while removing and separating the materials from folders, containers, or other papers.

Architectural plans:
The architectural plans we worked with came in one of two varieties: either rolled and stored in cardboard tubes, or folded. In each case, we handled them cautiously as we attempted to dry them.

When we set up the flood, we had placed one set of architectural plans stored in a cardboard tube in lake water. In this case, extracting the plans from the container was the most hazardous part of the salvage. About half of the tube was soaked, but we were able to slide the plans out, and lay them flat on blotter paper. We then used another sheet of blotter to soak up as much water as possible. The folded plans were peeled apart carefully and laid between blotters in the same fashion.

* For plans stored in cardboard tubes, assess the damage to the tube and the moisture level before removing the plans. If the plans are dry, or only slightly damp, attempt to remove them as you normally would. If the plans are still wet, or if you meet resistance, carefully cut the tube vertically, being sure not to cut the plans.

* If folded plans can be unfolded without causing further damage, unfold and flatten them slowly and gently. If not, you may need to dry them folded and humidify and flatten them after they have dried.

  • On a flat surface, place plans over blotter paper. You’ll want the plans as flat as possible so as not to cause creases.
  • Lay large sheets of blotter paper over plans. Gently smooth sheets in broad strokes, applying minimal pressure. 
  • Remove top blotter and check plans. If still wet, reapply blotter and repeat. If ink has bled onto the blotter, do not reuse it.
  • Once plans have reached an acceptable level of dryness, you can leave them between blotters until completely dry. 
  • Caveat: before leaving plans, replace damp blotter paper with dry blotter. This will reduce the chances of mold growth.  Check on the plans periodically.


Rolled plans from a cardboard tube which clearly show the water line.

Flattening plans over blotter paper.

Paper manuscripts:
We put a folder of handwritten and typed pages in our flood. The typewriter ink was relatively unaffected by the flood, and if dried properly the paper would only be a bit worse for wear. Some of our documents contracted a slight case of mold, which could have been removed if the papers had been important collection material rather than experiments. We discarded the moldy paper. The hand written pages, which contained multiple varieties of ink and pencil, several of which bled,  but in most cases, they were still legible.

  • Separate pages as carefully as possible. 
  • If you have the room, lay the pages out on a flat surface. Another option would be to stack them with paper towels or blotter between the pages. There will most likely be ink transfer between manuscript pages. If the ink used is stable and/or the content of the pages is not critically important, blotters can be used between every three or four pages in order to save resources. Another option would be hanging the papers to air dry, however the papers would not be quite so flat when done. 
  • Caveat: blotters should be monitored and changed to prevent mild growth.


Ink bleed on handwritten pages.

Stack of drying papers with blotters between every four to five pages.

The easiest way to prevent mold growth on drying papers is to monitor them often, changing the damp blotters. Good luck and happy salvaging!


Debriefing in the Aftermath

In the wake of the fire salvage, we were faced with the task of cleaning up the book lab where we were storing our damaged materials for salvage and perusal. By the end of the endeavor, we mostly looked like chimney sweeps, but before the cleaning up, we experimented with a stack of photographs we had salvaged from the fire.

For the most part, these photos sustained little damage from the fire, with the exception of a few with soot or burn marks. They were, however, subject to water damage as the fire was extinguished. Because they had been stacked together initially, and because they remained that way while drying, they stuck to one another.

Most modern photographs contain three layers: a paper backing, a baryta layer which increases the sharpness of the image, and the emulsion layer which contains the imaging material. When exposed to water, the emulsion layer softens. If not dried, eventually the emulsion may run or delaminate. If the photo is dried in contact with something else, say the paper backing of another photo, it can stick. It may be impossible to separate the photos without causing some damage, or total destruction in some cases, but we made an effort to liberate as many photos as possible.

Simply peeling the photos apart may seem like the obvious solution, but this can cause catastrophic damage. Pulling can cause the photos to bend, which may not cause visible damage immediately, but may show over time. Materials should always be handled on a horizontal plane, keeping them as flat and supported as possible. Consequently, you can see how peeling may not be the best solution. Instead, we approached the photos with a milder tactic. Using a variety of spatulas (Teflon, wood, and metal) we held the photos flat and used the spatulas in small circular motions to separate the photos. Due to the limited visibility between the photos, we had to practice using our hands to feel if we were delaminating (separating the layers instead of the whole photo). In some cases, damage was inevitable. Large areas of the photos were stuck, making it difficult to separate them. A portion of the stack was completely adhered together, so we decided to take drastic measures—in the name of science!

We do not suggest the following method when working with valuable or keepsake photos!

For the blocked stack, we had few options. If necessary, the photos might have been recovered by a photo conservator, or simply stored as is. However, we did not like those options, so we submerged them in water. Potentially, this method could work, but it is also very radical, and you should be prepared for the possibility of losing the materials. Within an hour, the photos were loosened but still pretty well stuck. After a week (not suggested), most of them were loose, but much of the emulsion, which contains the image, was also floating freely in the water. While highly educational, this was not the best technique for salvaging water damaged photos!

When we finished with the photos, we began the undertaking of sanitizing the book lab, a task which mainly consisted of discarding our lovely, toasty-scented fire-damaged materials, as well as any materials left after the flooding. In a sooty process, we examined our handiwork—both destruction and salvage—and gave our valiant materials a grand send off. Among the departed: A Guide to Punchcard Programming; Thermodynamics; Alfred Lord Tennyson: A Biography; and many un-mourned copies of a tome on L. Ron Hubbard. May they find peace.

Audio and video cassettes after the flood

Some of the items contained in our "flooded" collection were compact audio cassettes and VHS tapes. We separated the items in these groups according to the three "flood" conditions (lake water, oily water, and clean water) to see if the different types of water affected the media differently.

Most of the audio cassettes were inside their original plastic cases. The VHS tapes were in a variety of cases, including a plastic "clamshell" case and cardboard cases. For a description of how well these cases survived, see our separate post on the subject.

When we pulled the items out of the water, we observed that the plastic cases all performed fairly well in keeping moisture away from the cassettes. The cardboard cases, however, did not because they are open on one end and readily absorbed water.


Because the plastic cases blocked water from the cassettes, the tapes themselves were not overly wet. However, we did notice small droplets of water were visible on the inside of the clear windows of the cassettes.

Clean water itself is not damaging to the tapes. However, any particulates in flood water will damage the tapes, especially during playback when the tapes are wound back and forth at high speeds across a tape machine head. Even particulates as small as those left by a fingerprint (see image below) are larger than the distance between the tape and the playback head. Playback can drag those particulates across the surface of the tape, damaging the tape binder and possibly even the tape substrate.

Image taken from: Van Bogart, J. “Magnetic Tape Storage and Handling: A Guide for Libraries and Archives.” National Media Laboratory and Council on Library and Information Resources, 1995. http://www.clir.org/PUBS/reports/pub54/index.html.

Additionally, the presence of moisture could eventually activate mold existing on the tape or in the enclosure. If this were to happen, the tape would need to be cleaned and rehoused in another cartridge.

We tried several methods to extract the water from the inside of the cartridges. One group of cassettes were placed standing on the cartridge edge that opens up during playback. The goal of this was to let gravity pull the water down and out of the cassette housing, similar to the way a dish drying rack works.


Some tapes were propped up to "air-dry," without concern for which side of the enclosure was up or down.


We submerged the second group of cassettes inside a pile of rice. We hoped that the rice would dry the tapes by absorbing the moisture. This is similar to the method we used to dry out a pair of phone chargers.


We checked the tapes after a week to see if either the gravity or the rice approach worked. The inside of the tape housings that we stood on edge were visibly drier than when we pulled them out of the water. The tapes that we submerged in the rice did not show any noticeable difference. We then tried the gravity approach with these tapes and a week later they were dry as well.

We are not sure why the rice method did not work. Rice is recommended to dry electronic devices that have been submerged in water, suggesting that rice can absorb water from fairly sealed enclosures. It is possible that we did not allow the rice enough time to extract the water from the cartridges. However, the longer the water is allowed to sit, the more chance there is of mold growing in the enclosure. For our experiment, we found that air drying, with the help of gravity, pulled water out of the tape enclosures the fastest.

Even after water is extracted from tapes, be sure to clean them before playback. Unless you know the water that touched the tapes is clean and distilled, there is a chance that particulates are still on the surface of the tape. They will need to be removed to avoid damaging the tape, and machinery, during playback.


Thursday, November 27, 2014

Salvaging Photographs from the Flood

Many of the photographs survived our floods, some better than others. In the cases where the photos survived fairly well, we did the following:

  • Gently removed each photo from the water and surrounding artifacts, taking care to not rub or scratch the surface of the emulsion side (the side that the image is on) 
  • If photos were stuck together, we gently peeled them apart (they will stick together like glue once they dry)
  • If the photo was free from debris, we laid it out flat to air dry, again being careful not to touch or smudge the emulsion since it was very soft from sitting in water for so long 
  • If the photo was covered in lake debris or mud, we gently rinsed it by slipping it into a pan of clean water, passing it through the water (do not swish or dunk it as this may cause the emulsion to run), and then laying it out to dry

In one case, the photo had been part of a photo album where it had been glued to a thick page and covered with plastic. We carefully peeled the plastic away using a horizontal motion by bending the plastic completely back rather than at a 90 degree angle to the page. This reduced the likelihood that the photo would tear.


We were unable to save some photos because the emulsion had grown too soft. Even tipping the photo from side to side caused the emulsion to run.


Surprisingly, the photos that survived the best were those that had been stuck between the pages of books or held within another container, such as a film can. Although these photos got wet, most of them survived with little damage to the emulsion.


In the case of a small photo book, we placed sheets of blotter paper between the pages to absorb as much water as possible and were quite successful with that method. The pages became slightly cockled, but the book was still very usable.

Drycleaning

We attempted to salvage a framed drawing that hung on the back wall of our fire testing room.

The drawing, in wonderful condition, before the fire.

A little worse for the wear after the fire was put out.
Upon getting the art piece back to the lab, our first task was to reduce the risk of injury to ourselves. We realized that we could be injured by the broken glass or splinters from the frame.


We examined the piece to determine if the artwork was attached to the board behind it. We placed packing tape over the pieces of broken glass to keep them from shattering, being sure to contacting any part of the artwork with tape.


We carefully flipped the piece over using a piece of stiff board for support and to contain any glass particles that were not captured by the tape.


We cut the hanging wire and removed it from the frame.


Then we removed the tape that was around the edge backing board. We went much more slowly than seemed necessary to avoid any tearing to the artwork. We peeled the tape away at nearly a 180 degree angle as depicted in the following photo. This method prevents ripping as much as possible and reduces the pressure on the object from which we were peeling away. Peeling away at a 90 degree angle is one of the least effective ways of tape removal because it can cause delamination of the fibers in the substrate. Keep a close eye as you work.


We dusted away particles of soot and drywall dust from the artwork before proceeding with the removal of the art piece to keep our work as clean as possible.


Carefully, we removed the metal diamonds that held the backing board in place by slipping a micro spatula beneath the tab and gently lifting away from the artwork. Be careful not to damage the artwork by gouging it with your spatula. Match your tool to the strength of the task. Lift the tab just enough to grab it with a needle-nose pliers using controlled strength. Pull the tabs straight out without bending them. Just as with tape removal, 180 degree removal is best.


Generally when unframing the glass is not broken and it is usually best to flip the artwork back over and lift the glass from the object so you can see what is happening as you lift the glass.  In our case, the glass was broken, so we lifted the artwork carefully from the frame. We examined the artwork with raking light, light aimed at an oblique angle or nearly parallel to the surface of the object.


While wearing UV goggles, we examined both the front and back of the piece under UV light to look for damage. We noticed yellowish spots, which are most likely from rubber-based adhesives. Whitish spots suggest acrylic-based adhesive. These are not conclusive findings but are indicative of those substances.


Before beginning the actual process of dry-cleaning, we made a paper tray to hold the artwork and to contain any messes.


To keep the artwork from moving, we placed glass paperweights with blotter paper underneath and lead weights above the glass. We placed the weights on the margins of the print, not over the ink.


We used a piece of chromatography paper (un-sized paper) to test the friability of the ink. First we touched the chromatography paper gently to the surface of the print; next we brushed the chromatography paper gently across the surface of the ink.  There was no off-set in either case.


i

We gently brushed soot off of the piece without touching the ink using a slightly stiff brush. Then we brushed over the media with a very soft brush.


For the main phase of the dry-cleaning, we used soot sponges, which are made of vulcanized rubber. You can also use vinyl erasers, which are designed to remove graphite, either as whole erasers or grated into crumbs.


The paper will be brittle in charred areas, so use care to not damage the piece further. Moving your sponge in small arcs, not back and forth, will leave a less obtrusive lines. Take care to keep your workspace clean; avoid getting eraser crumbs on the floor because they can get slippery.
When the artwork is as clean as possible on the front, flip it over to clean the back. When lifting the piece, support it with a board or turn gently.

Some tape can be removed with a micro spatula, working gently from the inside of the piece to the outside edge.


A crepe eraser may remove residual adhesive.


Once your cleaning is complete, lift the weights off of the artwork.

There is not much you can do to repair charred areas. A conservator may be able to reduce the dis-figuration, or it may be more desirable to retain the damaged parts as provenance.


During the cleanup stage, we used packing tape to tape the back side of the glass.


We wrapped the frame and broken glass in Kraft paper before discarding to prevent anyone getting injured.