Thursday, November 27, 2014

Salvaging Photographs from the Flood

Many of the photographs survived our floods, some better than others. In the cases where the photos survived fairly well, we did the following:

  • Gently removed each photo from the water and surrounding artifacts, taking care to not rub or scratch the surface of the emulsion side (the side that the image is on) 
  • If photos were stuck together, we gently peeled them apart (they will stick together like glue once they dry)
  • If the photo was free from debris, we laid it out flat to air dry, again being careful not to touch or smudge the emulsion since it was very soft from sitting in water for so long 
  • If the photo was covered in lake debris or mud, we gently rinsed it by slipping it into a pan of clean water, passing it through the water (do not swish or dunk it as this may cause the emulsion to run), and then laying it out to dry

In one case, the photo had been part of a photo album where it had been glued to a thick page and covered with plastic. We carefully peeled the plastic away using a horizontal motion by bending the plastic completely back rather than at a 90 degree angle to the page. This reduced the likelihood that the photo would tear.


We were unable to save some photos because the emulsion had grown too soft. Even tipping the photo from side to side caused the emulsion to run.


Surprisingly, the photos that survived the best were those that had been stuck between the pages of books or held within another container, such as a film can. Although these photos got wet, most of them survived with little damage to the emulsion.


In the case of a small photo book, we placed sheets of blotter paper between the pages to absorb as much water as possible and were quite successful with that method. The pages became slightly cockled, but the book was still very usable.

Drycleaning

We attempted to salvage a framed drawing that hung on the back wall of our fire testing room.

The drawing, in wonderful condition, before the fire.

A little worse for the wear after the fire was put out.
Upon getting the art piece back to the lab, our first task was to reduce the risk of injury to ourselves. We realized that we could be injured by the broken glass or splinters from the frame.


We examined the piece to determine if the artwork was attached to the board behind it. We placed packing tape over the pieces of broken glass to keep them from shattering, being sure to contacting any part of the artwork with tape.


We carefully flipped the piece over using a piece of stiff board for support and to contain any glass particles that were not captured by the tape.


We cut the hanging wire and removed it from the frame.


Then we removed the tape that was around the edge backing board. We went much more slowly than seemed necessary to avoid any tearing to the artwork. We peeled the tape away at nearly a 180 degree angle as depicted in the following photo. This method prevents ripping as much as possible and reduces the pressure on the object from which we were peeling away. Peeling away at a 90 degree angle is one of the least effective ways of tape removal because it can cause delamination of the fibers in the substrate. Keep a close eye as you work.


We dusted away particles of soot and drywall dust from the artwork before proceeding with the removal of the art piece to keep our work as clean as possible.


Carefully, we removed the metal diamonds that held the backing board in place by slipping a micro spatula beneath the tab and gently lifting away from the artwork. Be careful not to damage the artwork by gouging it with your spatula. Match your tool to the strength of the task. Lift the tab just enough to grab it with a needle-nose pliers using controlled strength. Pull the tabs straight out without bending them. Just as with tape removal, 180 degree removal is best.


Generally when unframing the glass is not broken and it is usually best to flip the artwork back over and lift the glass from the object so you can see what is happening as you lift the glass.  In our case, the glass was broken, so we lifted the artwork carefully from the frame. We examined the artwork with raking light, light aimed at an oblique angle or nearly parallel to the surface of the object.


While wearing UV goggles, we examined both the front and back of the piece under UV light to look for damage. We noticed yellowish spots, which are most likely from rubber-based adhesives. Whitish spots suggest acrylic-based adhesive. These are not conclusive findings but are indicative of those substances.


Before beginning the actual process of dry-cleaning, we made a paper tray to hold the artwork and to contain any messes.


To keep the artwork from moving, we placed glass paperweights with blotter paper underneath and lead weights above the glass. We placed the weights on the margins of the print, not over the ink.


We used a piece of chromatography paper (un-sized paper) to test the friability of the ink. First we touched the chromatography paper gently to the surface of the print; next we brushed the chromatography paper gently across the surface of the ink.  There was no off-set in either case.


i

We gently brushed soot off of the piece without touching the ink using a slightly stiff brush. Then we brushed over the media with a very soft brush.


For the main phase of the dry-cleaning, we used soot sponges, which are made of vulcanized rubber. You can also use vinyl erasers, which are designed to remove graphite, either as whole erasers or grated into crumbs.


The paper will be brittle in charred areas, so use care to not damage the piece further. Moving your sponge in small arcs, not back and forth, will leave a less obtrusive lines. Take care to keep your workspace clean; avoid getting eraser crumbs on the floor because they can get slippery.
When the artwork is as clean as possible on the front, flip it over to clean the back. When lifting the piece, support it with a board or turn gently.

Some tape can be removed with a micro spatula, working gently from the inside of the piece to the outside edge.


A crepe eraser may remove residual adhesive.


Once your cleaning is complete, lift the weights off of the artwork.

There is not much you can do to repair charred areas. A conservator may be able to reduce the dis-figuration, or it may be more desirable to retain the damaged parts as provenance.


During the cleanup stage, we used packing tape to tape the back side of the glass.


We wrapped the frame and broken glass in Kraft paper before discarding to prevent anyone getting injured.


Saturday, November 22, 2014

Art in a Flood

What happens when art gets wet? We wanted to find out, so in our flood experiment we flooded and salvaged three different paintings.

Large Painting

We flooded a large painting with lake water.


To salvage the painting we had to carefully remove the staples holding in the cardboard backing to the frame and then remove the cardboard backing. Next, we could take the painting out of its frame. From there we set the painting on blotter paper and allowed it to lay flat and dry.


There was some water damage to the painting. You can see the areas of discoloration in this picture.


This is not something we could fix ourselves. If this was collection material we would have to make a discussion to keep this damage or send the painting to an art conservator. Since, this wasn’t collection material we didn’t have to make this decision but we did decide to keep the painting for re-use in our fire experiment.


Wood Panel Painting

We also flooded a wood panel painting (fondly dubbed “the world’s ugliest panel painting” by our class) in lake water.


The flooding caused some cracking of the wood. But the most damage to the panel painting actually came from our salvage efforts. Because the panel painting had been in lake water we wanted to rinse the painting before we set it out to dry. However, the water pressure coming out of the sink was too high and we caused damage to the painting in the lower corner where we had started rinsing.


Next, we sat the panel painting flat and allowed it to dry. Like the large panting, the damage was not something we could fix ourselves so we would have to make a decision to keep the damage or send it to an art conservator. For our purposes, we again decided to save the panel painting for our fire experiment.


Small Painting

We also flooded a small panel painting in clean water. This experiment showed us that sometimes luck can be on your side in a flood. This painting was not damaged at all.


There were two layers of cardboard behind the painting in the frame so we removed one to facilitate drying and set the painting in the frame flat to dry. Both and painting and the frame were undamaged and could be put back on the wall for display.

Flood Recovery of Phone Charger

Have you ever dropped a phone charger in a pool? In bathwater? A sink? Or even a lake?

Sometimes we have phone charger accidents and think immediately, "I need a to buy a new one." This is not necessarily true. At times, you can try some methods to save these common day-to-day electronic devices.

1. The first thing you will need to do is remove your phone charger from the water.

2. After removing the phone charger from water, thoroughly dry the item.


3. Next, locate an empty plastic container that you can use for a few days.

4. In this empty plastic container, place your dried phone charger inside.

5. Then place uncooked white rice on top of the phone charger.


6. Make sure your phone charger is buried in the uncooked white rice and not on top of the rice.


7. Keep the phone charged and uncooked rice in a plastic container for several days (3-10 days or even more depending on the amount of water damage and if the charger has dried).

8. After phone charger has completely dried, try plugging item in a socket and check if it can hold a charge to your phone.


I experimented with phone chargers placed in either lake water and clean water. Both items were placed in their respective water for approximately 7 days, dried, and then placed in a container filled with uncooked rice. The clean water phone charger works!


However, the phone charged placed in lake water was no longer usable and was eventually discarded to a trash receptacle.


Friday, November 21, 2014

Packing Out After the Fire

The day after the fire took place, we returned to the fire training facility to retrieve salvageable materials from the fire disaster. According to Lt. Elmore, our arson specialist and fire supervisor, it is common for the victims of a disaster to stay away from the scene overnight. Our first instinct is to rush back in as soon as the flames are extinguished, but the firefighters don’t let people back in that quickly. Not only is it dangerous, there is also a certain level of shock that we need time to process. He told us that they recommend all victims of a fire go home for a night, or if their home is the scene of the disaster, to go to a hotel or friend’s house for at least one night. He told us that it typically takes 24-48 hours for people to mentally process the severity of the event and begin planning for recovery.

The first step we took was to discuss a plan. We needed to minimize the time spent on pack-out, while not further damaging any salvageable materials. We wanted to remove the materials worth saving and transport them back to the lab as quickly as possible. Time is certainly of the essence, as the materials had now suffered fire, smoke, and water damage. However, taking a few minutes to come up with a planned and coordinated effort was sure to produce the best results. The best scenario would have been if we already had had a response plan in place. Coming up with a response plan in advance, that clearly designates tasks and responsibilities, is the surest way to respond effectively and efficiently to a disaster.

Three people arrived for pack-out, so we divided up the small room amongst us. One person was assigned the desk, another person focused on the materials on the floor around and under the desk, and the third person removed the items that were situated on the opposite side of the room from where the fire started.

The picture below shows the room as we found it on the second morning. The side of the room at the right side of the picture below was farthest away from the fire. As the picture shows, the fire did not damage the materials on the floor at the right side of the room. They were jostled around a bit, and did suffer some smoke damage, but only to the extent of inheriting a smoky smell (we’ll talk more about removing that smell in another post).


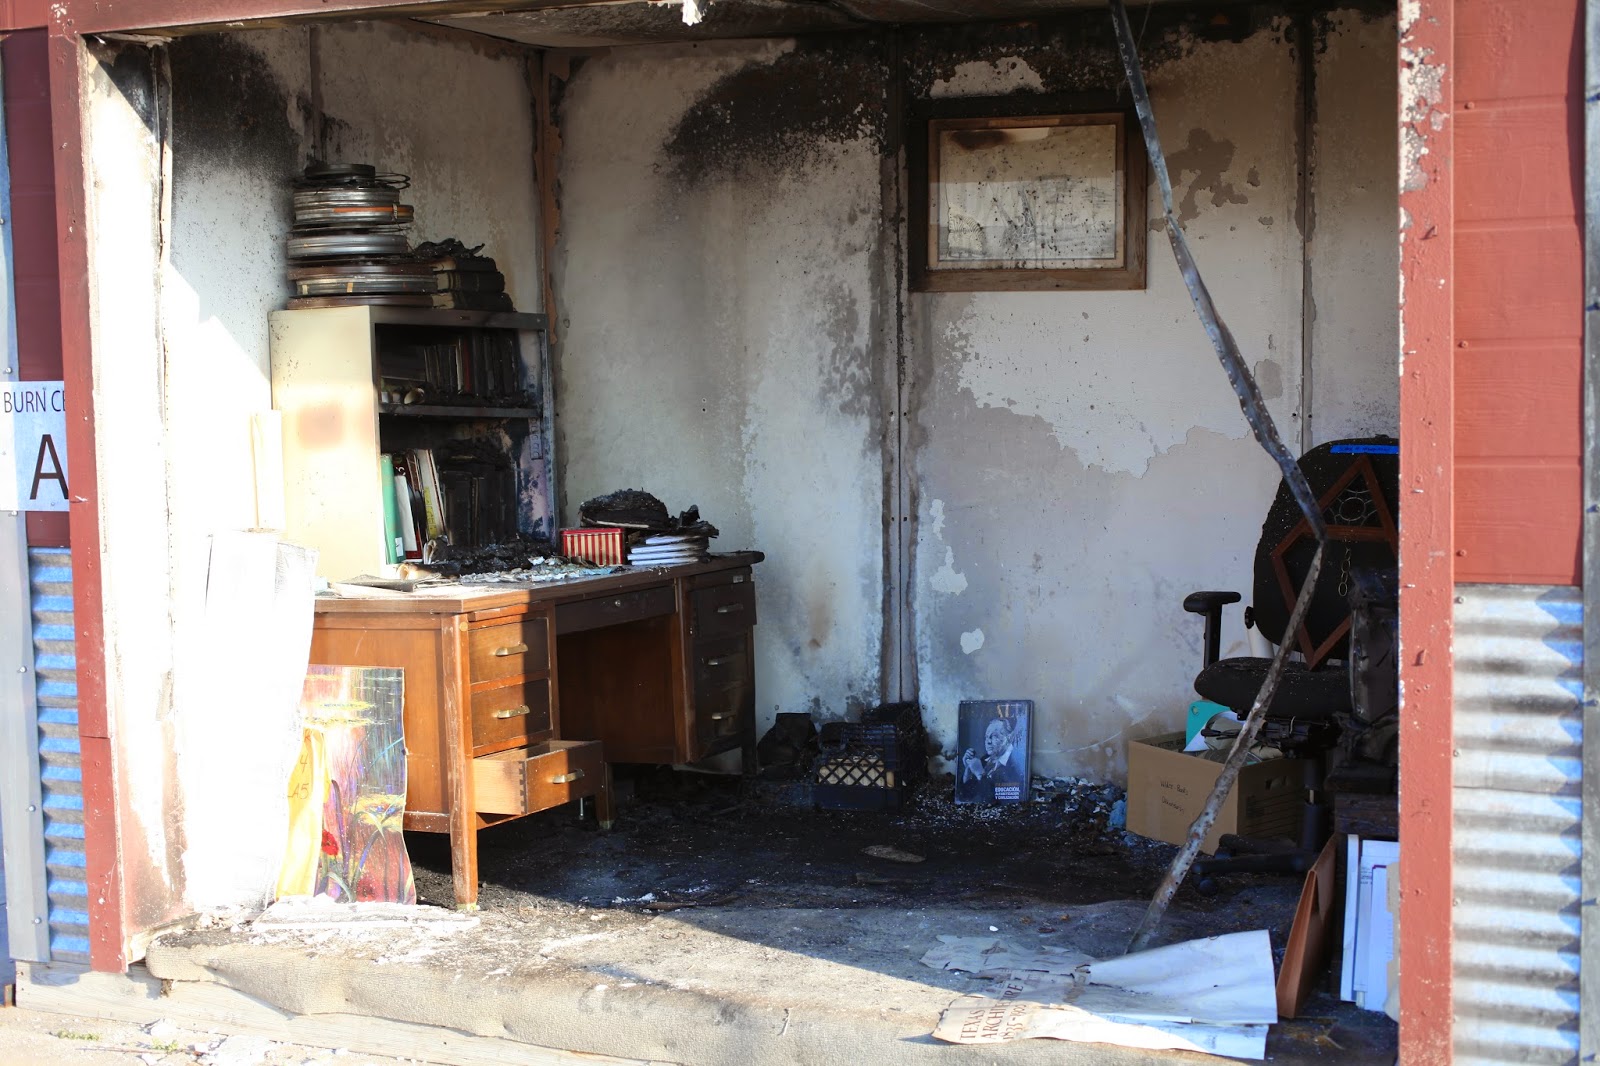
The room on the morning of the second day, before recovery of salvageable items.

The picture also shows the state of the materials leaning up against the desk, opposite the corner of the room in which the fire started. These materials suffered water and smoke damage, but the fire did not spread to the side of the desk closest to the room’s open wall. To get a visual idea of how large the fire grew, see the picture of Lt. Elmore walking into the room with his hose a-sprayin’ in our last post.

The materials on and under the desk were damaged the most. The level of severity varied, however, depending on the type of material and the location on or around the desk. For instance, the paper materials, photographic prints, and a sheet of slides were completely ruined, but some of the books at the left end of the bookshelf experienced minimal damage.

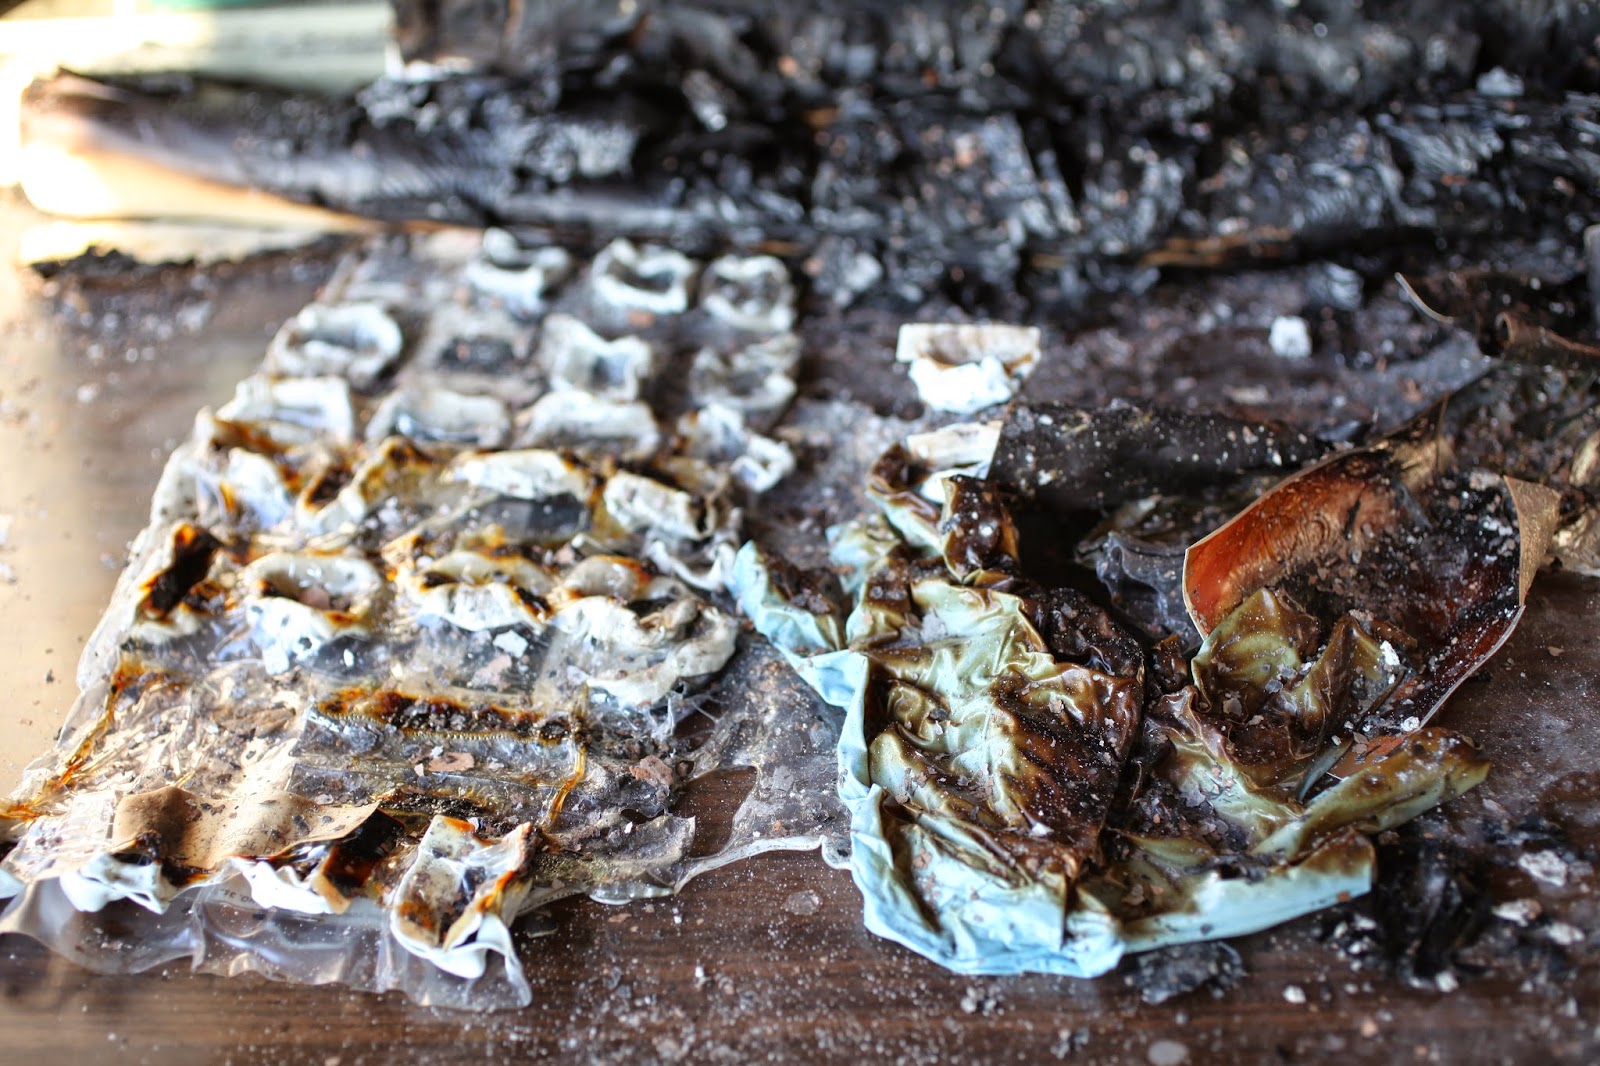
A plastic sheet filled with photographic slides.

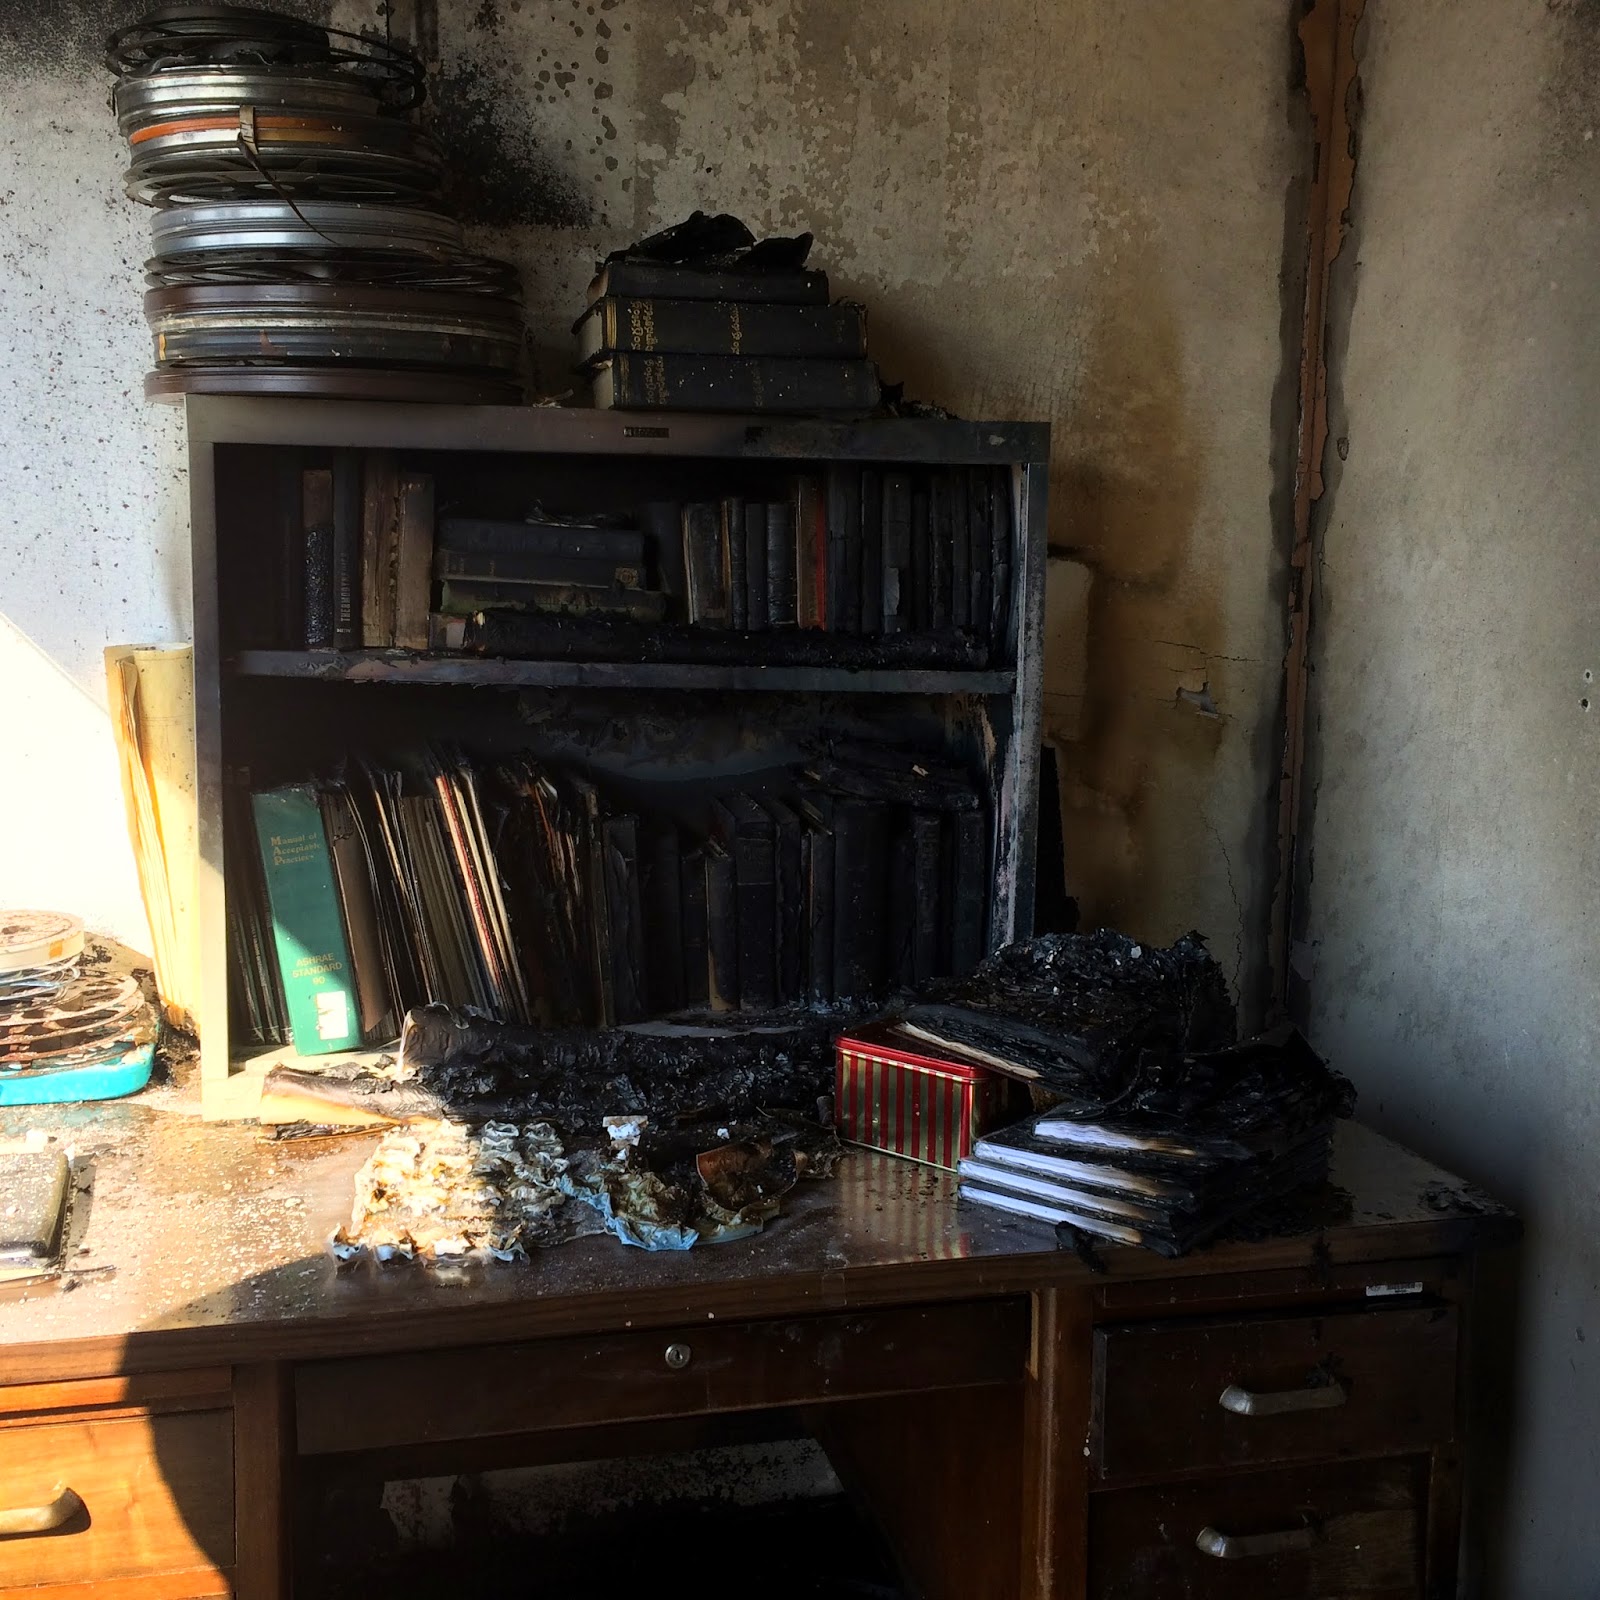
The bookshelf on the desk after the fire.

It was evident during pack-out that materials protected each other from the fire. The books were damaged on the spines and textblock edges that had been exposed, but the covers and the text areas of the pages were, for the most part, salvageable. We also found that the materials inside the desk drawers and small metal containers on top of the desk were surprisingly unaffected. One of the drawers showed some evidence of fire damage, but the other drawers showed no evidence that flames crept into the drawers.

Materials inside one of the right-hand drawers were barely affected.

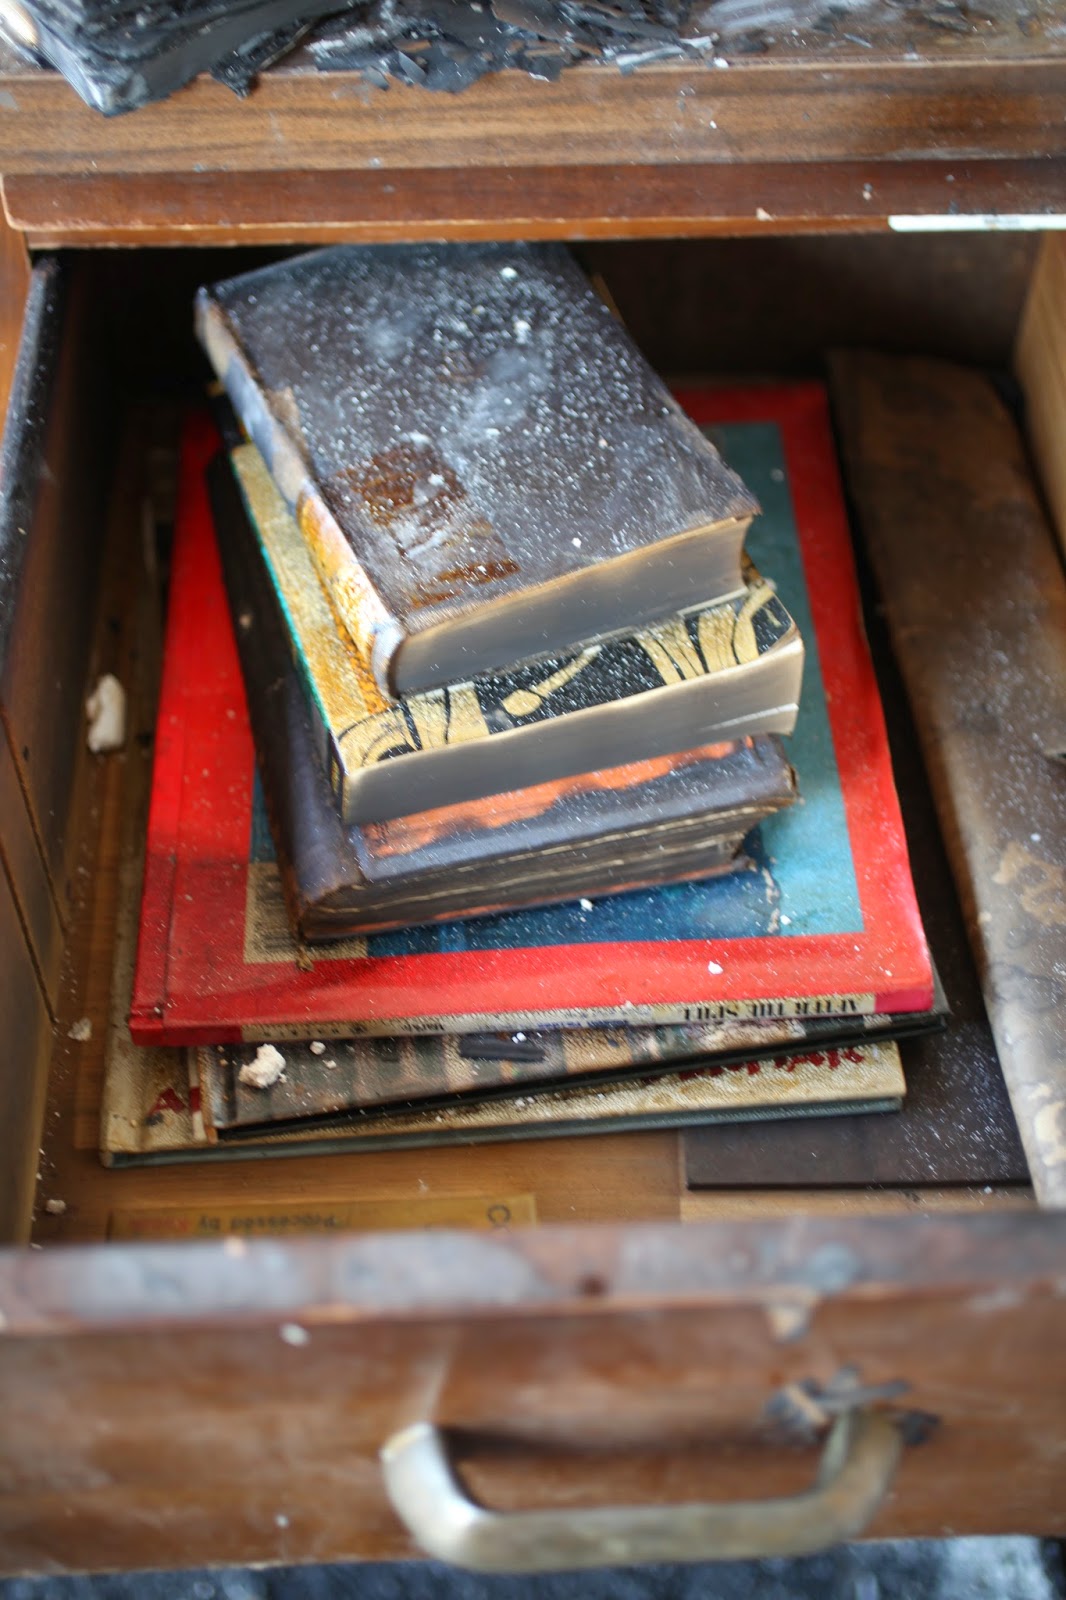
Materials inside a second right-hand drawer suffered damage, but remained salvageable.

The corner of the room in which the fire started was by far the worst. No materials were salvageable from this corner. There was also a plastic crate near this corner with books inside. We decided to take the crate back to the Lab for inspection without removing any books, but we were not optimistic that many of its contents could be saved.

Nothing survived in the corner where the fire started.

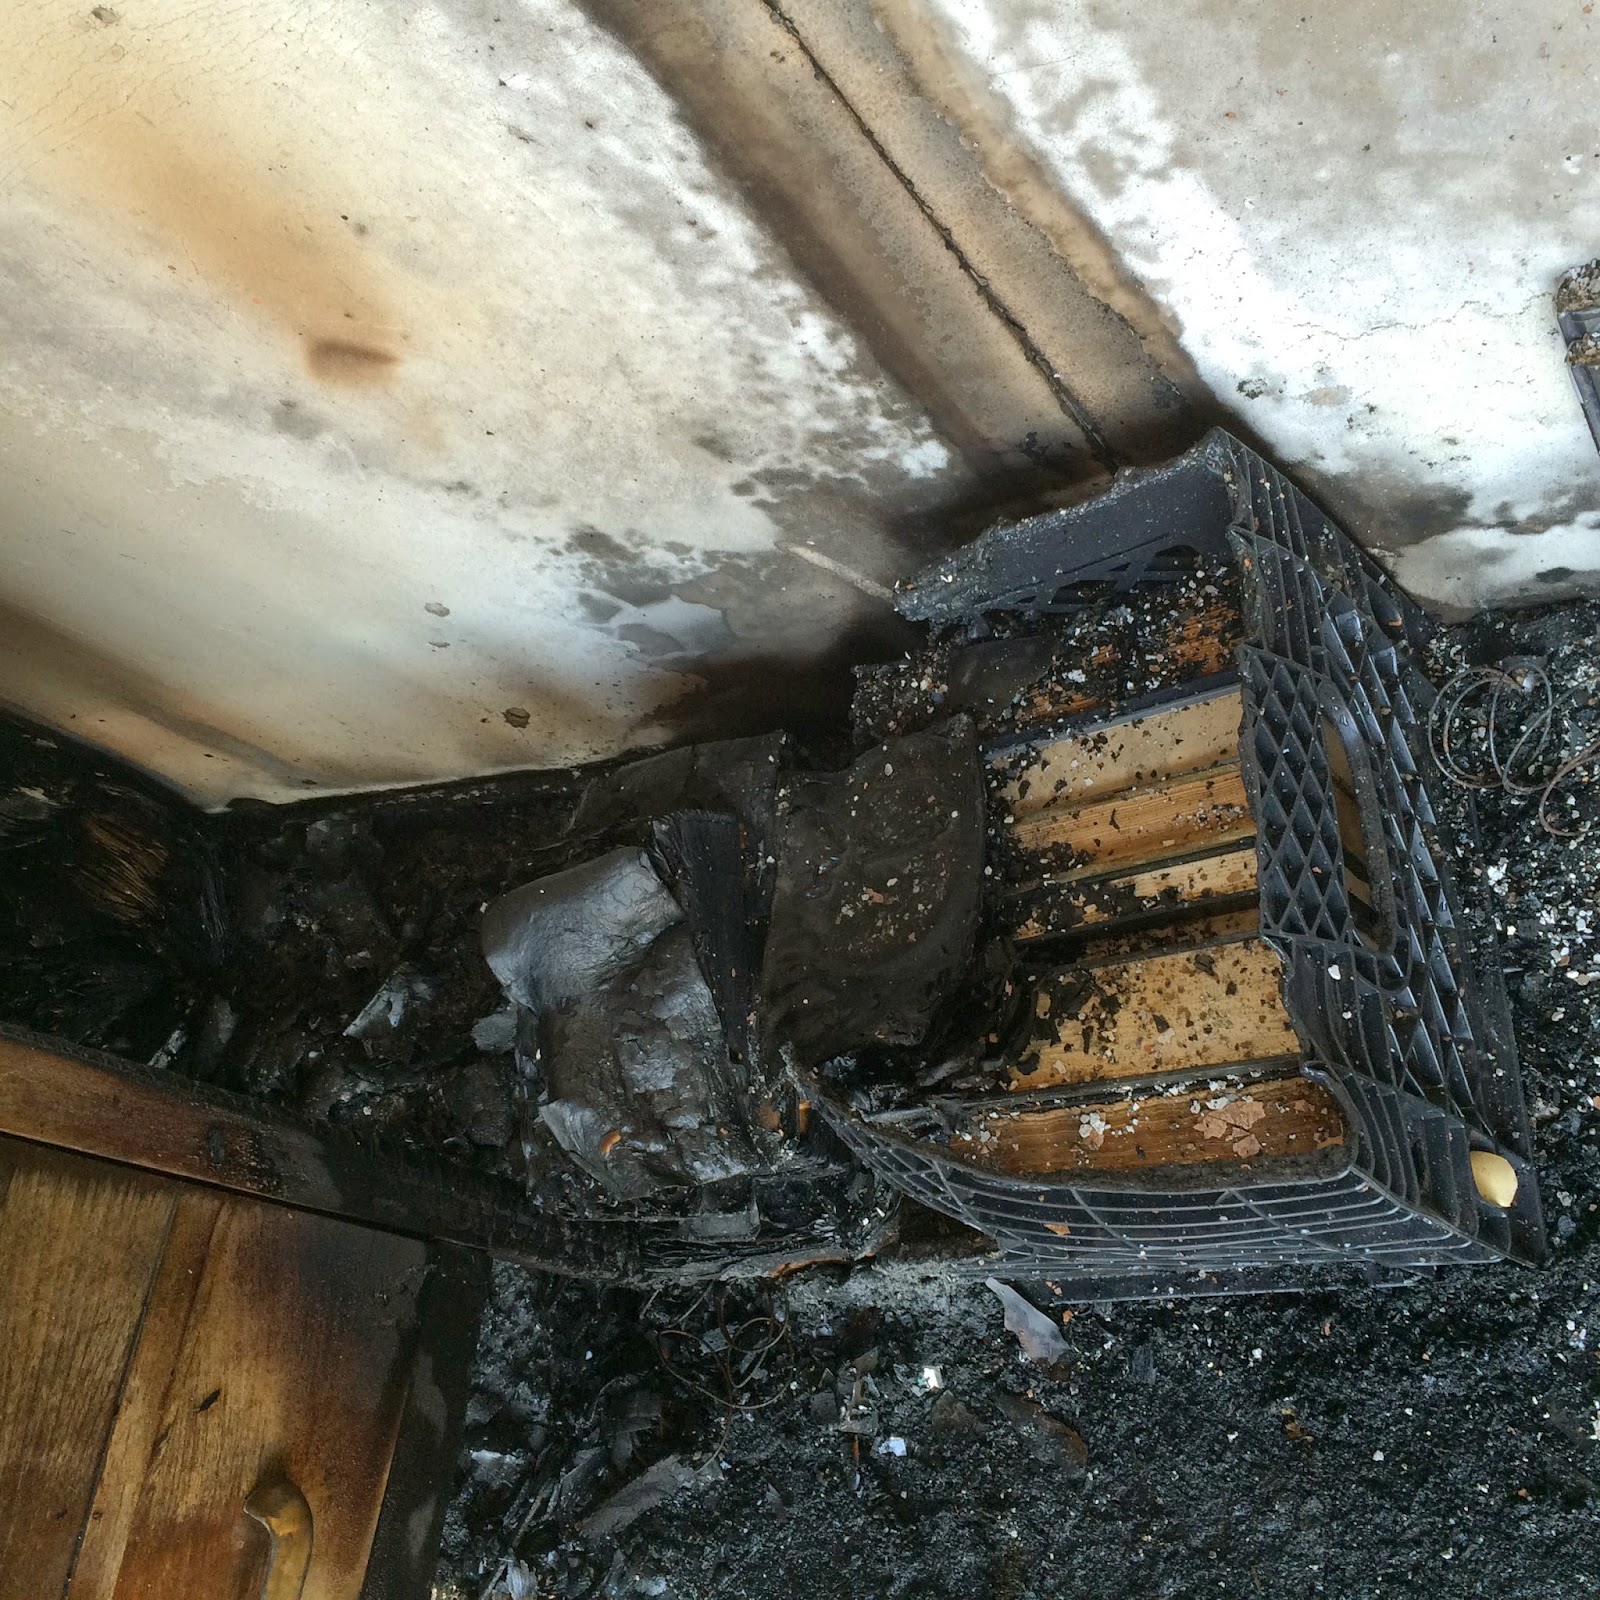
A plastic crate filled with books near the ignition corner was badly damaged.
We carefully packed any materials on top of the desk, in the drawers, and on top of the shelving into crates and boxes for transport back to the lab. Once a space on the desktop was cleared, the books were packed into plastic crates. The books were very wet. They had experienced water damage because this area was hit hard with water from the firehose. Therefore, we packed the books by wrapping them in waxed paper. This was a precautionary measure, in case the books were placed in a freezer until further inspected. If the books were not wrapped in waxed paper, there was a good chance they would stick together, potentially causing further damage. When removing the books from the shelf, the books at the left side of each shelf were removed first. These were easiest to remove, as they suffered the least fire damage. The badly burned books were easier to remove safely after the book to its left was cleared away.

A book wrapped in waxed paper is set in a new crate that is being filled.

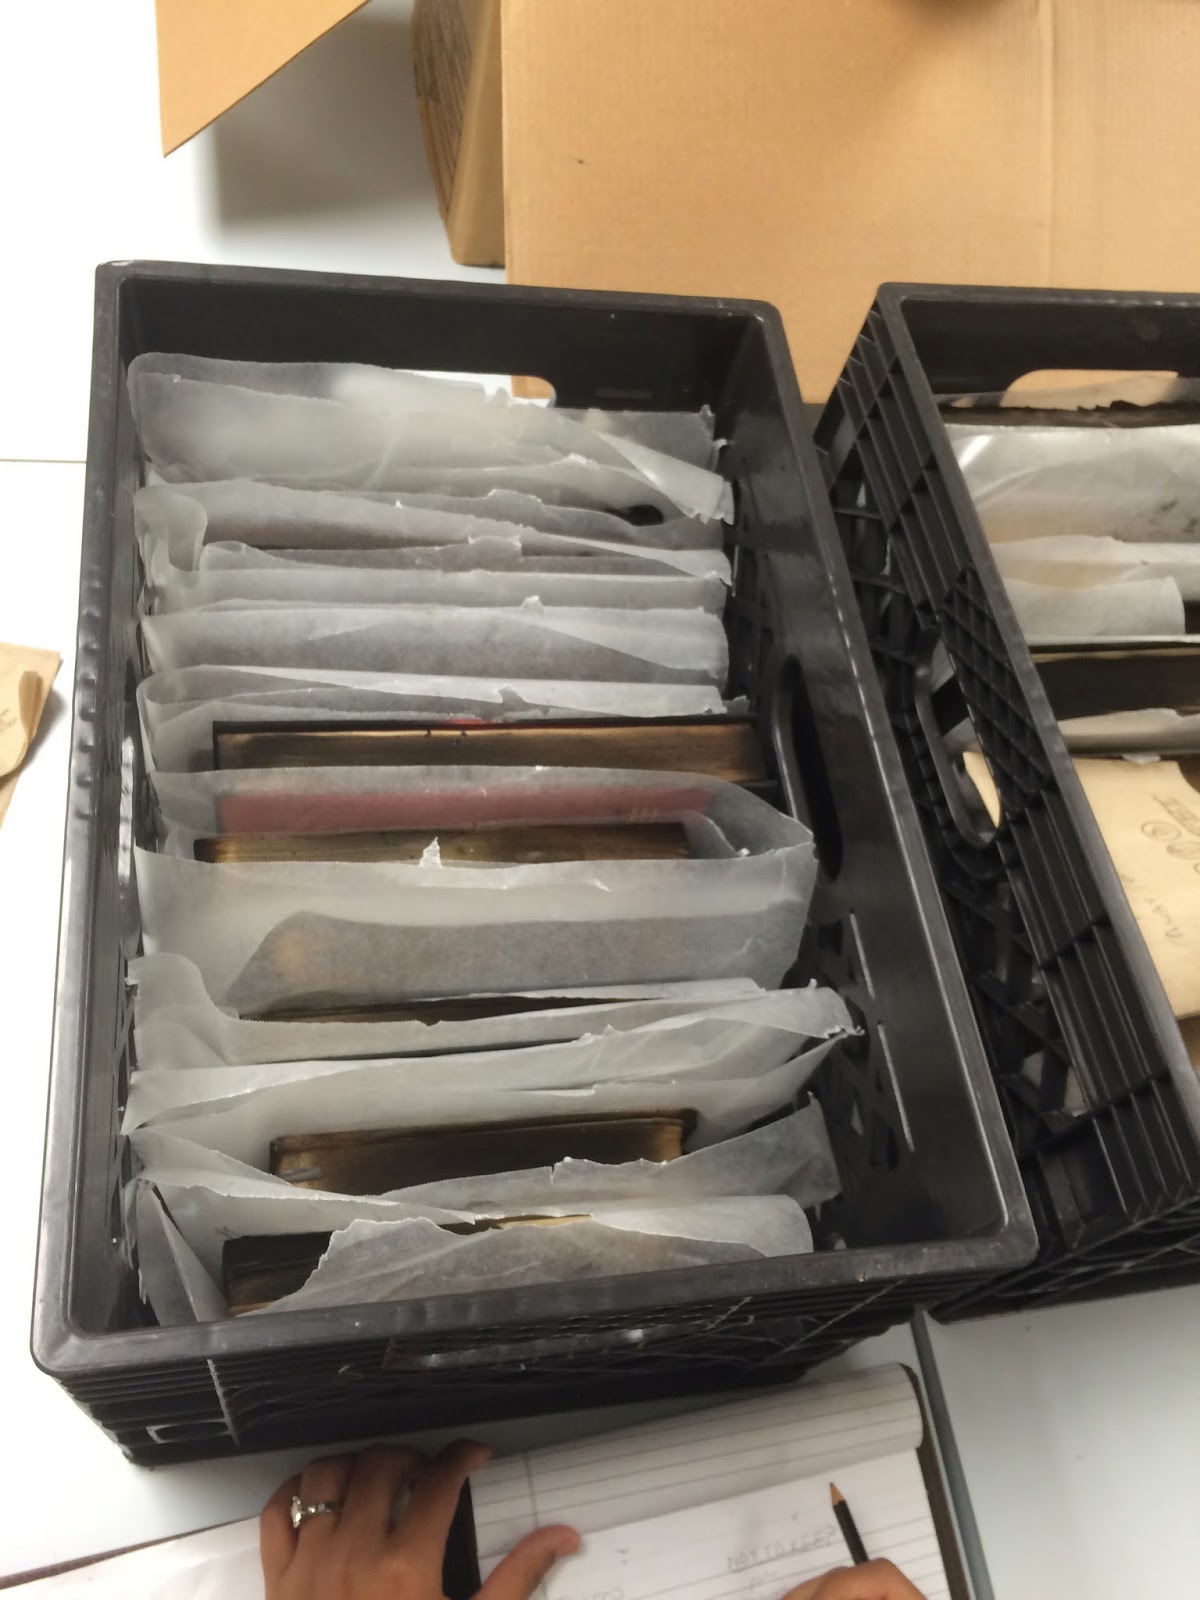
A full crate of books back at the lab.

During the pack-out process, we discarded quite a few items. These items were appraised on the spot for the extent of damage they incurred, and their value as part of our “collections.” For example, we discarded any items that were burned beyond recognition. We also discarded several damaged items that duplicated other materials.

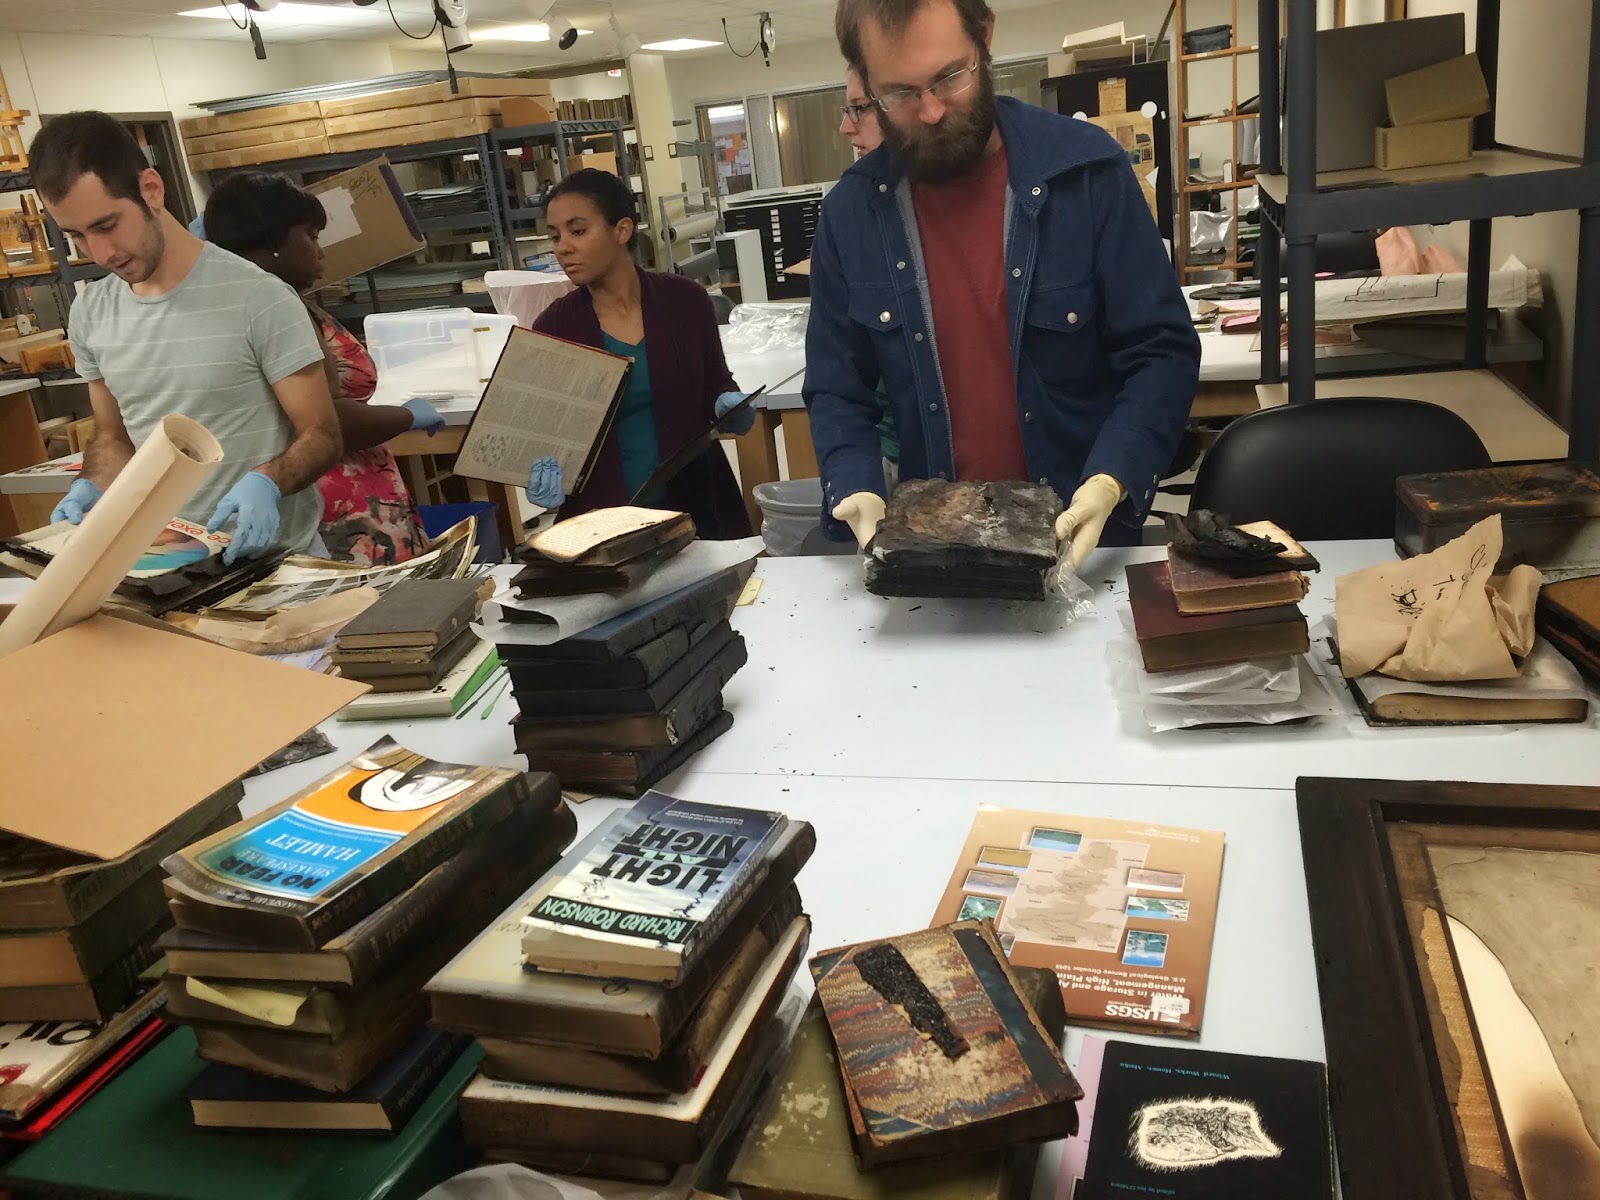
After the materials made it back to the lab, we began another round of assessment that included triage and prioritizing the items to be cleaned and/or repaired. One thing we noticed was that none of the materials showed signs of mold growth, even up to a week after being back at the lab. This is not to say that mold growth was not possible. Taking advantage of the opportunity to retrieve the items only a day after the disaster helped, though.

During the assessment process at the lab, we divided the items into the following groups:
  • Okay as is
  • Dry -- needs deodorizing
  • Dry -- needs cleaning and deodorizing
  • Wet -- needs drying and cleaning
  • Wet -- needs drying, cleaning, and rebinding
  • Discard (Not salvageable)

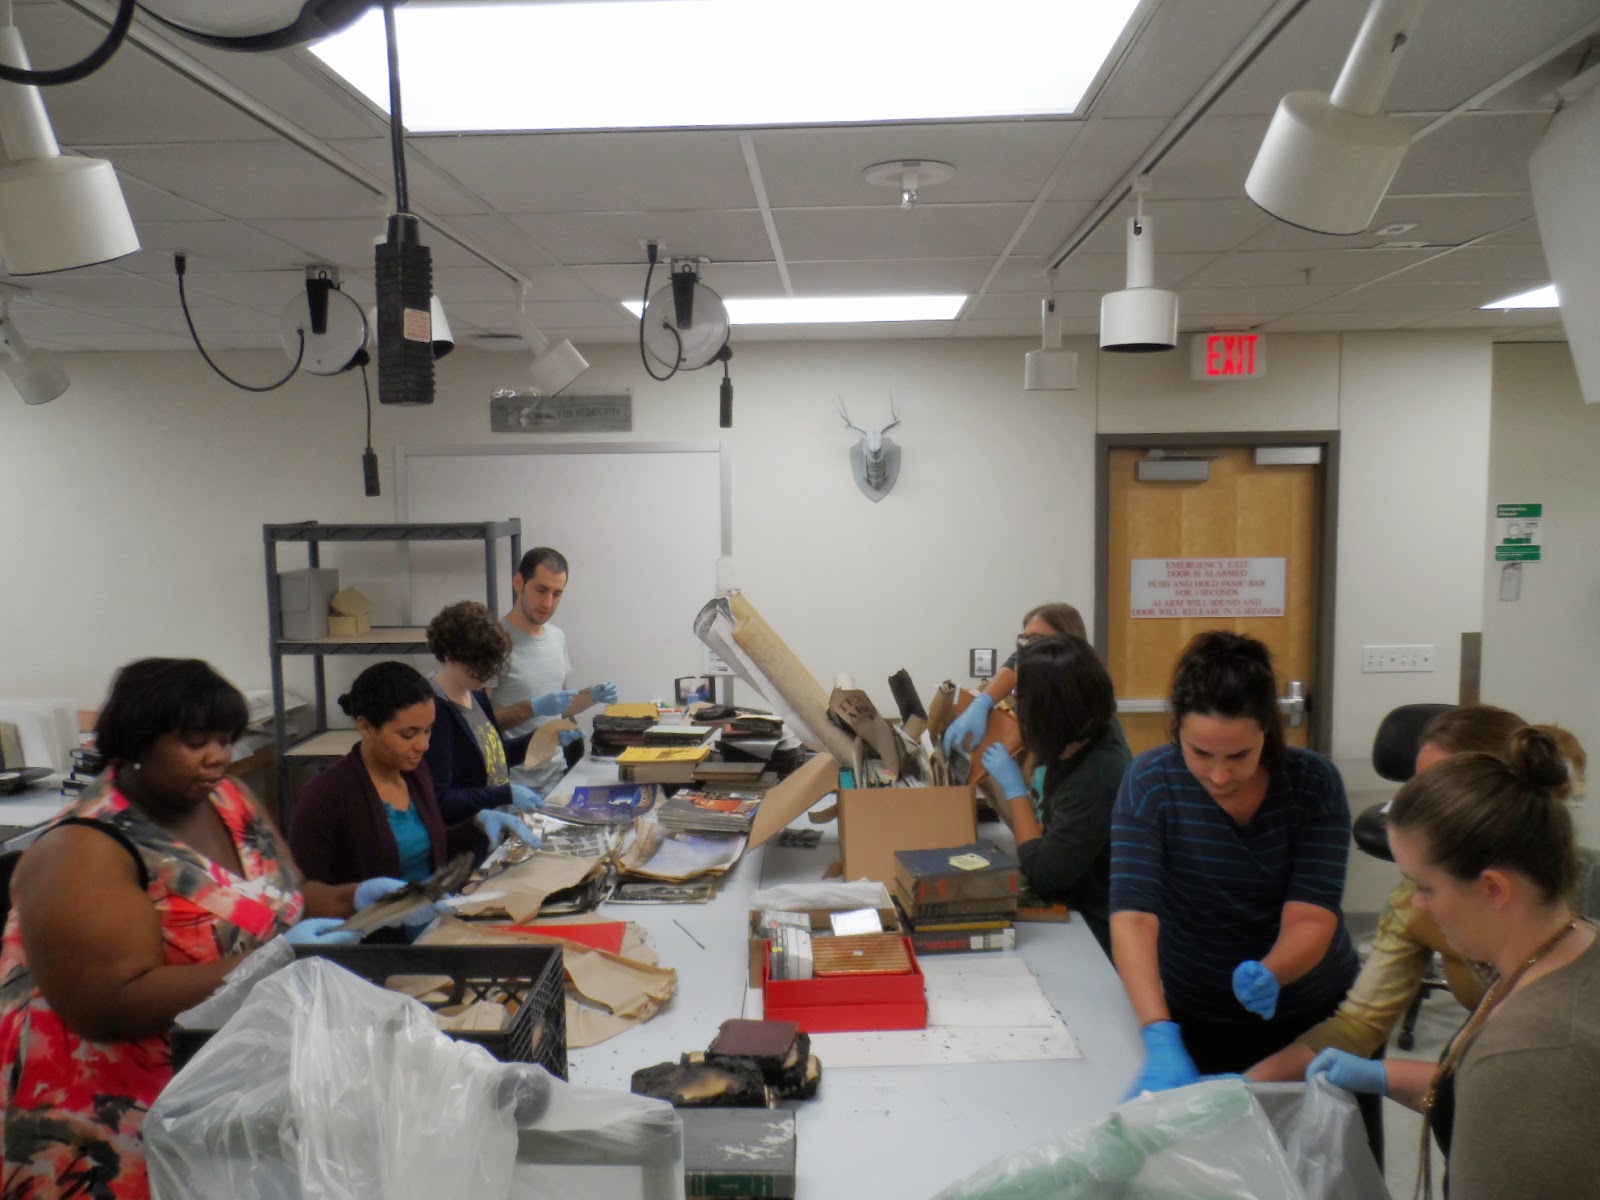
Our class dividing up the items into batches based on type and severity of damage.

Salvage isa messy business. The table was much dirtier by the time we were done. Wear gloves!

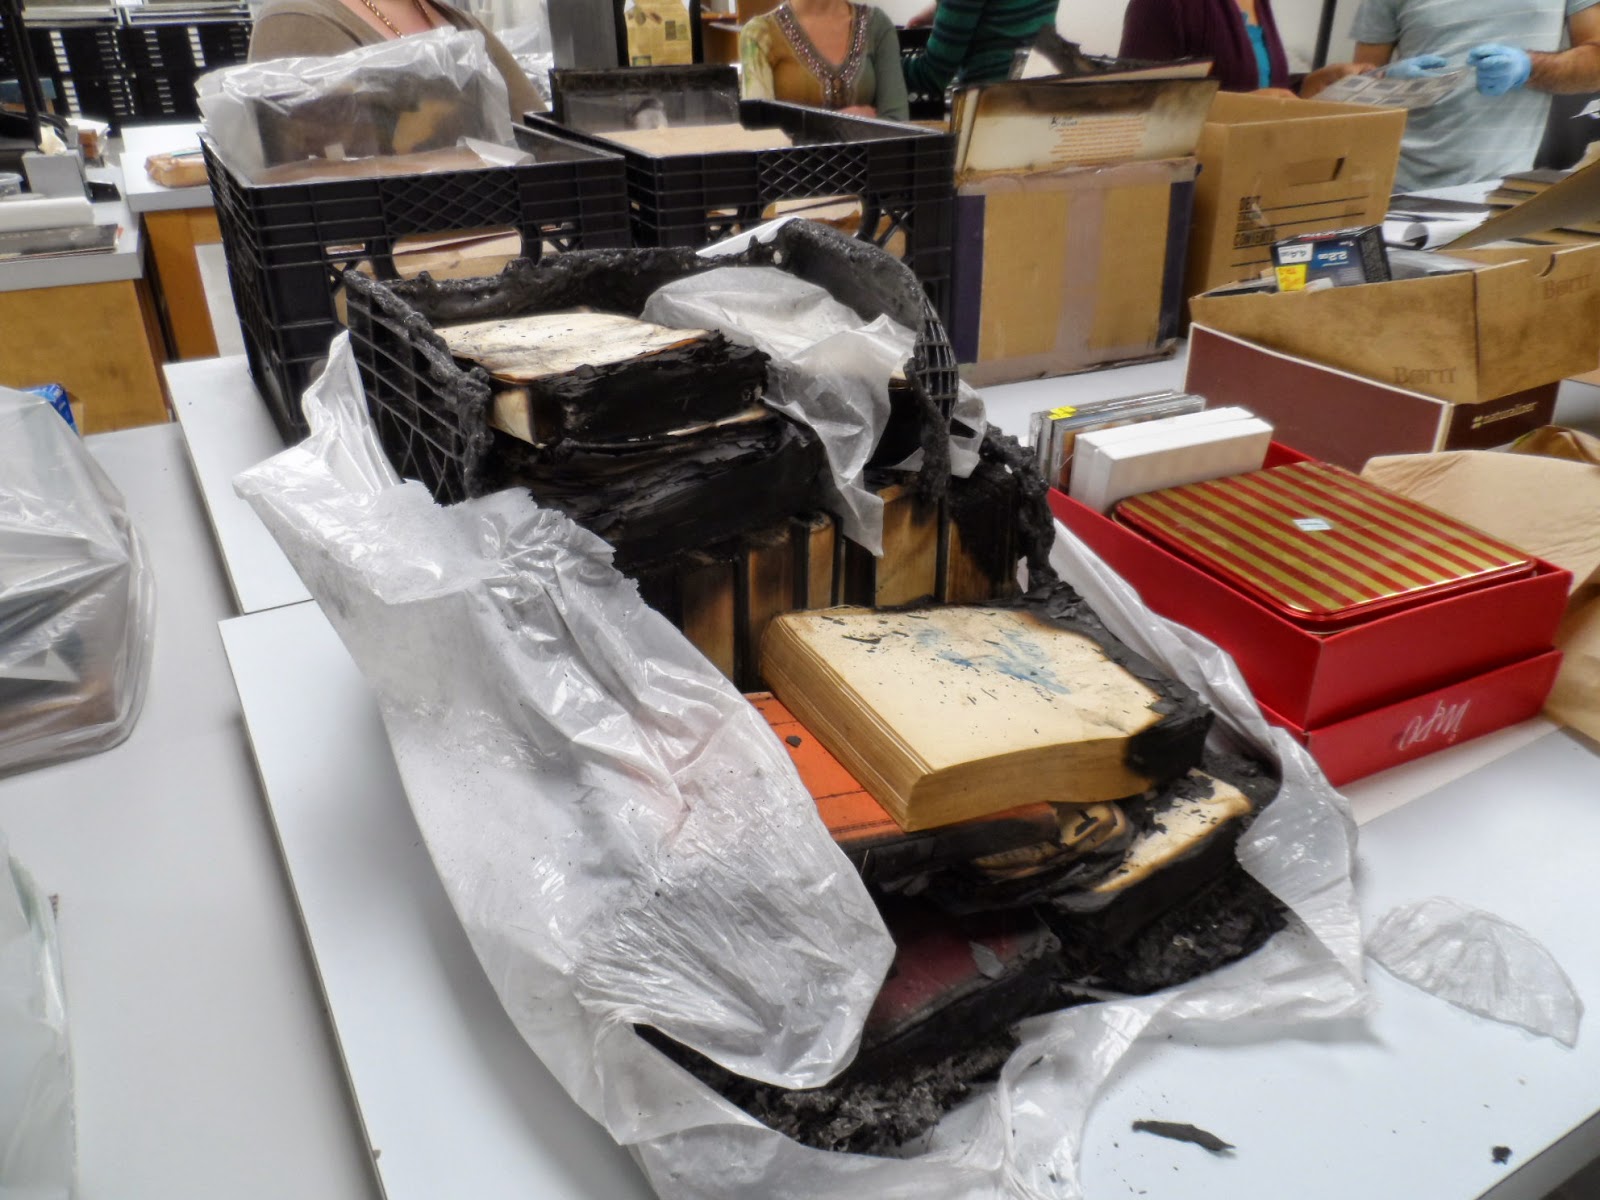
The crate that was near the fire corner. Maybe some of those books can be salvaged after all!

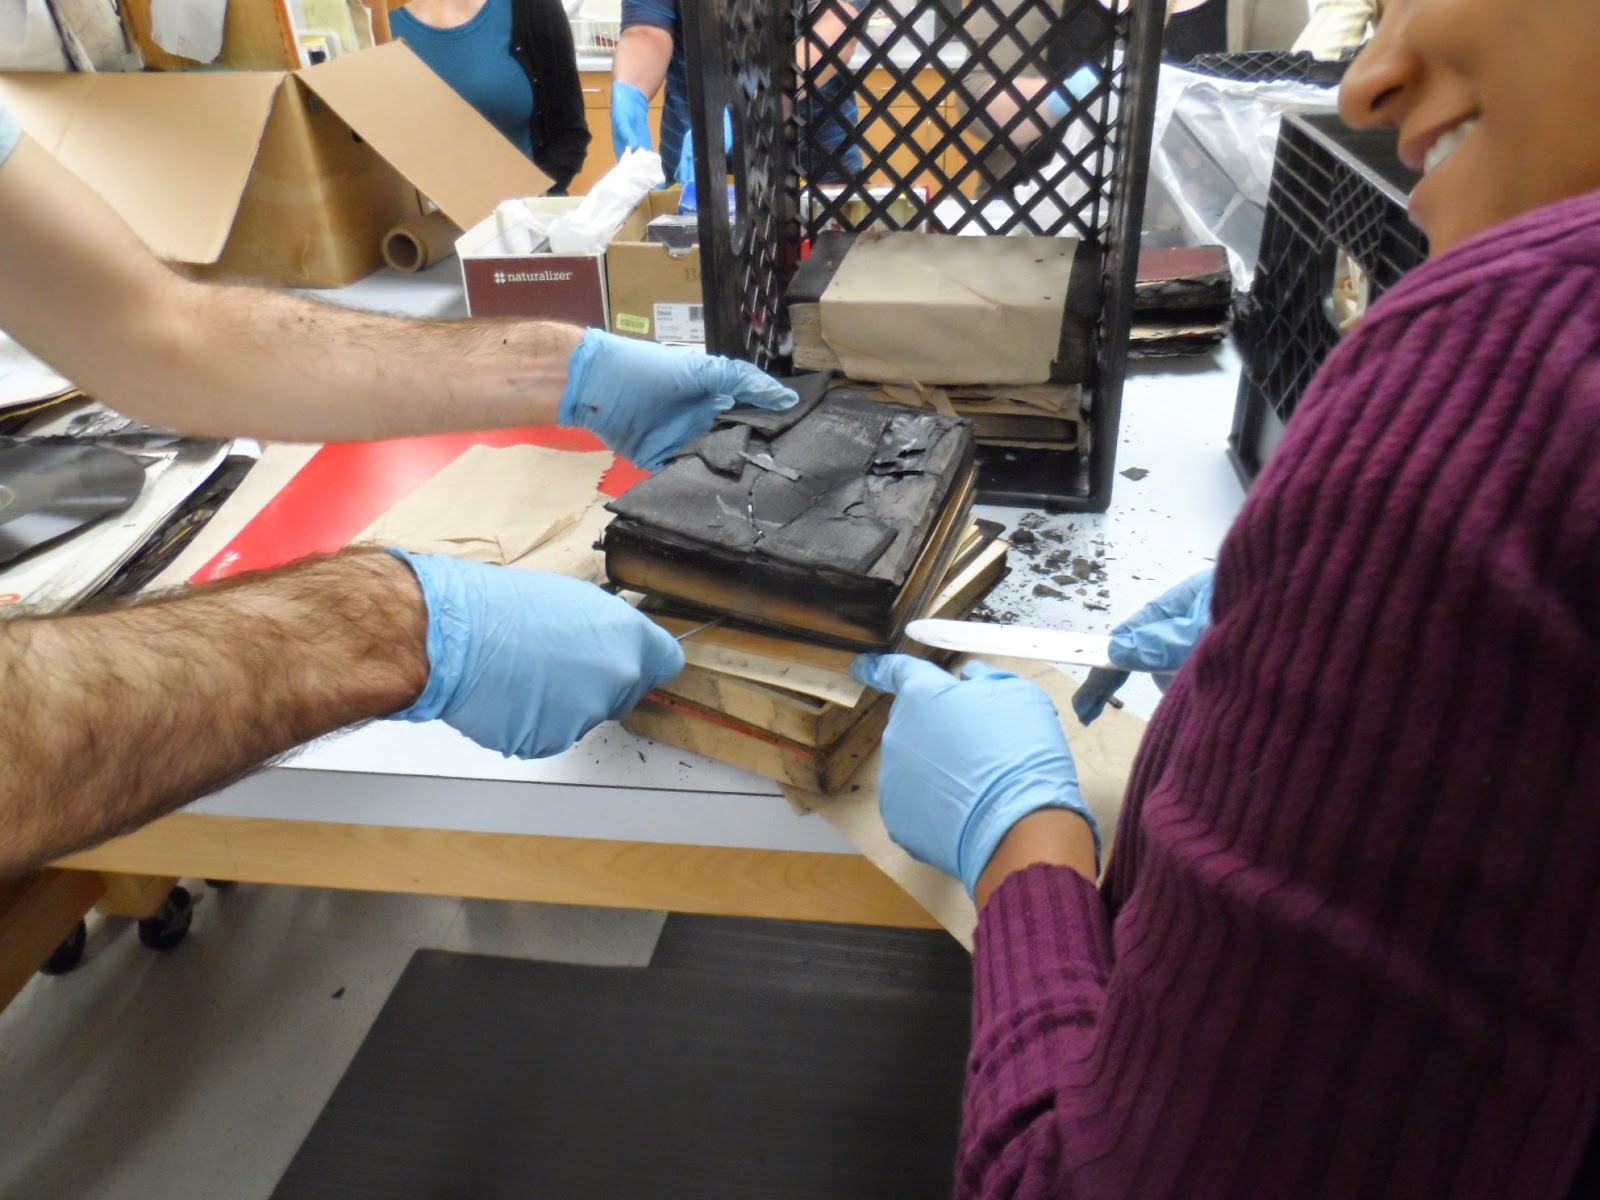
Gently separating books stuck together after the fire.

After the items were divided into these groups, the class began cleaning, drying, and repairing items from the “collections.” These techniques, however, will be described more fully in blog posts coming soon.

The points that we, as a class, took away from the salvage and transport exercise were:

  • Create a salvage plan before the disaster occurs. However, if you don’t have a plan in place already, take a few minutes to create a plan of action on the spot (or during that night in the hotel room while you wait to go back to the scene). An ounce of prevention really is worth a pound of cure.
  • Perform an initial assessment during pack-out, especially if the materials are going to be transported to another location.
  • Label containers as you pack them out. It will save a lot of time during the recovery process later.
  • Don't wait too long to respond. We luckily did not see any mold growth as a result of the water used to extinguish the fire. However, if we had waited several more days to begin removing items, we might have seen some mold.
  • When packing out books, or other items that will be frozen, wrap each item in waxed paper. This will prevent the items sticking together as the water they hold freezes.
  • Items that were inside closed containers and closed drawers fared the best (other than those minimally affected items that were far away from the fire, of course). Close your desk drawers!
  • Books on the shelf protected each other. The edges and the spines were damaged because they were exposed. However, most of the cover surface area, and the text areas of the pages, were not damaged.
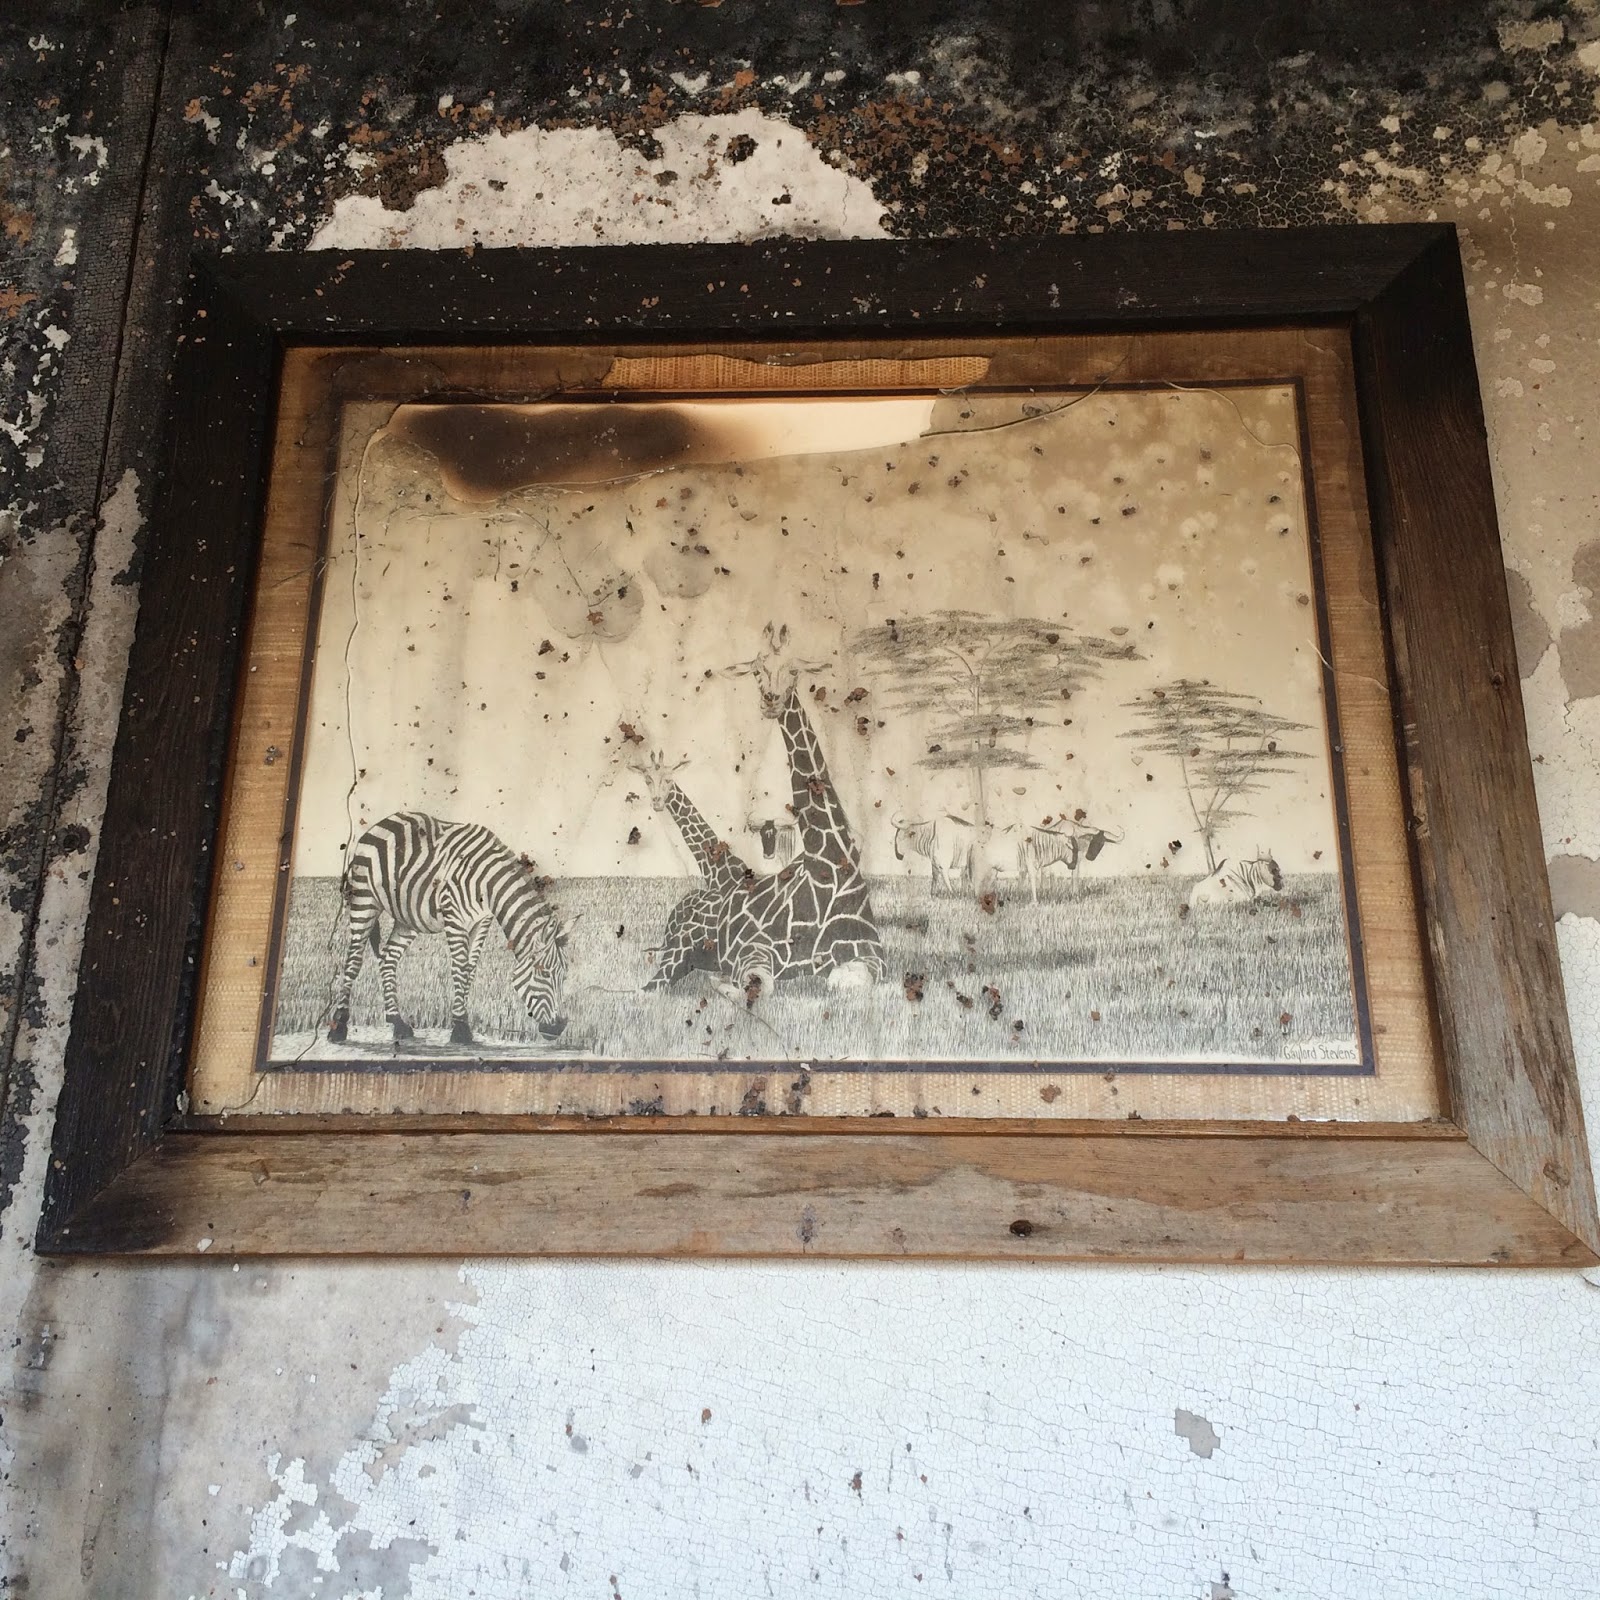
  • Be careful where you step. Large pieces of glass in our framed picture broke because of the heat in the room and fell to the ground.