Saturday, November 22, 2014

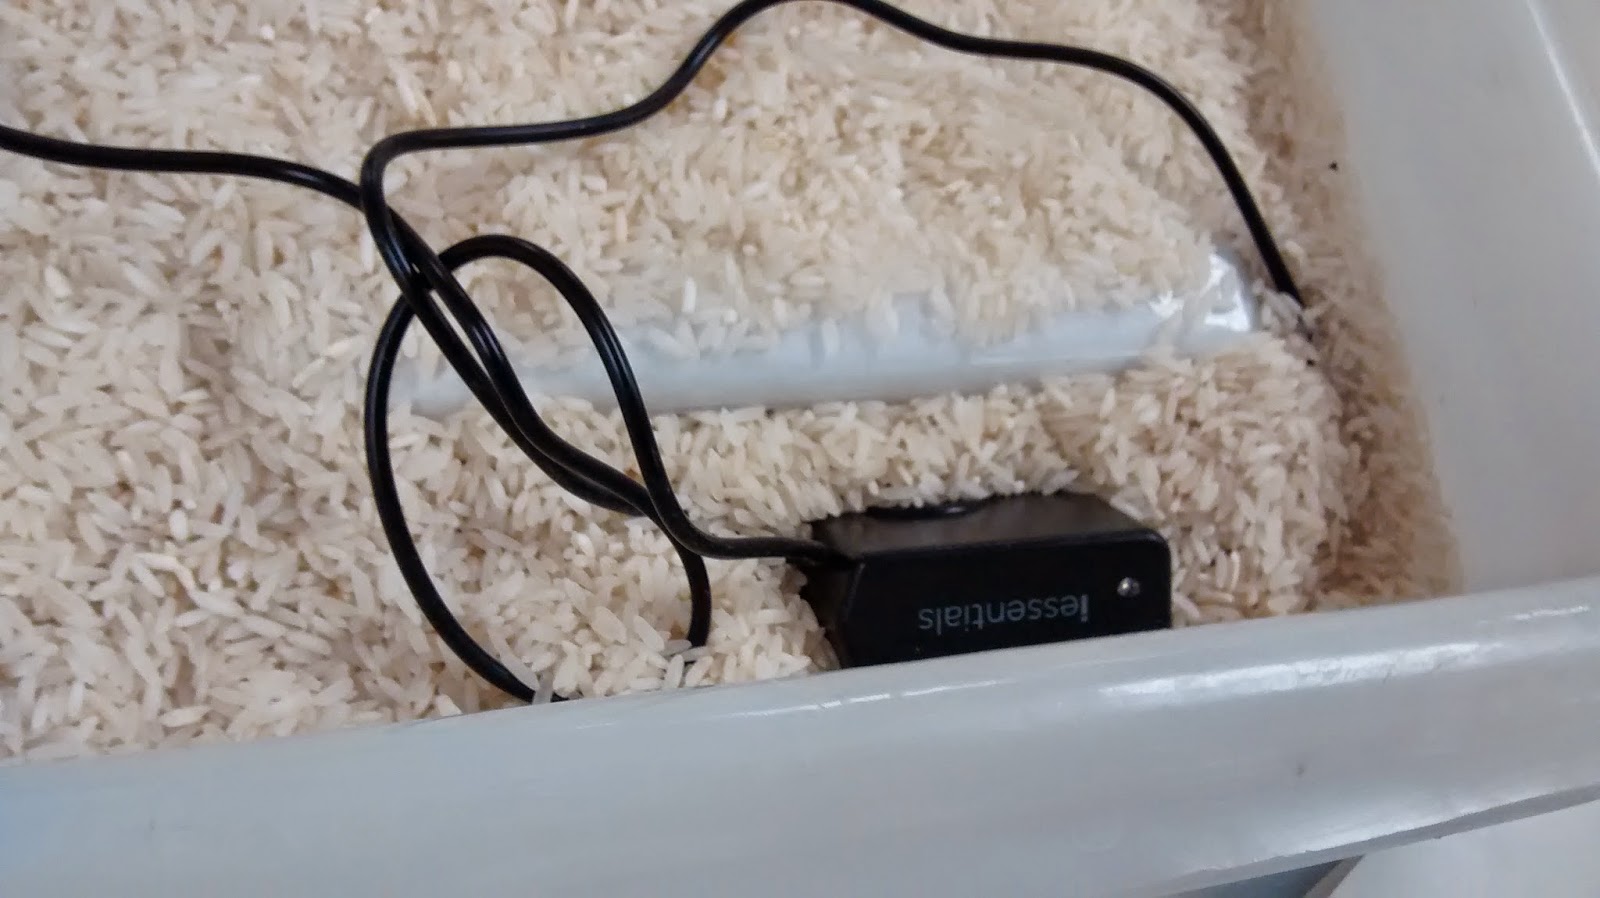
Flood Recovery of Phone Charger

Have you ever dropped a phone charger in a pool? In bathwater? A sink? Or even a lake?

Sometimes we have phone charger accidents and think immediately, "I need a to buy a new one." This is not necessarily true. At times, you can try some methods to save these common day-to-day electronic devices.

1. The first thing you will need to do is remove your phone charger from the water.

2. After removing the phone charger from water, thoroughly dry the item.


3. Next, locate an empty plastic container that you can use for a few days.

4. In this empty plastic container, place your dried phone charger inside.

5. Then place uncooked white rice on top of the phone charger.


6. Make sure your phone charger is buried in the uncooked white rice and not on top of the rice.


7. Keep the phone charged and uncooked rice in a plastic container for several days (3-10 days or even more depending on the amount of water damage and if the charger has dried).

8. After phone charger has completely dried, try plugging item in a socket and check if it can hold a charge to your phone.


I experimented with phone chargers placed in either lake water and clean water. Both items were placed in their respective water for approximately 7 days, dried, and then placed in a container filled with uncooked rice. The clean water phone charger works!


However, the phone charged placed in lake water was no longer usable and was eventually discarded to a trash receptacle.


Friday, November 21, 2014

Packing Out After the Fire

The day after the fire took place, we returned to the fire training facility to retrieve salvageable materials from the fire disaster. According to Lt. Elmore, our arson specialist and fire supervisor, it is common for the victims of a disaster to stay away from the scene overnight. Our first instinct is to rush back in as soon as the flames are extinguished, but the firefighters don’t let people back in that quickly. Not only is it dangerous, there is also a certain level of shock that we need time to process. He told us that they recommend all victims of a fire go home for a night, or if their home is the scene of the disaster, to go to a hotel or friend’s house for at least one night. He told us that it typically takes 24-48 hours for people to mentally process the severity of the event and begin planning for recovery.

The first step we took was to discuss a plan. We needed to minimize the time spent on pack-out, while not further damaging any salvageable materials. We wanted to remove the materials worth saving and transport them back to the lab as quickly as possible. Time is certainly of the essence, as the materials had now suffered fire, smoke, and water damage. However, taking a few minutes to come up with a planned and coordinated effort was sure to produce the best results. The best scenario would have been if we already had had a response plan in place. Coming up with a response plan in advance, that clearly designates tasks and responsibilities, is the surest way to respond effectively and efficiently to a disaster.

Three people arrived for pack-out, so we divided up the small room amongst us. One person was assigned the desk, another person focused on the materials on the floor around and under the desk, and the third person removed the items that were situated on the opposite side of the room from where the fire started.

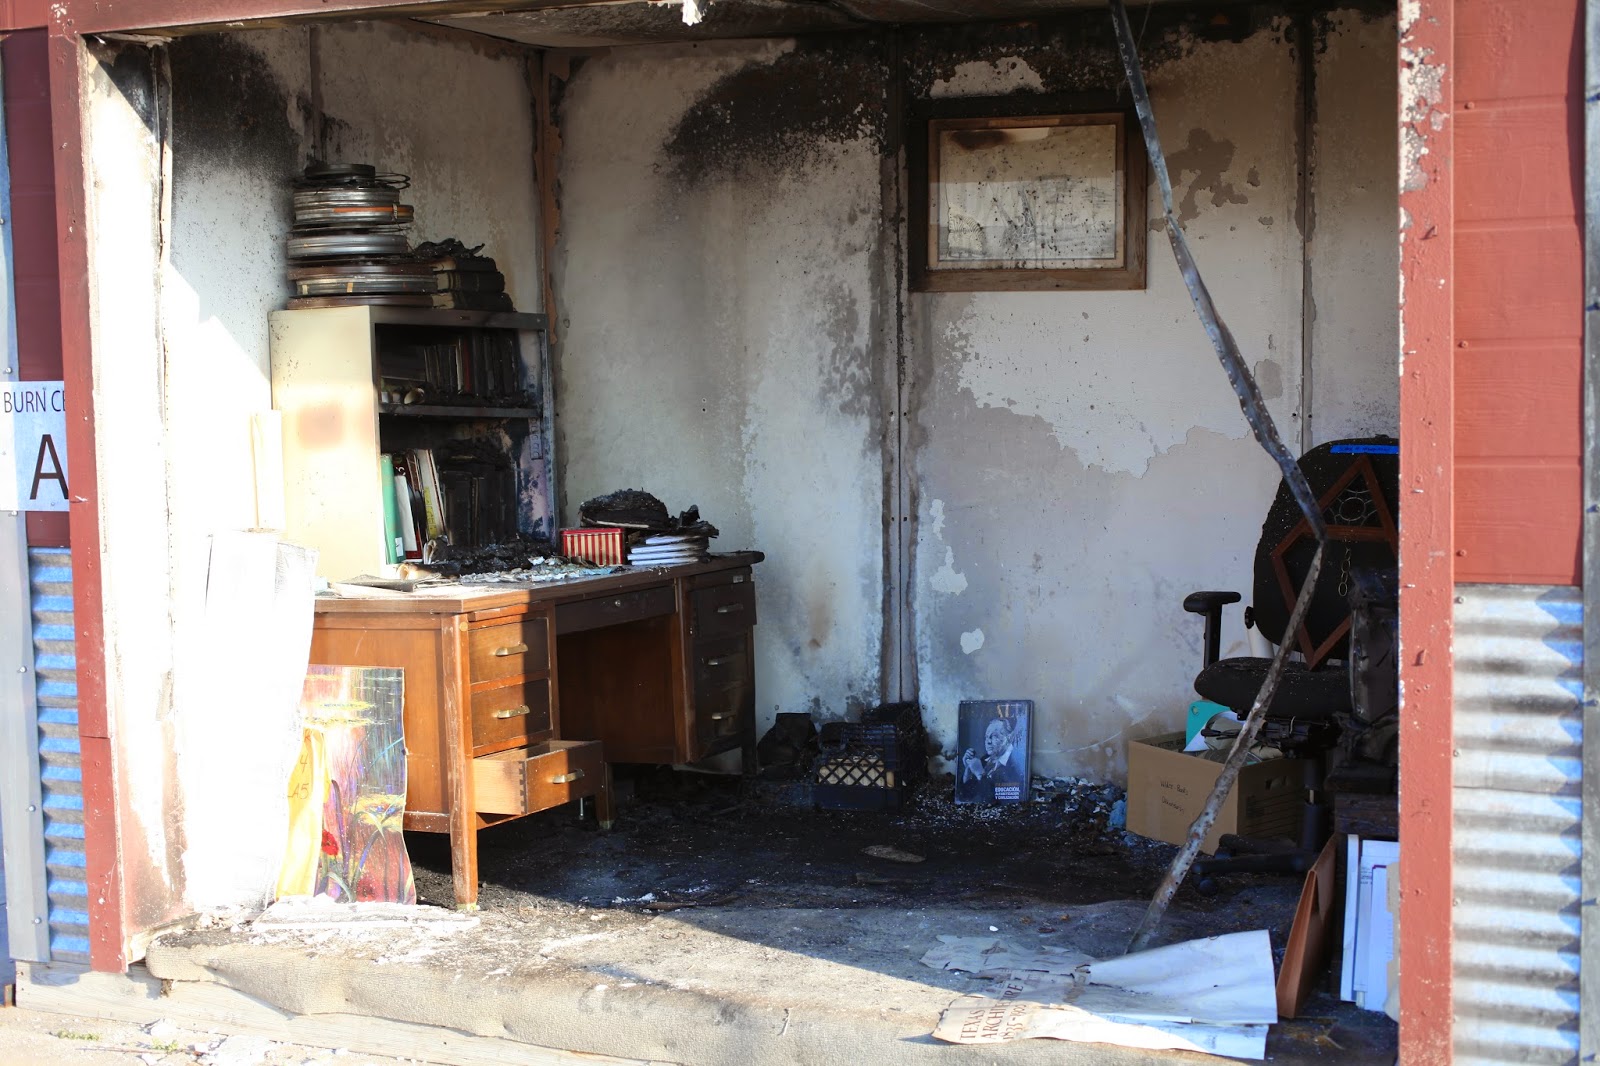
The picture below shows the room as we found it on the second morning. The side of the room at the right side of the picture below was farthest away from the fire. As the picture shows, the fire did not damage the materials on the floor at the right side of the room. They were jostled around a bit, and did suffer some smoke damage, but only to the extent of inheriting a smoky smell (we’ll talk more about removing that smell in another post).


The room on the morning of the second day, before recovery of salvageable items.

The picture also shows the state of the materials leaning up against the desk, opposite the corner of the room in which the fire started. These materials suffered water and smoke damage, but the fire did not spread to the side of the desk closest to the room’s open wall. To get a visual idea of how large the fire grew, see the picture of Lt. Elmore walking into the room with his hose a-sprayin’ in our last post.

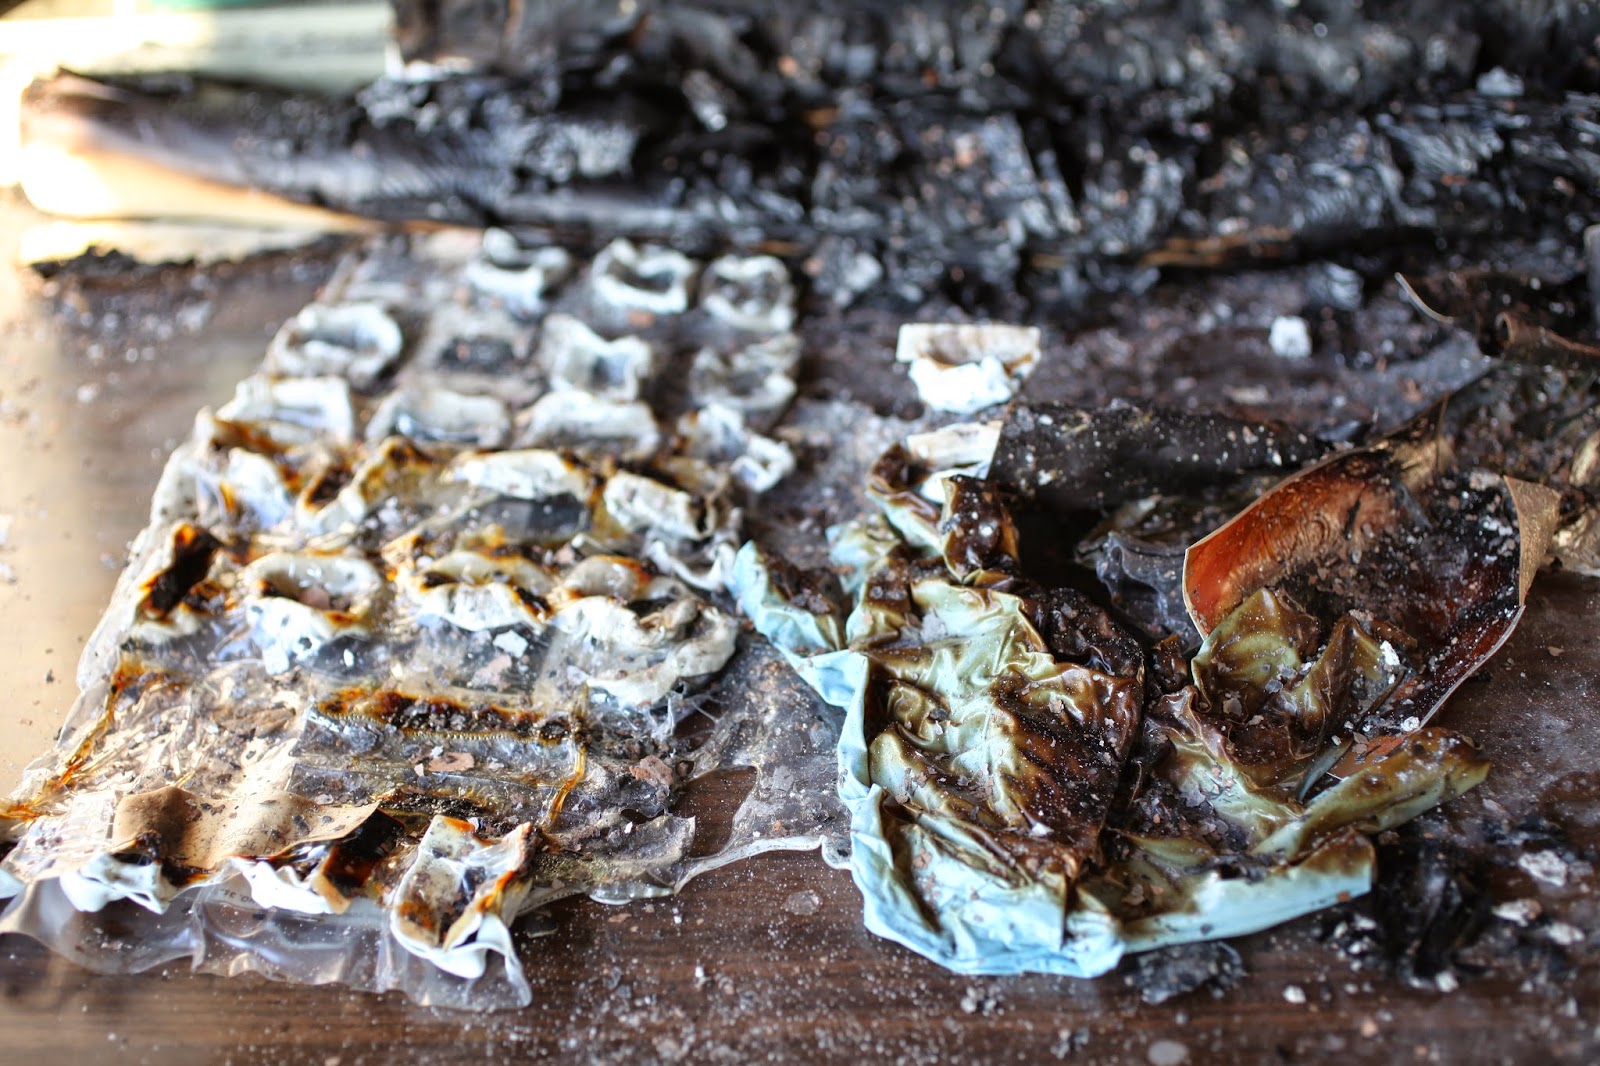
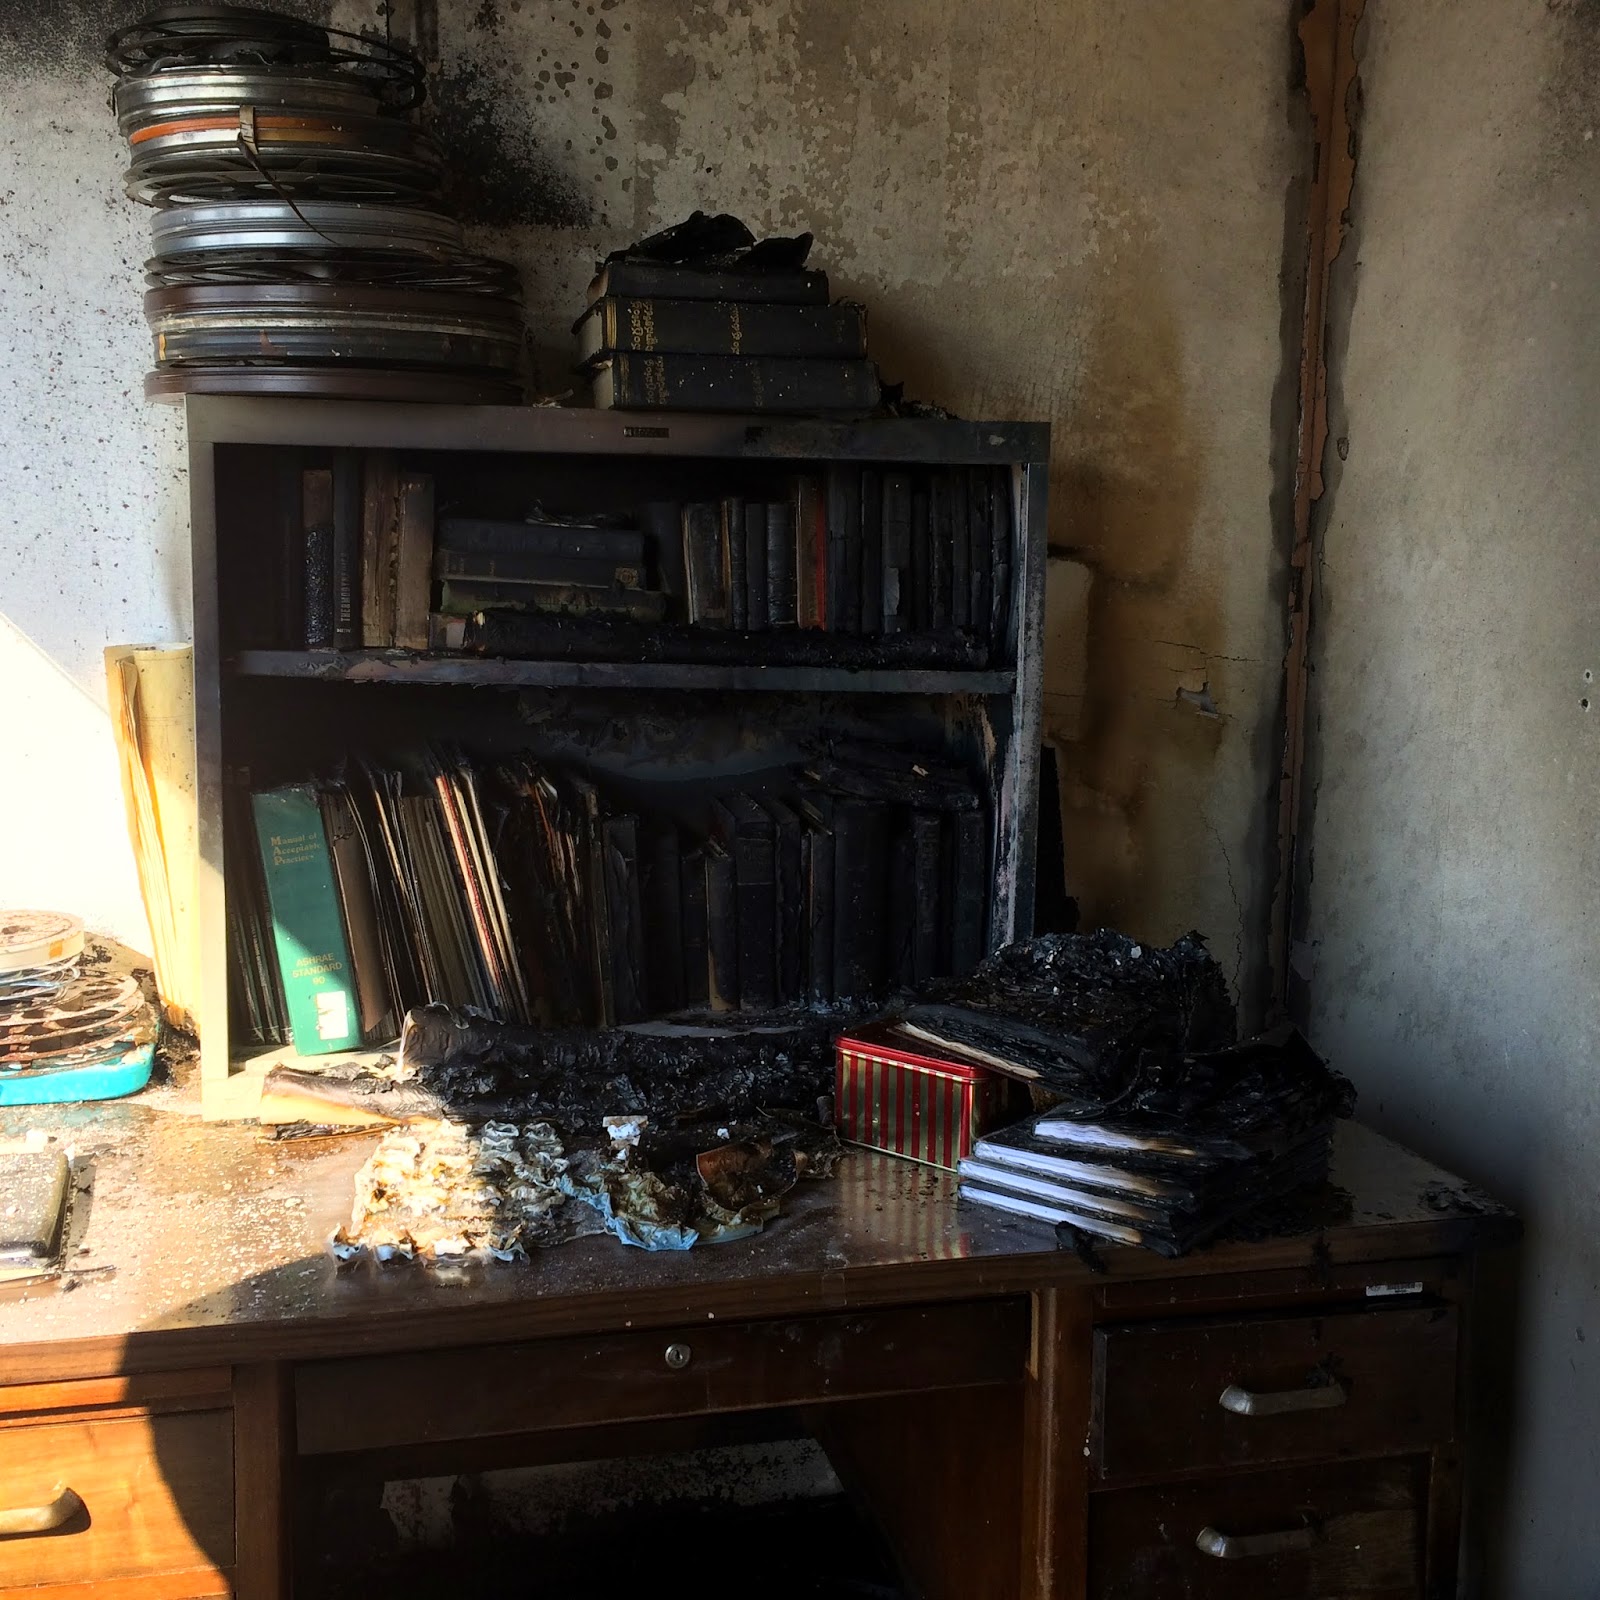
The materials on and under the desk were damaged the most. The level of severity varied, however, depending on the type of material and the location on or around the desk. For instance, the paper materials, photographic prints, and a sheet of slides were completely ruined, but some of the books at the left end of the bookshelf experienced minimal damage.

A plastic sheet filled with photographic slides.

The bookshelf on the desk after the fire.

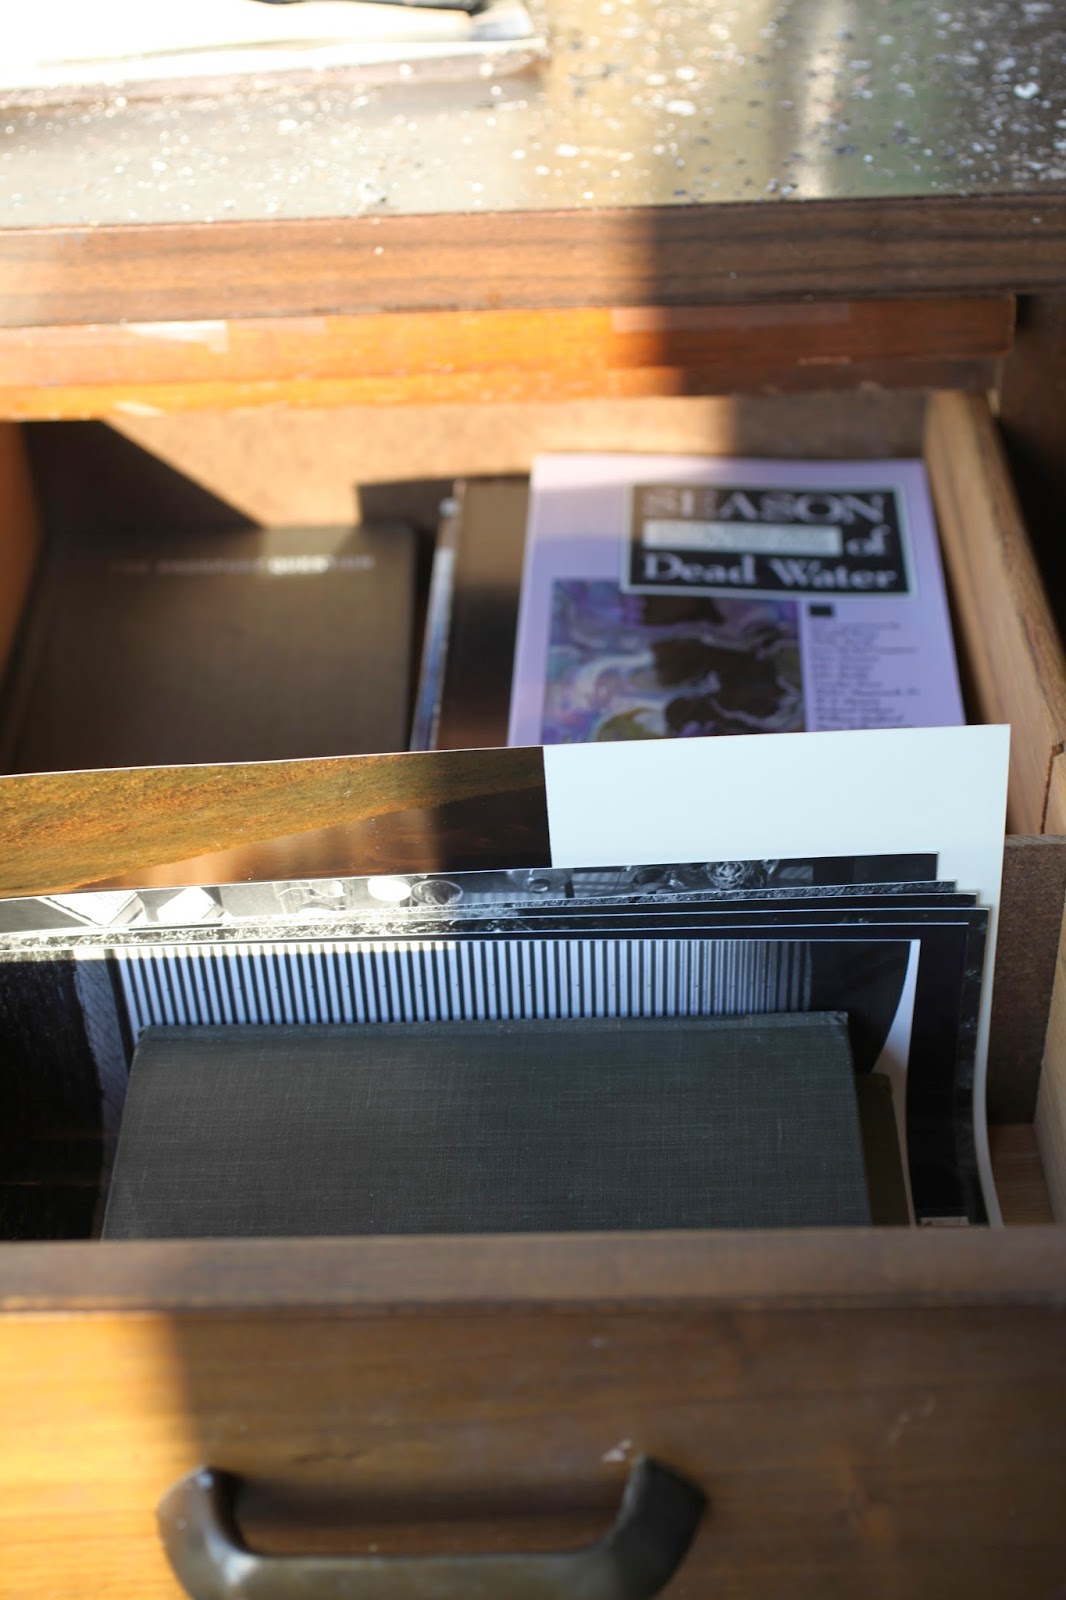
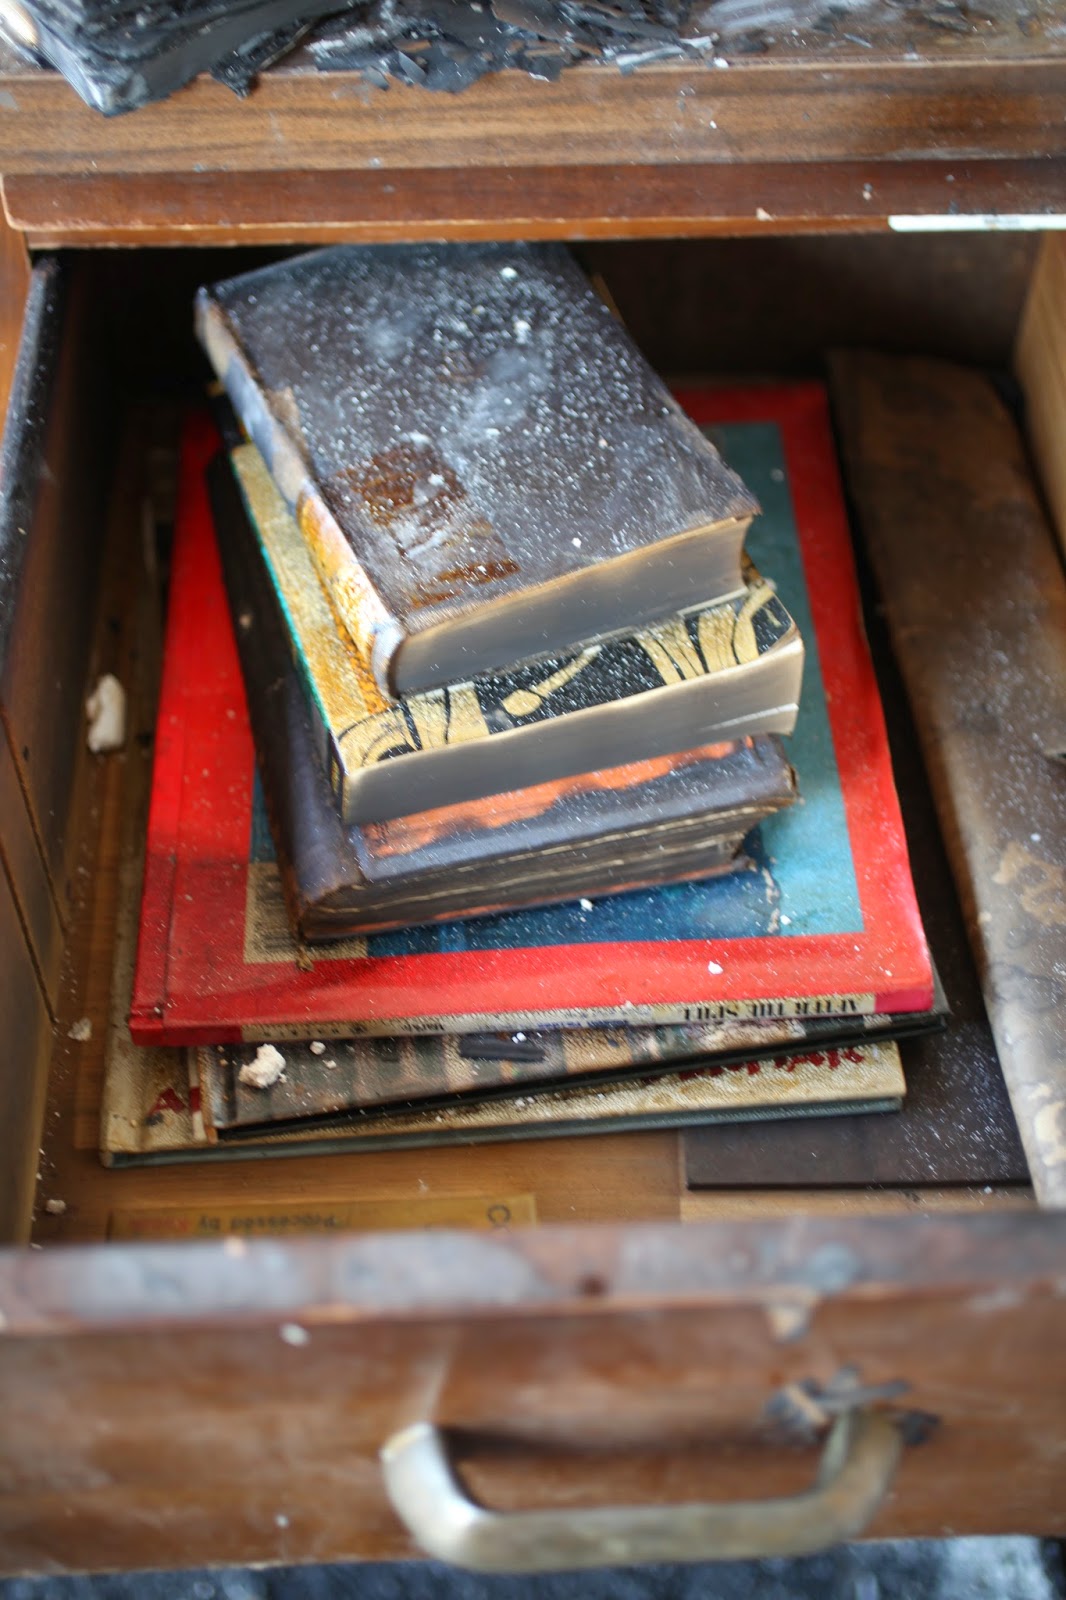
It was evident during pack-out that materials protected each other from the fire. The books were damaged on the spines and textblock edges that had been exposed, but the covers and the text areas of the pages were, for the most part, salvageable. We also found that the materials inside the desk drawers and small metal containers on top of the desk were surprisingly unaffected. One of the drawers showed some evidence of fire damage, but the other drawers showed no evidence that flames crept into the drawers.

Materials inside one of the right-hand drawers were barely affected.

Materials inside a second right-hand drawer suffered damage, but remained salvageable.

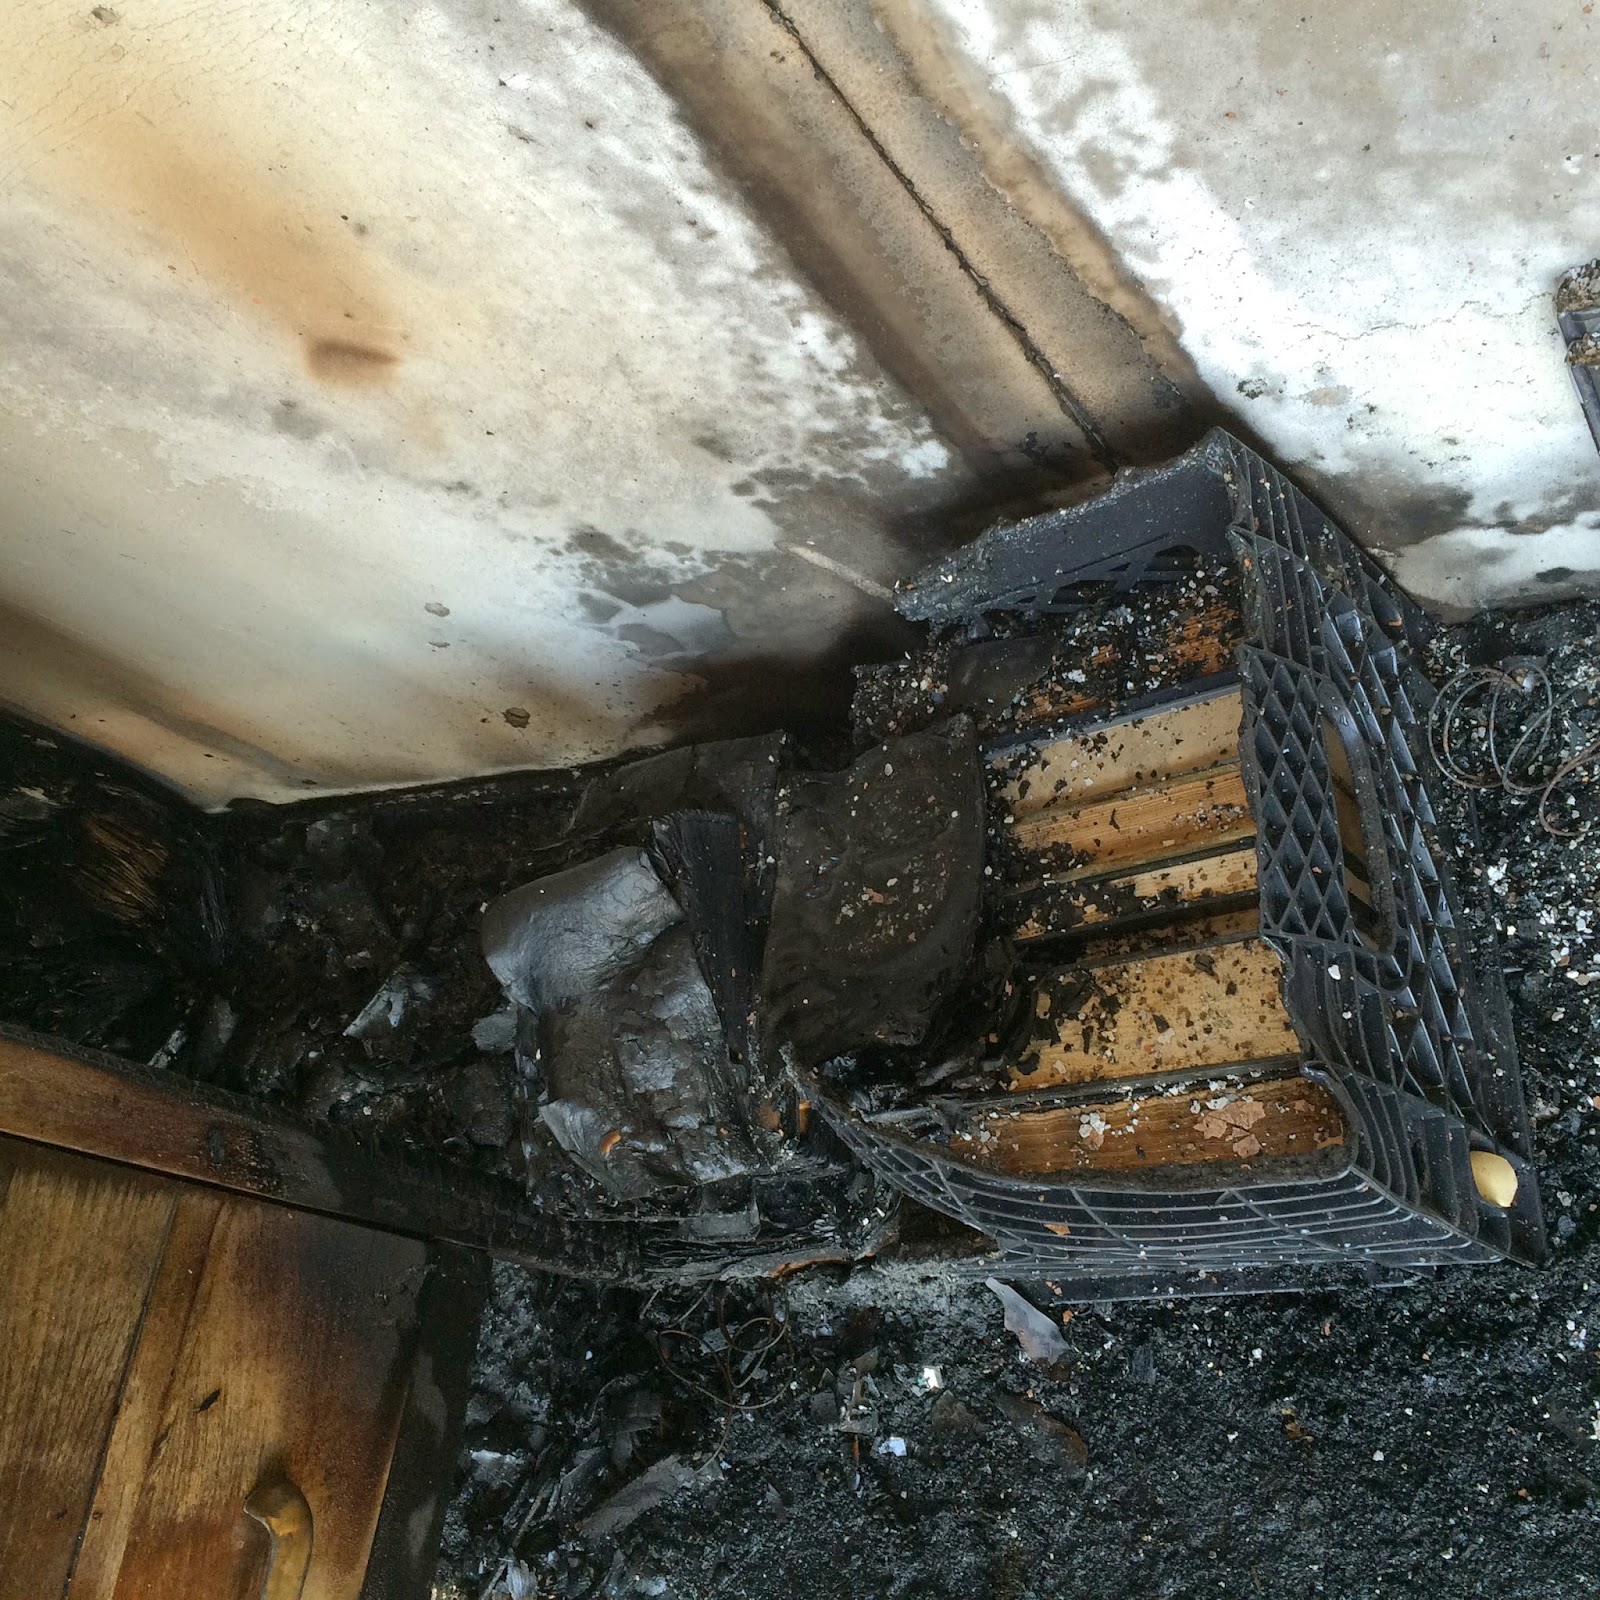
The corner of the room in which the fire started was by far the worst. No materials were salvageable from this corner. There was also a plastic crate near this corner with books inside. We decided to take the crate back to the Lab for inspection without removing any books, but we were not optimistic that many of its contents could be saved.

Nothing survived in the corner where the fire started.

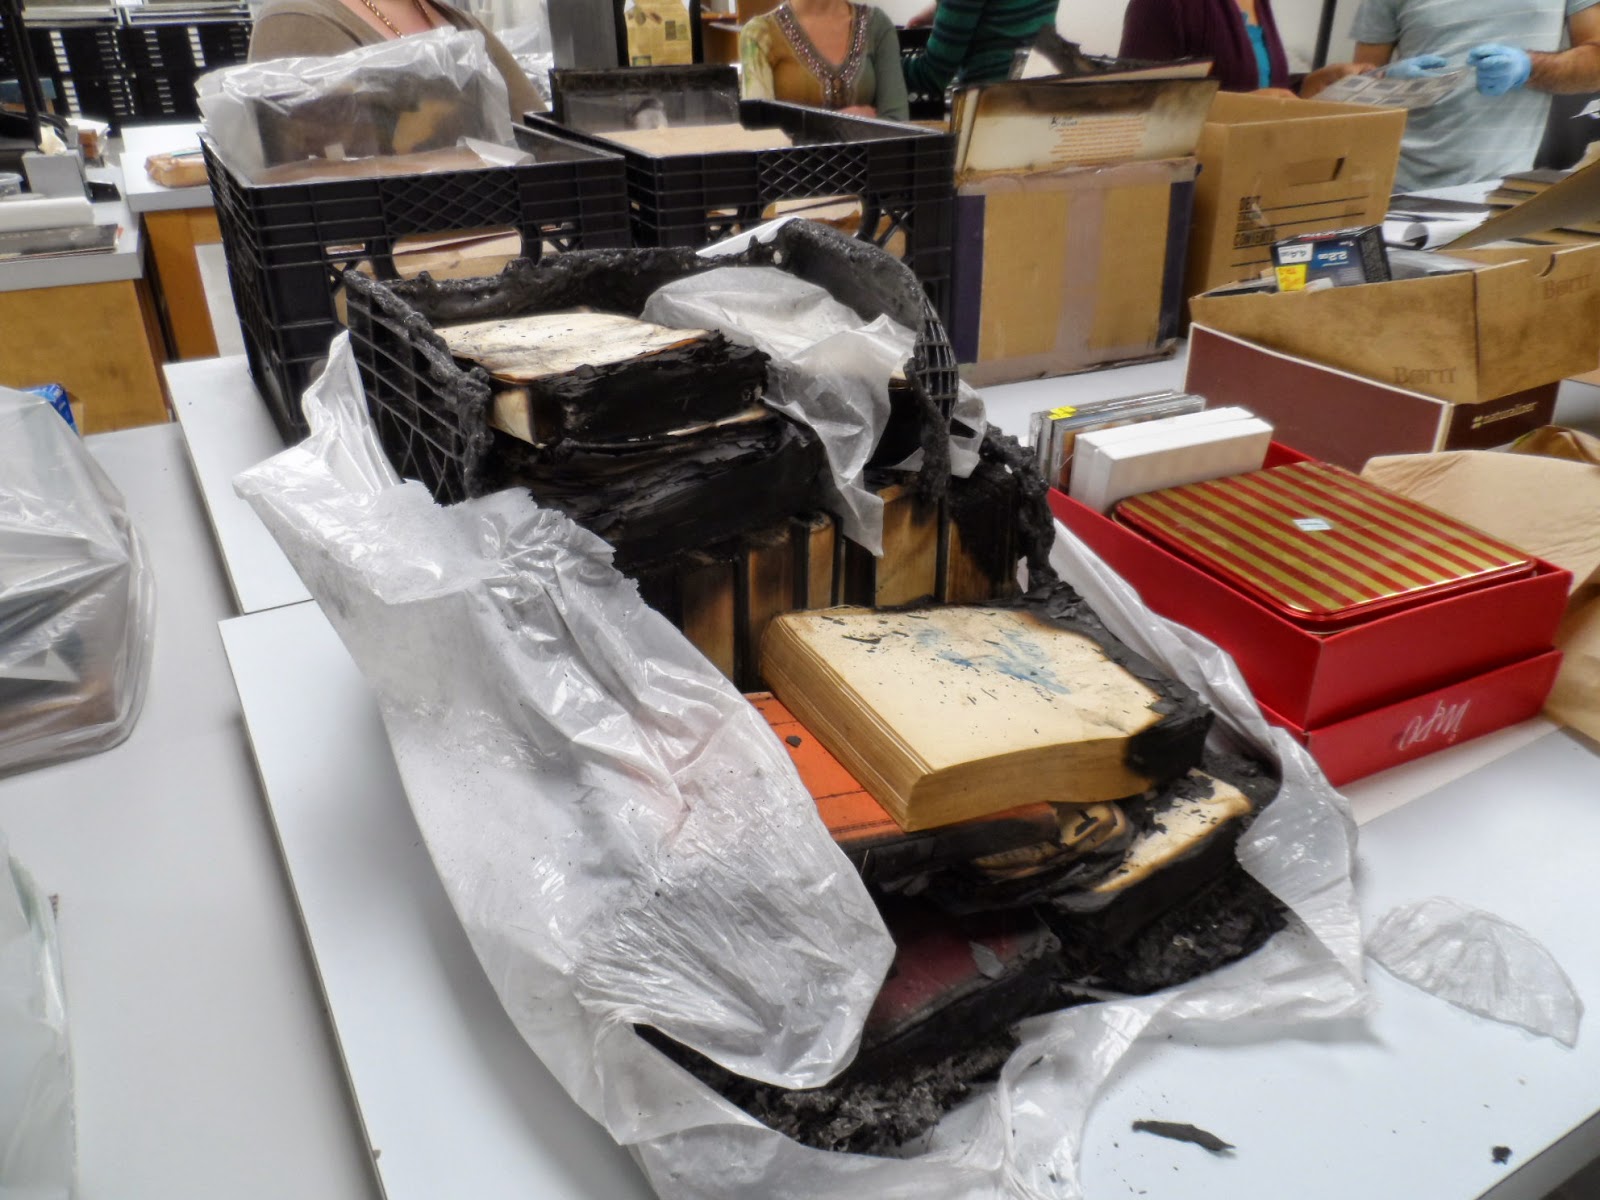
A plastic crate filled with books near the ignition corner was badly damaged.
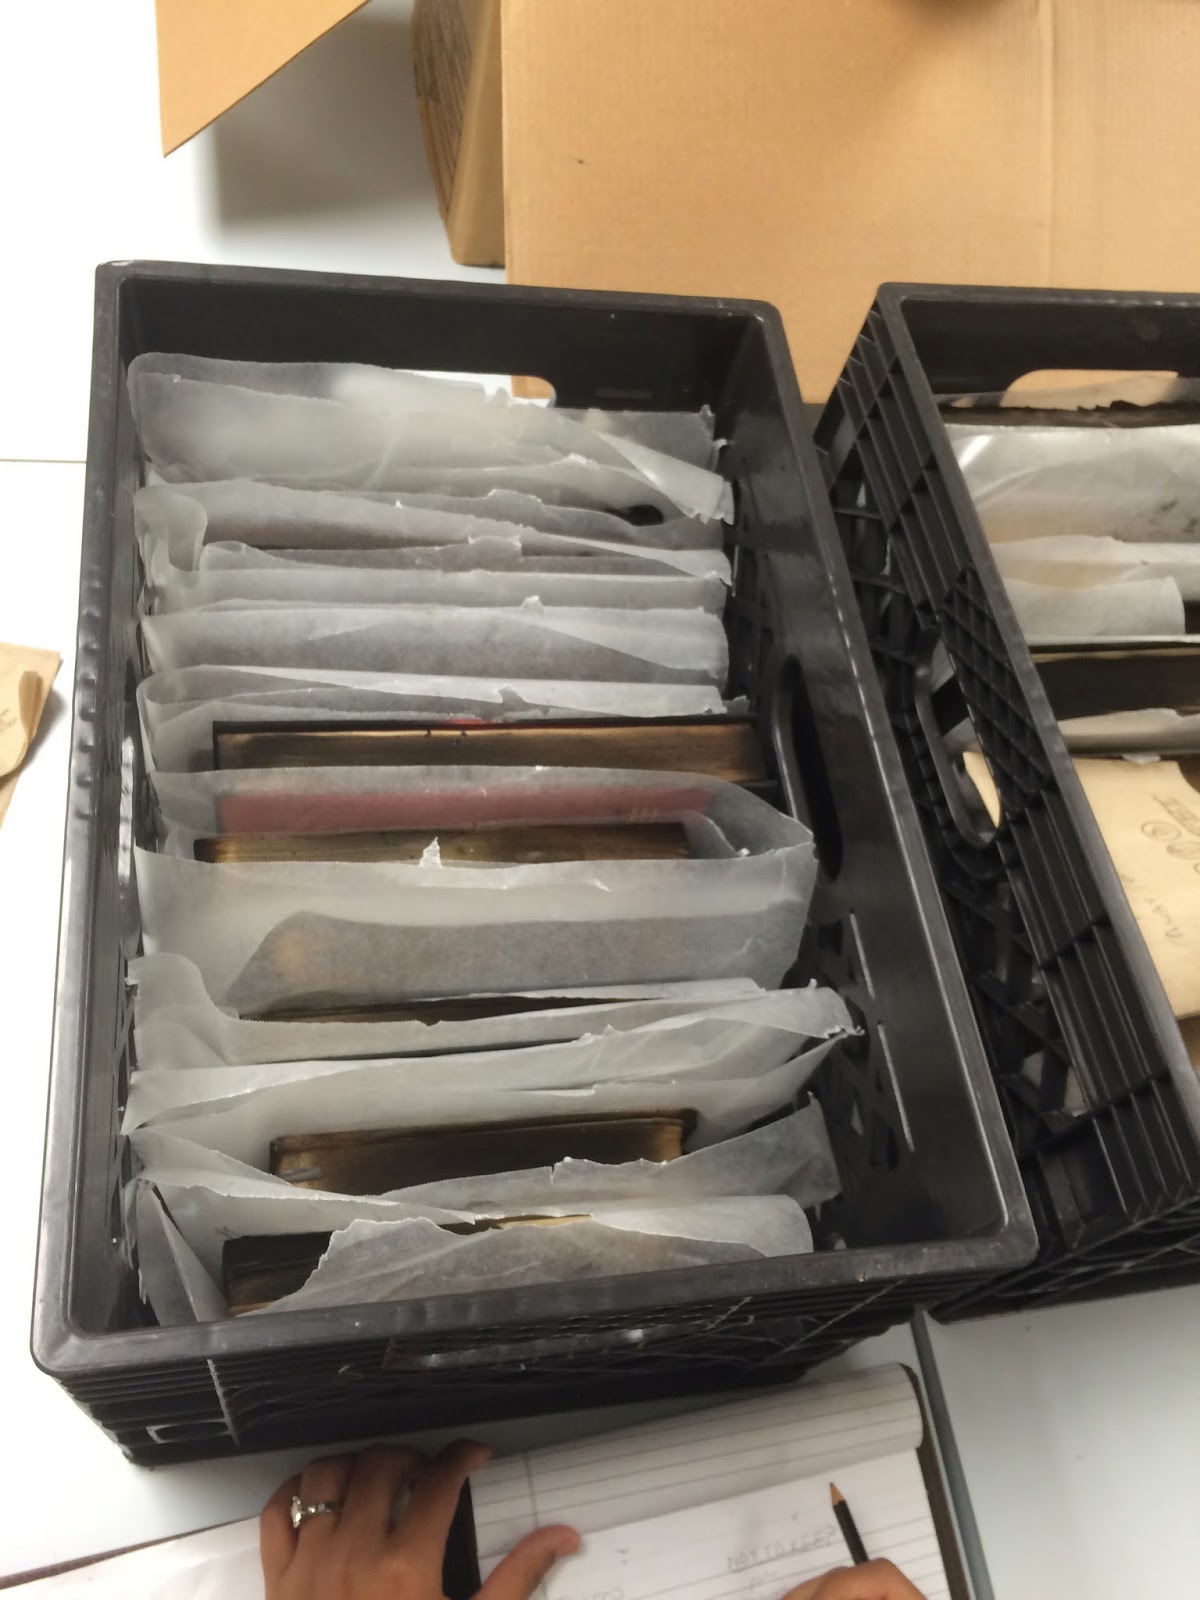
We carefully packed any materials on top of the desk, in the drawers, and on top of the shelving into crates and boxes for transport back to the lab. Once a space on the desktop was cleared, the books were packed into plastic crates. The books were very wet. They had experienced water damage because this area was hit hard with water from the firehose. Therefore, we packed the books by wrapping them in waxed paper. This was a precautionary measure, in case the books were placed in a freezer until further inspected. If the books were not wrapped in waxed paper, there was a good chance they would stick together, potentially causing further damage. When removing the books from the shelf, the books at the left side of each shelf were removed first. These were easiest to remove, as they suffered the least fire damage. The badly burned books were easier to remove safely after the book to its left was cleared away.

A book wrapped in waxed paper is set in a new crate that is being filled.

A full crate of books back at the lab.

During the pack-out process, we discarded quite a few items. These items were appraised on the spot for the extent of damage they incurred, and their value as part of our “collections.” For example, we discarded any items that were burned beyond recognition. We also discarded several damaged items that duplicated other materials.

After the materials made it back to the lab, we began another round of assessment that included triage and prioritizing the items to be cleaned and/or repaired. One thing we noticed was that none of the materials showed signs of mold growth, even up to a week after being back at the lab. This is not to say that mold growth was not possible. Taking advantage of the opportunity to retrieve the items only a day after the disaster helped, though.

During the assessment process at the lab, we divided the items into the following groups:
  • Okay as is
  • Dry -- needs deodorizing
  • Dry -- needs cleaning and deodorizing
  • Wet -- needs drying and cleaning
  • Wet -- needs drying, cleaning, and rebinding
  • Discard (Not salvageable)

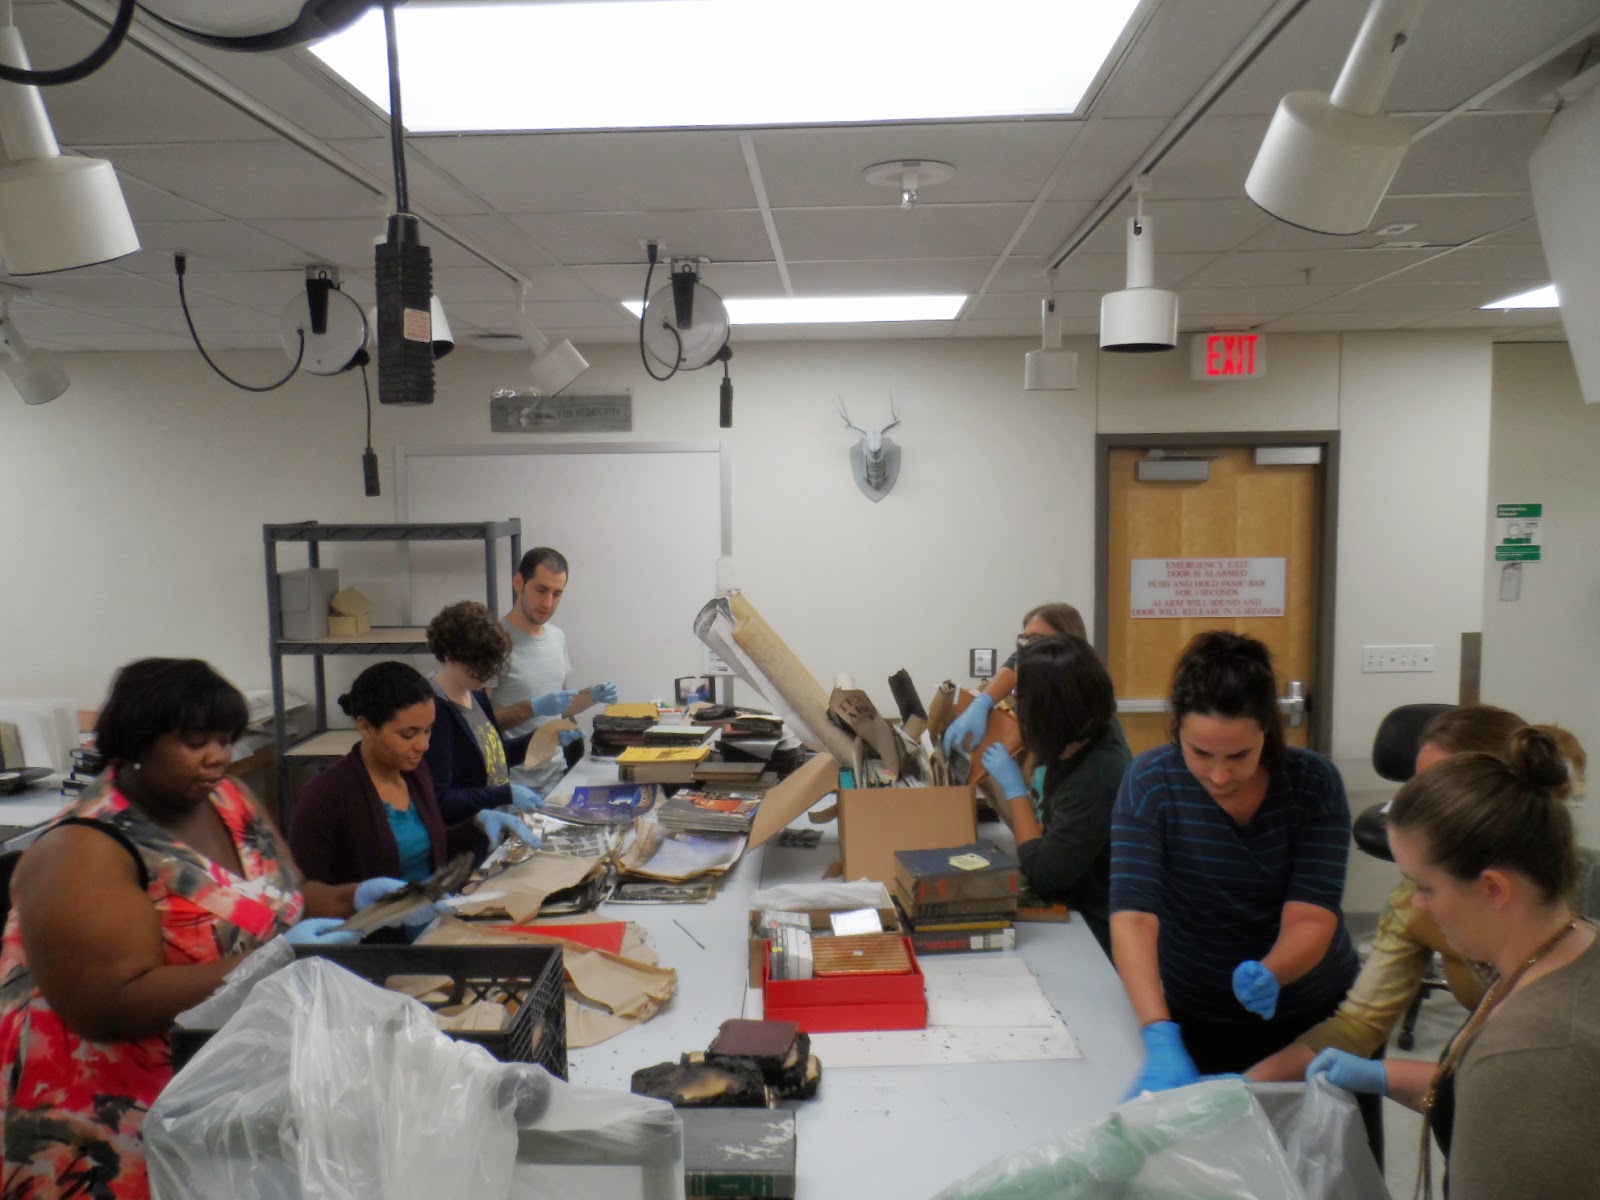
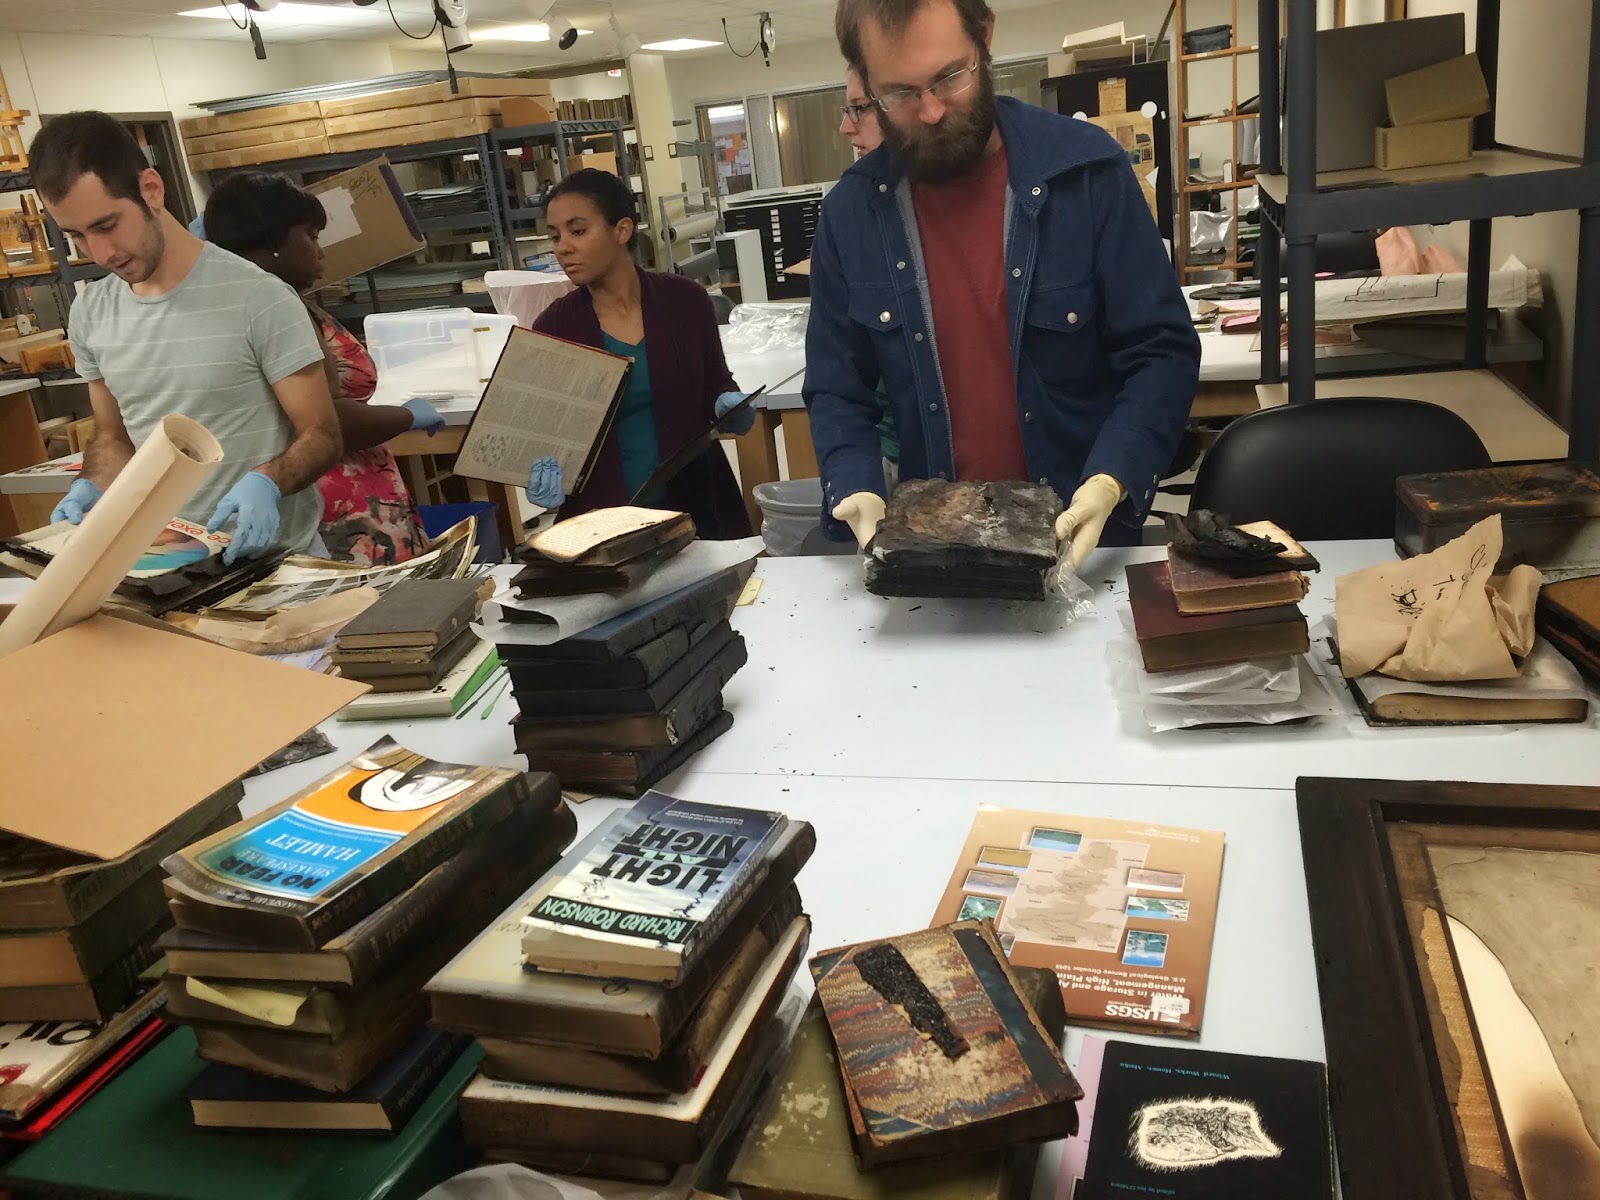
Our class dividing up the items into batches based on type and severity of damage.

Salvage isa messy business. The table was much dirtier by the time we were done. Wear gloves!

The crate that was near the fire corner. Maybe some of those books can be salvaged after all!

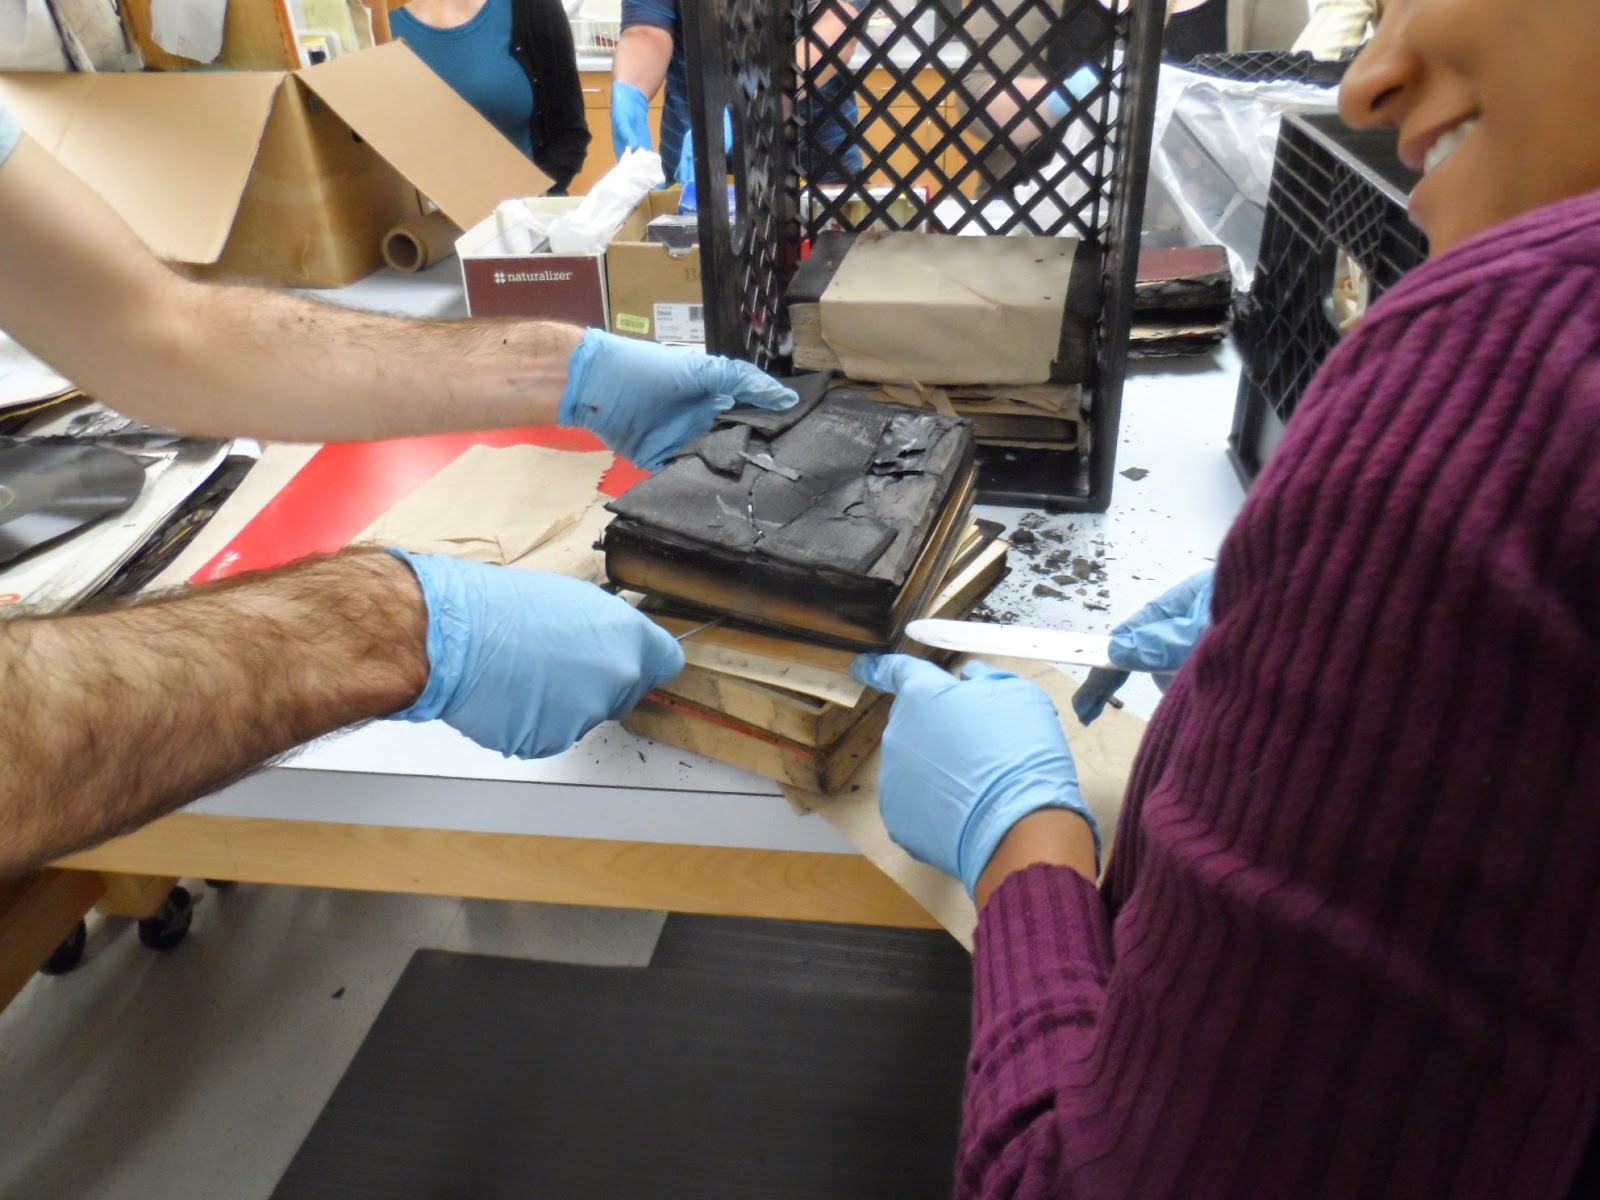
Gently separating books stuck together after the fire.

After the items were divided into these groups, the class began cleaning, drying, and repairing items from the “collections.” These techniques, however, will be described more fully in blog posts coming soon.

The points that we, as a class, took away from the salvage and transport exercise were:

  • Create a salvage plan before the disaster occurs. However, if you don’t have a plan in place already, take a few minutes to create a plan of action on the spot (or during that night in the hotel room while you wait to go back to the scene). An ounce of prevention really is worth a pound of cure.
  • Perform an initial assessment during pack-out, especially if the materials are going to be transported to another location.
  • Label containers as you pack them out. It will save a lot of time during the recovery process later.
  • Don't wait too long to respond. We luckily did not see any mold growth as a result of the water used to extinguish the fire. However, if we had waited several more days to begin removing items, we might have seen some mold.
  • When packing out books, or other items that will be frozen, wrap each item in waxed paper. This will prevent the items sticking together as the water they hold freezes.
  • Items that were inside closed containers and closed drawers fared the best (other than those minimally affected items that were far away from the fire, of course). Close your desk drawers!
  • Books on the shelf protected each other. The edges and the spines were damaged because they were exposed. However, most of the cover surface area, and the text areas of the pages, were not damaged.
  • Be careful where you step. Large pieces of glass in our framed picture broke because of the heat in the room and fell to the ground.


Wednesday, November 19, 2014

Burn Baby Burn: Experiments with Fire Damage

It’s a Monday at the house museum, and you’ve been in the on-site storage room since six am. You’re tired, your coffee hasn’t kicked in yet, and you still have an awful lot of work to do before opening the doors for the public today. There are some new acquisitions on your desk, along with several objects you need to accession into the collection, including books, photographs, nitrate film negatives, and slides. There’s just so much to do. You’ve got several donation boxes around your desk, and you have no idea what exactly is inside some of them. You leave your desk for four whole minutes to go get a glass of water, and when you get back, the worst thing imaginable has happened--- Fire. Fire in your storage room, in the house museum you serve, and the fire is already out of your control.

For us, this small scenario was our fire set-up. Within a five by ten foot burn room located at the Austin Fire Department Training Facility, we simulated this storage room fire to understand what might happen to a small house museum, archive, or private collection if a fire were to break out.

Our room is five by ten feet. The desk is against the left wall, and to the right side of it in the back left corner of the room is a trash bin. On top of the desk are an open book, sealed books, a closed container, photos, plastic sheet, slides, and photos, along with a bookcase. Inside the book case are many books, along with some VHS tapes, nitrate film negatives, and photographs. By the back wall are two donation boxes, one a plastic crate and the other a cardboard box. The plastic crate is closer to the left where the trash bin is located and the cardboard box is two feet away from the plastic crate. To the left of the desk on the floor and along the right wall are rolled papers and various art media. A sketch hangs framed with glass on the back wall. The entire space lacks a fourth wall-- like a theater, we can watch from the outside.

For our experiments, however, we arranged our room and watched as the fire spread. In our five by ten foot burn room, we arranged a desk with shelving, filled the drawers of the desk (with one kept open on purpose), a trash bin, two open donor boxes (one cardboard, the other plastic), two closed boxes, a stack of rolled papers, a canvas sitting on the floor, and framed print hanging on the wall.

Before the Main Fire Experiment:

Pre-Experimentation: Before the burn experiments was this minor experimentation, demonstrating how difficult it is to burn a closed book.
Even with fire applied directly to the book, there was only smoke damage. This is quite easy to clean off.

The Burn Site: Before the Fire

The left side of the room contained most of our materials, including: desk with bookcase and assorted items on top, assorted rolled papers and media on either side of the desk, two donation boxes, the framed sketch.

The right side of the room was sparce, as we knew the origin of the fire would be in the far left corner of the room in the waste bin. To this side of the room was a poster, an office chair, a piece of decorative art made of wood and glass, and the remnants of previous burns from the space. This room has been used for burn experiments before.

Yours truly for scale: I'm 5'10''.

We elected to start the fire in the back, right-hand corner of the room where we had placed a diverse arrangement of objects. We did this to satisfy our curiosity about specific types and configurations of materials. Lt. Elmore lit a piece of paper in a wastebasket next to the desk and we watched. For the first few minutes there was little evidence of any combustion and several of us began to wonder if the paper had ignited. Finally the fire took hold, first producing puffs, then clouds of smoke, and then climbing  the wall, the right side of the desk, the plastic donation bin, and began severely charring the items kept at the right of the desk and the plastic donor box next to it. The shelving grew so hot that the items to the right of the bookcase caught fire.

Before the experiment began, we decided as a class that we would allow the fire to burn for twelve to fourteen minutes with time given to the usual steps of the fire detection and extinguishing process. There were three to five minutes allocated for a worker to detect the smoke from the fire then dial 911, four to five minutes for the fire department to arrive, then four minutes for the hose to get connected and begin extinguishing the fire. The times provided for the fire department’s response and hose connection are the average for the Austin Fire Department as Lt. Randy Elmore informed us. The times for your local fire department to reach your building and begin extinguishing a fire could be different.

The Burn Site: During the Burn

Four minutes in: We begin to see the fire visibly.
Ten minutes: We have backed up several feet by now from the intense heat.
Ten minutes: We asked Lt. Randy Elmoreto move the open book closer to the fire to see what would happen-- the damage was swift as soon as it entered range of the heat.
Twelve minutes and thirty seconds: Lt. Randy Elmore begins extinguishing.
Extinguishing overall takes a minute, but the room smoked for a long time after.
Our courageous assistant from the Austin Arson Department, Lt. Randy Elmore

We were working with a microcosm of a collection in a small space and the fire damaged more than half of our materials in only twelve minutes and thirty seconds. We decided to extinguish the fire before we had no materials left to salvage. Lt. Randy Elmore put out the fire in under thirty seconds, and additional small and rather hidden fires were put out as they appeared afterward. While he refrained from using an excessive amount of water in extinguishing the fire to prevent further damage to the collection, it was still necessary to drench some items in our collection to fully extinguish the flames.

The extent of the damage was beyond what we initially expected the open metal shelves grew so hot the materials combusted, and the closed drawers of the desk became small ovens for the materials inside.

  • The back right leg of the desk was completely charred. The front right leg of the desk was barely left standing. It was remarkable the desk did not collapse.
  • A drawer we had intentionally left open on the desk smoldered for ten minutes after the fire was put out. The closed drawers on the right side of the desk fared no better.
  • The damage on the bookcase progressed from severely charred to undamaged moving across from right to left.
  • All the items placed on the left side of the desk were fine. All items left on the right side of the desk or near the trash bin were decimated.
  • The plastic crate half-melted away and half of the contents were burned to ash. The cardboard crate was fine.

The Burn Site: After the Burn

This was a panel painting, leaning on the desk to the right of the book case, all of a foot above the epicenter of the fire. Notice the smoke stain around where the object protected the wall.
These sealed books sat the the right bottom corner of the desk. Their plastic seal did nothing to prevent the charing.
The desk overall
Close-up of the bookcase. There's a visual gradient change of smoke damage from right to left-- a clear indicator of where the fire originated.
The heat was so intense, the glass broke in the frame. Only where the glass left the paper exposed did damage occur.
This donor box was closest to the fire.
This donor box was only two feet away from the melted plastic crate donor box-- nearly untouched.

For several minutes after the fire was put out, we were not allowed to enter the building. For a fire with less ventilation than our test site, the time would have been significantly longer. Burning plastics may emit toxic gasses, and the odors emanating from the burned materials was very strong. In the case of a real fire scenario, personnel can be withheld from a building by fire-fighter order for hours or days if necessary.

The next morning, we were allowed access again to retrieve our materials from the room, as any and all nauseous gasses were dispelled over night. I was unable to observe retrieval. Crystal Paul, however, was able to observe and assist, and here is her account:

William, Karen, and I went to the site at around 9am on Friday. We ended up discarding about 1/3 of the materials, mostly items that either hadn't been damaged and were duplicates of other items or were beyond salvage. Surprisingly, some items closest to the fire were salvageable, such as the open law book on the desk. Some pages were burnt to a crisp but most were still intact.

There was a set of slides that had been in the middle of the desk that were completely melted and destroyed, even though they were not directly affected by the fire (the fire got close to them). Items in the drawers closest to the fire were surprisingly unaffected by fire and in fact, were more damaged by the water. The waste basket was no more, and the items that were in it and next to it (papers and a couple nooks) were the only things I saw that completely crumbled.

The next exciting step in our journey is recovery-- we shall see how well the materials fared, and how much will be retrievable. The subsequent water damage from the hose could lead to molding, just as our flood experiments have molded. Before we focus more closely on specific recovery techniques for collection materials, the next blog will go into more detail about first steps to take when you are allowed back into the building after the firefighters give the “all clear.”

Monday, November 17, 2014

Flood Recovery of Hard Drives

When flood strikes, everything can go. Typically, when archives personnel think ‘flood,’ thoughts might go straight to the 19th century newspapers, rare and unique manuscripts, or other paper materials. Today, these thoughts must include computers and other electronic devices as well. The digital back-ups, the photocopies, the expensive hard drives and software connected to specific licensing keys are equally affected by flood and can also be salvaged.

After a flood, there are a few basic things to consider: make sure all electronics are dry before turning on the device. A good rule is to shut down all power within the vicinity until the water is gone. Secondly, classify what type of water you are facing--grey or black water is hazardous at best, and can be extremely damaging to your equipment. Approach any flood with caution and understanding-- the toxicity of the water may be too much for you or your institution to handle. Thirdly, if you want to access the data within your now-damaged computer, you MUST remove your hard drive from the computer and treat it separately from the rest of the computer. A computer can be expensive, but it is wholly replaceable, and after a computer goes through water damage, it can no longer be trusted to fulfill basic tasks. A computer can grow very hot, and any residues left inside from polluted water could cause the computer to fail, or possibly ignite.

In my mini experiments during the flood, I placed five hard drives, removed from their computers, straight into clean water, lake water, and oily lake water. Of the five, two were in oily lake water, two in lake water, and one in clean water. After twenty- four hours, I removed the two hard drives from the oily water, and one from the lake water. After a week, I removed the rest of the hard drives, from the lake and clean water. After removing the hard drives from contaminated or ‘grey’ or ‘black’ water, especially so for the oily water drives, I used goat soap to cut the oil that stuck to the hard drives, then rinsed down the outside of the drives with clean water from the tap with the least amount of water pressure possible. I rinsed all of the drives with clean water to remove surface contaminants, sans the drive that remained in clean water.

The next step was drying in rice. When removing excess water from the drives, especially water from within the device, it is important to allow water to seep out into an absorbent substance. Rice is cheap, plentiful, and small enough to reach into the small, open cavities of the hard drive, yet large enough to not get lodged into the drive or the reader slots. The first two drives I pulled were left submerged in rice for two weeks, while the third, fourth, and fifth drives I pulled were left in the rice for one week. While a few grains of rice grew mold, the plastics did not, and after assessing testing the relative humidity of the drives within closed containers, the drives were judged to be relatively dry enough to test.


Inside of the plastic containers with red-rimmed lids are where the hard drives were dispersed to dry. In the two wide white plastic trays, a laptop and additional drives were left to dry.

A drive after being pulled from rice. The 'fuzzy' grains of rice are mold ridden, but there were not many of them, nor did their state of mold affect the drive.

Another pulled drive with grains of rice still attached. I removed any grains that held on with a micro-spatula.

To test how affected the drives were, I used a computer that, besides lacking a hard drive, was completely fine, yet wholly disposable. When testing water-damaged electronics, recognize the danger. After any amount of water affects an electronic device, all data may be totally gone or the device may be inoperable. You may never get back what is on that computer, so operate with care and low expectations.

In testing, I took baby steps-- instead of plugging the drive into the computer then going straight to on, I wanted to see how the drive was going to power up-- within all computer hard drives is an internal battery to help with start-up, and if that battery is damaged, the drive is gone. I plugged the drive into the system, keeping the test computer isolated and close to a fire extinguisher. I then, with the computer plugged into a surge protector, turned the computer on. I left the side panel of the computer open in order to openly observe the drive. Without a monitor to watch, nor a keyboard nor mouse, I was only testing to see if the computer could maintain power with the hard drive spinning for five minutes. Hard drives that are not solid-state, or a solid single card, are like CD’s, they spin and turn to access their information. If a hard drive is properly working, you can actually FEEL the hard drive going through it’s proper cycles. All I did was turn the computer on and leave my hand on the drive, feeling for the spin and listening carefully to the turn.

Three of the drives that I pulled from the waters after twenty-four hours powered perfectly. There was never a hitch in the sound or the buzz of the drive working. With the other two drives, there were significant problems. The drive that had been in lake water for seven days gave a god-awful sound akin to a record skipping a beat in a track again and again. With the drive from seven-days of clean water, there was a single hitch of the drive turning and one loud pop, then the drive went about it’s cycles again though it was very slow.


All I wanted to test was the potential of the drive. The next step after this would be to attempt to start the computer through to operation and try and access the files within. While all the hard drives I dipped into water had information on them, they all lacked operating systems-- No Windows 7, no Apple OS X, nothing. I used the drives as one would use an external drive, like a thumb drive, because it simplified the checking process-- there was less for the system to fail with if only a few files were affected by the water instead of total system failure. There is still also a great danger in handling hard drives that may still be coated in caustic chemicals, and I would heartily refrain from heating the drives from oil and lake water for extended periods of time or at very high temperatures as the insides of a computer can get especially hot.

Finally, a laptop was left to soak in clean water for seven days. Upon removal from the water, it was placed into a container filled with rice. After a week of draining, several people worked to extricate the hard drive from the laptop. While they were successful, the water inside the laptop was trapped inside after the flood with no chance to escape. The water held inside ate away at the hard drive’s battery and leaked out onto the front of the drive. I would not attempt to start this drive no matter what. If you believe that your electronics are releasing battery acid, DO NOT TOUCH THEM. If you come in contact with battery acid, wash exposed skin immediately and keep any affected surfaces contained until it can be cleaned up. You can safely clean away battery acid with gloves and soapy water, but show adequate caution when around it.

Overall, the hard drives came through with flying colors. Despite the crude nature of the water these drives went through, fast response kept the drives going even after complete submersion. If you can not get to your equipment within a 24-48 hour window, not all hope is lost, but you need to focus on removing the contaminants from the drive and then allowing the water to work it’s way out.

When dealing with electronics, realize that you may not have the equipment or expertise to properly recover your information. In order to avoid further damage to the contents, or toxic exposure to yourself, get in contact with a company that specializes in information recovery. In these situations, also consider how replaceable the information is. If you have undamaged backups, it may be safer and more cost-effective to safely dispose of the damaged hard drives.

Sunday, November 16, 2014

Polygon Visit

A Visit From Polygon

For our October 16th class we took a break from destroying and salvaging materials and listened to an informative presentation from Summer Street about Polygon’s Document Recovery services. Polygon is a global provider of temporary humidity control and property performance services and is a market leader in property damage restoration. Polygon is a private lab focusing on commercial work in industries like health care facilities and hospitals, commercial and retail, libraries and museums, schools and universities, and government agencies.  For more information about Polygon visit http://www.polygongroup.com/us/document-recovery/

At this time, Polygon focuses on physical restoration of documents rather than digital restoration and recovery. In the presentation, Street talked about basic disaster risks, provided us with a past scenario in which a disaster occurred, and some of the document recovery methods that Polygon offers.

First, we talked about the most common disaster risks: fire, mold, and water. In Street’s disaster scenario, an unnamed New York firm’s three sub-basements had been flooded with seawater, fuel, sewage, and organic material during Hurricane Sandy. Over 30,000 boxes filled with highly sensitive materials were damaged. In the aftermath of the disaster:

Here is what they did correctly:
  1. Called Polygon document restoration center as soon as possible
  2. Authorized implementation of the stabilization of documents immediately
  3. Allowed priority records to be packed out and frozen before they were able to incur further damage
 Here is what they could have done better:
  1. There were no priority documents or sections designated before the disaster
  2. There was no plan for disposing of damaged or unneeded documents
Street also provided us with a Document Checklist with a list of questions to consider in disaster planning or during recovery.

 Document Checklist
  • Are there vital records?
  • Is there a current retention schedule for documents?
  • How long are records kept before they are discarded or destroyed?
  • What are priority items?
  • Is there a current disaster plan?
  • How are records currently being stored?
  • Is restoration the best option? What are the limitations? What are your options for a recovery strategy?
  • Are documents wet? Moldy?
  • Are there concerns for health and safety?
  • What are the documents stored in?
  • Are there security requirements?
  • If there is a disaster can things be destroyed instead of restored?
Last we talked about technologies Polygon currently uses for document recovery. In the case of a disaster, all materials should be frozen immediately if possible to halt further damage. Try to freeze damaged items within the range of 20 to 25 F, but only refrigerate film-based media. When Polygon responds to a disaster, they first create a detailed inventory during pack-out. Subsequently, customers are given the choice between the following:

Vacuum Freeze Drying: Freezing and drying records in a vacuum chamber where frozen water is removed by sublimation, bypassing the liquid water phase.
Pros of vacuum freeze drying include:
  • Allows batch processing
  • No “wet” phase which reduces the risk of inks bleeding and paper cockling
  • There is no heat so over-drying is not a problem
  • Low cost and lower margins for human error
 Cons include:
  • Vacuum freeze drying  can not be done on site because industrial freezers are required
  • Longer processing time frame, could be months not weeks
  • Equipment scarcity and limited accessibility

Desiccant Dehumidification: Using a dehumidifier that blows dry air throughout a room or area, allowing wet documents to dry

Pros of desiccant dehumidification include:
  • Process is both portable and scalable
  • Ability to provide on-site access to materials
  • This process is good for business papers, X-Rays, and photos.
 Cons of desiccant dehumidification
  • It is expensive.

Air Drying: Process of drying materials through contact with air

Pros of air drying include:
  • Process is scalable and good for most materials
  • Accessibility–on-site access is usually possible
  • Over-drying not possible
  • The relative humidity can be controlled
 Cons include:
  • Higher mold potential without stabilization
  • Not good for clay-coated papers
  • Labor intensive and results dependent on skill of the laborer

The recovery method used will depend on a business’ salvage priorities, the type of document and the extent of the damage. Disasters are also classified by Polygon from Level One to Level Five with five being the most severe disaster recovery scenario. Polygon pricing is based on cubic ft., drying type requested, cleaning level requested, whether documents need to deodorized, disinfected, or gamma-irritated, and the overall labor and pack-out needed to process materials. Gamma radiation is used to sterilize dirty documents to where they are safe enough to handle. Gamma radiation leaves no residue or visible changes to processed documents and is simple, reliable, and low cost.


Overall, Street emphasized that early planning for a disaster, before a disaster does occur, is the best step you can take. Most simply, have a plan, be educated about potential recovery options, and keep a clean house and updated inventory of your items.

Wednesday, November 5, 2014

Flood Recovery of Audio Visual Housings

In the flood simulation, we put several different kinds of audio visual housings into the different types of flood water. None of the cases were completely unharmed by the water, but some of them were still salvageable.

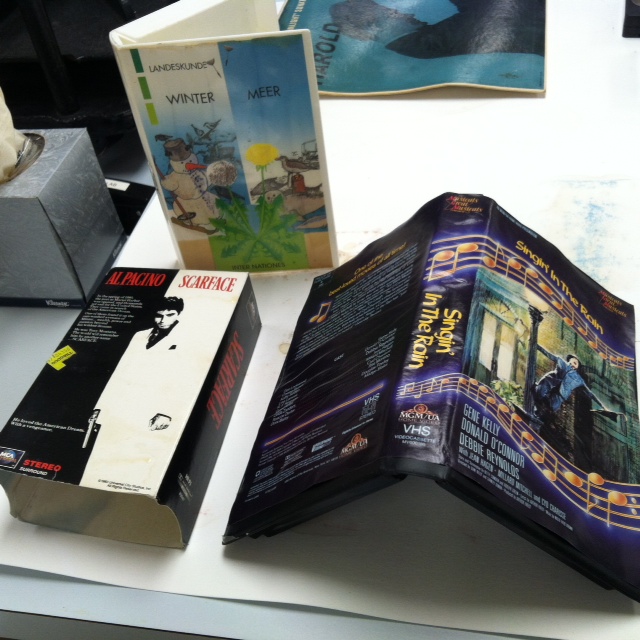
photo.JPG
  • Cardboard VHS box (in oily water) -- a little discoloration and warping, biggest problem is the oil left on it. Not all of the oil would come off the box and the oil seemed to seal moisture into the cardboard. This box would need to be discarded.

  • Plastic VHS housing (in lake water) -- in the salvaging process, we removed the plastic (that was holding the paper insert) and let the paper insert dry on top of the container (lower right in the image). The insert has some cockling, but would likely be fine if it were humidified, flattened, and cleaned. The container was left to dry propped on its opening on blotter paper. The container would need to be cleaned to get the dirt from the lake off of it, but then could be used again.

  • Plastic VHS housing (in clean water) -- we did not remove plastic film from the outside of the case, which caused more discoloration and more severe cockling than the other plastic case. This type of case would likely be salvageable after cleaning it. The paper insert might be saved if it is humidified, flattened, and cleaned.

  • CD jewel case -- one of these was put in the water with the plastic wrapping still intact. When we removed it from the water, the plastic wrapping inhibited the water from draining out of the case. The plastic wrapping would need to be removed promptly after removing it from the item in order to prevent further damage to the CD.

  • Plastic cassette case -- similar to the other plastic cases above, this type would likely be salvageable after the paper insert was humidified, flattened, and cleaned and the container itself was also cleaned.

Sorting Through the Mess: Continued Flood Salvage

This week we continued last week’s flood salvage, but in some ways, it felt more like the calm after the storm. There was not the same chaotic energy there had been the week before when we were trying to get everything out of the water. So, with calmer minds and without facemasks taped to our faces or the overpowering smell of mold hanging in the air, we started to look through the items we had set out to dry.


Some of our salvage efforts worked well: 

 Loose-leaf paper we had interleaved with blotter and laid flat to dry looked good.

Some of the books that we interleaved with blotter paper dried out very well.

A phone charger we had put in rice to dry was fine and was able to charge a phone.

The photographs mostly stayed in the condition they were in when we took them out of the flood. If the image had been damaged, it obviously stayed damaged and those photos are now just dry and damaged. But the photographs that didn’t have damaged images when we removed them from the flood dried out very well and look quite good now.


Unfortunately, not all of our salvage efforts worked. This week, like last, involved throwing a lot of things out. Some of the items were simply too damaged by the flood, and we could not fix them. For example, the ink ran on some of the blueprints and manuscripts we flooded, and some of the photographs were too damaged by the flood for us to save them. 


More interestingly, some of the salvage failures were due to our own actions. Going through these items was a great way to reconsider what we would do in a future flood. Some of our biggest problems were:


Books drying in weird shapes. We were very focused on getting books spread out to dry but we sometimes contorted books into convoluted shapes, and we did not replace the blotter papers often enough, so many books retained their weird shapes as they dried. 


Book pages sticking together. One of the books was made of clay-coated paper, and because we left blocks of pages closed together, they dried that way and are now stuck together. 


Damage to the panel painting while trying to clean it. The biggest area of damage to the panel painting is in the bottom right corner. That damage is not from the floodwater but from the pressure from the clean water we used when we tried to rinse the painting off. 


Finally, we also looked at the electronics and media we flooded. We didn’t get a chance to test them to see if they still work, so we won’t know the extent of our salvage success or failure there until later. We did dissect the computer we flooded in order to remove the hard drive and found some interesting things there. As we took apart the computer, we found that the battery had leaked and there was mold growing inside the computer.


We removed the hard drive and are letting it dry, so time will tell if the data can be saved. We also noticed a possible downside of the rice-drying method if we had wanted to save the entire computer. Rice stuck in the ports on the side of the computer and in some areas started molding. It looks really difficult, if not impossible to clean, so this is something to think about if you wanted to save a whole device, and not just the hard drive inside.


While we continue salvaging our flooded objects, we will prepare for our next disaster: the fire. In a couple of weeks, we will simulate a fire in a small house museum. We will take a collection of items similar to our flooded objects to the Austin Fire Department’s training facility, and set up the items in a small room also known as a “burn cell.” A small fire will be lit in the room and allowed to burn for a predetermined amount of time. The fire will be extinguished and we will see what we can save!